design-patterns-title
design-patterns-subtitle
design-patterns-origin-note
Structural Patterns
Structural design patterns explain how to assemble objects and classes into larger structures, while keeping these structures flexible and efficient.

Adapter
Allows objects with incompatible interfaces to collaborate.

Bridge
Lets you split a large class or a set of closely related classes into two separate hierarchies—abstraction and implementation—which can be developed independently of each other.

Composite
Lets you compose objects into tree structures and then work with these structures as if they were individual objects.

Decorator
Lets you attach new behaviors to objects by placing these objects inside special wrapper objects that contain the behaviors.

Facade
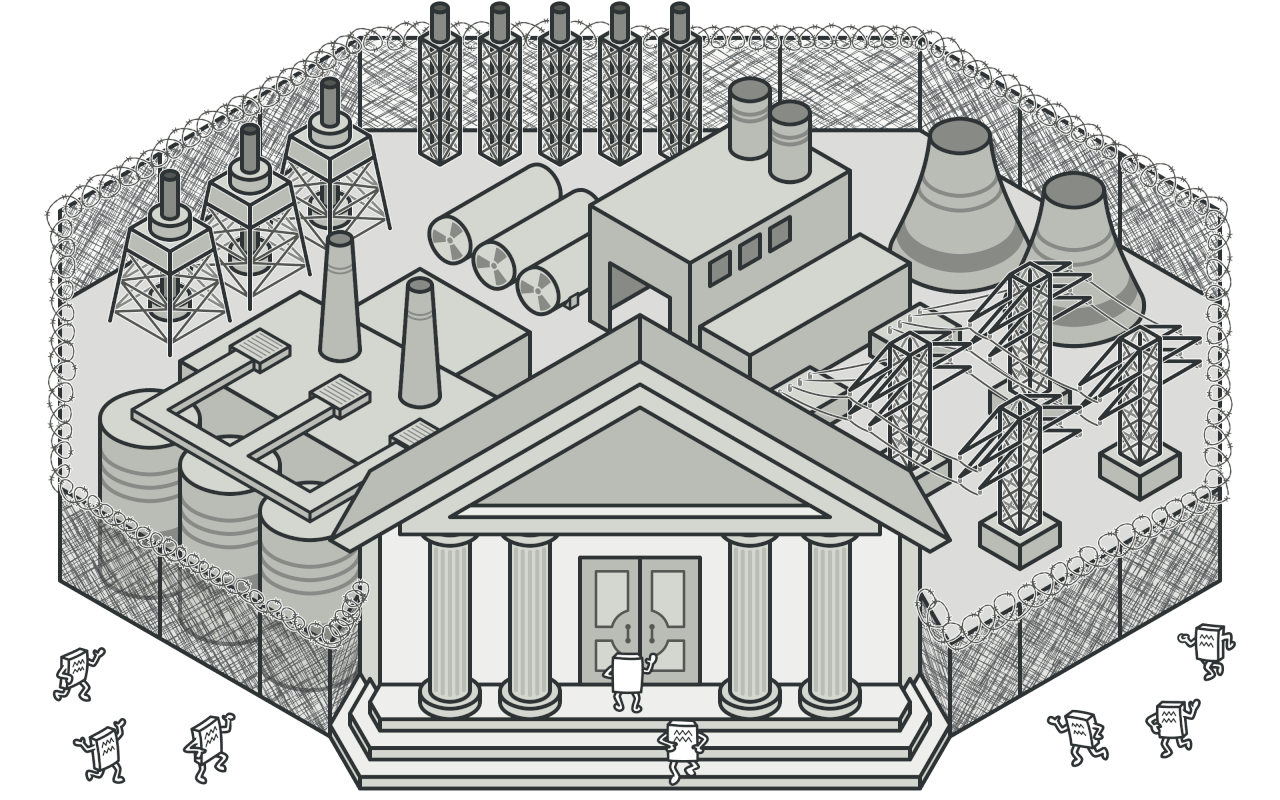
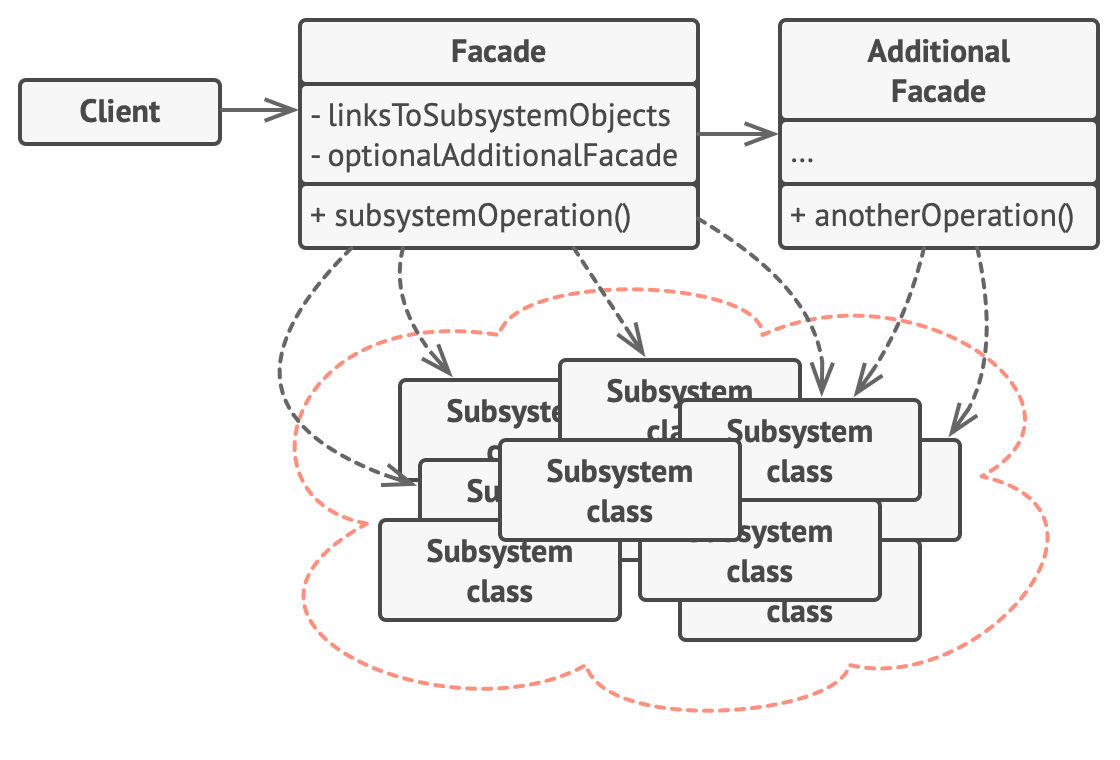
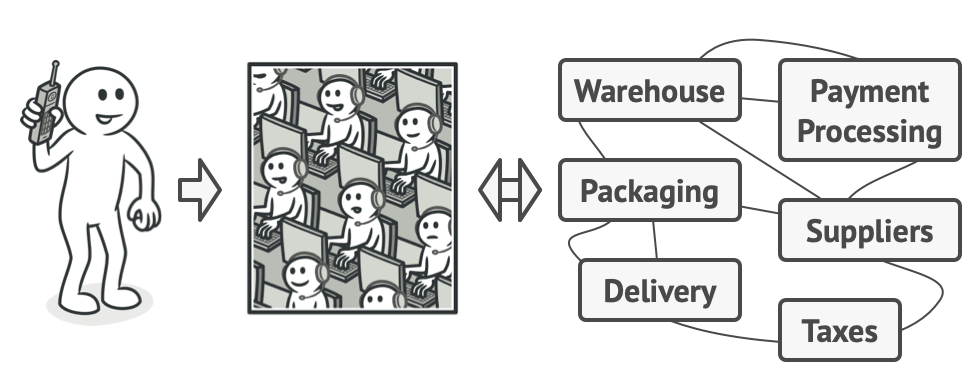
Provides a simplified interface to a library, a framework, or any other complex set of classes.

Flyweight
Lets you fit more objects into the available amount of RAM by sharing common parts of state between multiple objects instead of keeping all of the data in each object.

Proxy
Lets you provide a substitute or placeholder for another object. A proxy controls access to the original object, allowing you to perform something either before or after the request gets through to the original object.
Behavioral Patterns
Behavioral design patterns are concerned with algorithms and the assignment of responsibilities between objects.

Chain of Responsibility
Lets you pass requests along a chain of handlers. Upon receiving a request, each handler decides either to process the request or to pass it to the next handler in the chain.

Command
Turns a request into a stand-alone object that contains all information about the request. This transformation lets you pass requests as a method arguments, delay or queue a request's execution, and support undoable operations.

Iterator
Lets you traverse elements of a collection without exposing its underlying representation (list, stack, tree, etc.).
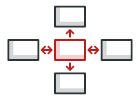
Mediator
Lets you reduce chaotic dependencies between objects. The pattern restricts direct communications between the objects and forces them to collaborate only via a mediator object.

Memento
Lets you save and restore the previous state of an object without revealing the details of its implementation.

Observer
Lets you define a subscription mechanism to notify multiple objects about any events that happen to the object they're observing.
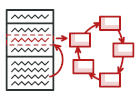
State
Lets an object alter its behavior when its internal state changes. It appears as if the object changed its class.
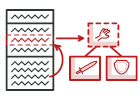
Strategy
Lets you define a family of algorithms, put each of them into a separate class, and make their objects interchangeable.
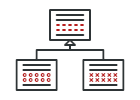
Template Method
Defines the skeleton of an algorithm in the superclass but lets subclasses override specific steps of the algorithm without changing its structure.

Visitor
Lets you separate algorithms from the objects on which they operate.
React Patterns
Composition Pattern
Build flexible and reusable components by combining smaller components together, avoiding inheritance and prop drilling.
Compound Components
Multiple related components that work together and share implicit state through Context for maximum flexibility.
Custom Hooks
Extract component logic into reusable functions that can share stateful logic between components.
Higher-Order Components
Functions that take a component and return a new component with additional props or behavior for code reuse.
Render Props
Pass functions as props that return JSX, giving parent components full control over rendering while managing state.
Creational Patterns

Factory Method
Provides an interface for creating objects in a superclass, but allows subclasses to alter the type of objects that will be created.

Abstract Factory
Lets you produce families of related objects without specifying their concrete classes.

Builder
Lets you construct complex objects step by step and produce different types and representations using the same construction code.

Prototype
Lets you copy existing objects without making your code dependent on their classes.

Singleton
Ensures that a class has only one instance and provides a global access point to it.
Factory Method
Intent: Factory Method provides an interface for creating objects in a superclass, but allows subclasses to alter the type of objects that will be created.

Problem
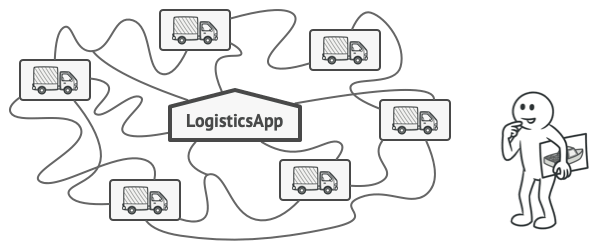
Logistics software initially hard‑codes a single transport class. As requests come in to support other transports (ships, airplanes, etc.), the code becomes riddled with conditionals and tightly coupled to concrete classes.
Solution
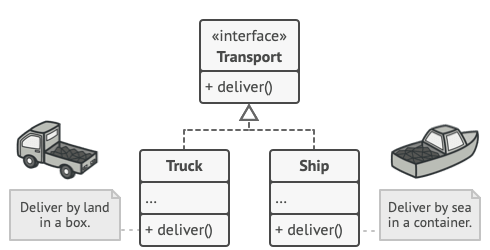
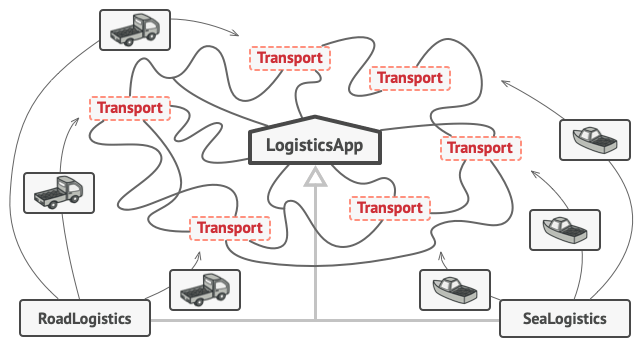
Replace direct construction calls with calls to a factory method. Subclasses override this method to return different product types, as long as all products share a common interface. This decouples client code from concrete product classes and centralizes object creation.
Structure
The Product declares the interface common to all objects produced by the creator.
Concrete Products implement the product interface.
The Creator class declares a factory method returning new products; its core logic works with product interfaces, not concrete classes.
Concrete Creators override the factory method to return different product types.
Code Example
// Factory Method: interface for creating objects; subclasses alter the typeinterface Button { fun render(): String; fun onClick(handler: () -> Unit) }abstract class Dialog {abstract fun createButton(): Buttonfun render() {val okButton = createButton()okButton.onClick { /* closeDialog */ }okButton.render()}}class WindowsDialog : Dialog() {override fun createButton() = object : Button {override fun render() = "Windows Button"override fun onClick(handler: () -> Unit) { /* Bind native OS click */ }}}class WebDialog : Dialog() {override fun createButton() = object : Button {override fun render() = "HTML Button"override fun onClick(handler: () -> Unit) { /* Bind web click */ }}}// Usage: dialog type chosen by configval dialog: Dialog = if (config == "Windows") WindowsDialog() else WebDialog()dialog.render()
// Factory Method: interface for creating objects; subclasses alter the typeinterface Button { render(): string; onClick(handler: () => void): void; }abstract class Dialog {abstract createButton(): Button;render(): void {const okButton = this.createButton();okButton.onClick(() => {});okButton.render();}}class WindowsDialog extends Dialog {createButton(): Button {return {render: () => "Windows Button",onClick: () => { /* Bind native OS click */ },};}}class WebDialog extends Dialog {createButton(): Button {return {render: () => "HTML Button",onClick: () => { /* Bind web click */ },};}}// Usage: dialog type chosen by configconst dialog: Dialog = config === "Windows" ? new WindowsDialog() : new WebDialog();dialog.render();
Abstract Factory
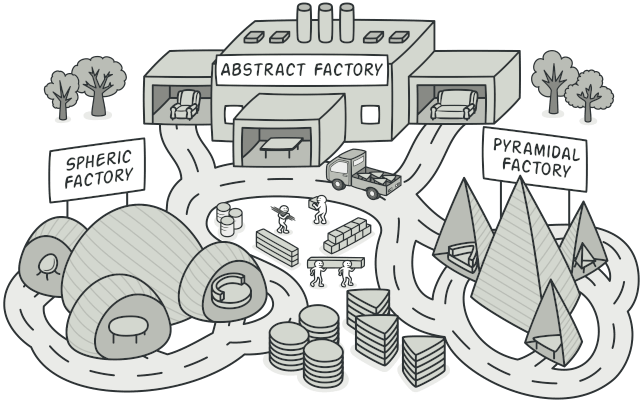
Intent: Abstract Factory lets you produce families of related objects without specifying their concrete classes.
Problem
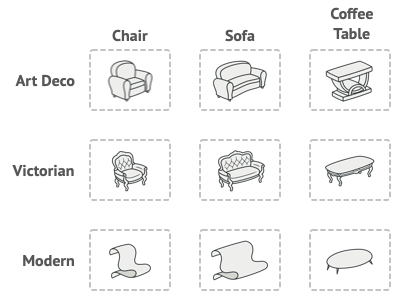
A furniture shop simulator must create matching sets of furniture (chairs, sofas, coffee tables) across several style variants (Modern, Victorian, ArtDeco). Hard‑coding constructors for each combination would either explode the number of subclasses or produce huge constructors.
Solution
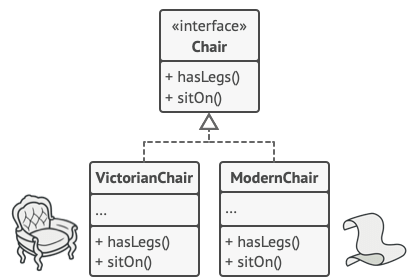
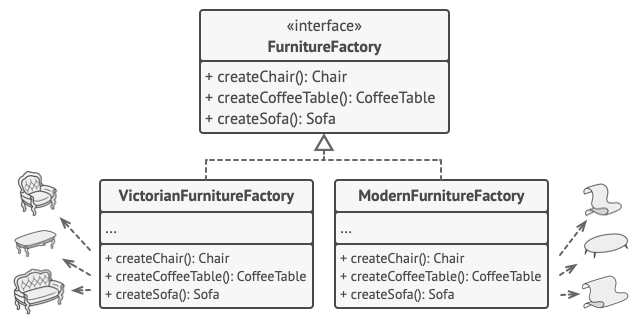
Declare interfaces for each kind of product and then define a factory interface that produces these abstract products. Concrete factories implement the interface and create consistent product variants (e.g., ModernChair, ModernSofa). Client code works only with the abstract interfaces and doesn't care which concrete factory it uses.
Structure
Abstract Products define interfaces for a family of related products.
Concrete Products are implementations of abstract products grouped by variants.
The Abstract Factory interface declares creation methods for each product type.
Concrete Factories implement creation methods and produce specific product variants while returning abstract types.
Code Example
// Abstract Factory: produce families of related objectsinterface Button { fun paint(): String }interface Checkbox { fun paint(): String }interface GUIFactory {fun createButton(): Buttonfun createCheckbox(): Checkbox}class WinFactory : GUIFactory {override fun createButton() = object : Button { override fun paint() = "WinButton" }override fun createCheckbox() = object : Checkbox { override fun paint() = "WinCheckbox" }}class MacFactory : GUIFactory {override fun createButton() = object : Button { override fun paint() = "MacButton" }override fun createCheckbox() = object : Checkbox { override fun paint() = "MacCheckbox" }}class Application(private val factory: GUIFactory) {private lateinit var button: Buttonfun createUI() { button = factory.createButton() }fun paint() = button.paint()}// Usage: factory chosen by OSval factory: GUIFactory = if (os == "Windows") WinFactory() else MacFactory()Application(factory).apply { createUI(); paint() }
// Abstract Factory: produce families of related objectsinterface Button { paint(): string; }interface Checkbox { paint(): string; }interface GUIFactory {createButton(): Button;createCheckbox(): Checkbox;}class WinFactory implements GUIFactory {createButton(): Button { return { paint: () => "WinButton" }; }createCheckbox(): Checkbox { return { paint: () => "WinCheckbox" }; }}class MacFactory implements GUIFactory {createButton(): Button { return { paint: () => "MacButton" }; }createCheckbox(): Checkbox { return { paint: () => "MacCheckbox" }; }}class Application {private factory: GUIFactory;private button!: Button;constructor(factory: GUIFactory) { this.factory = factory; }createUI() { this.button = this.factory.createButton(); }paint() { return this.button.paint(); }}// Usage: factory chosen by OSconst factory: GUIFactory = os === "Windows" ? new WinFactory() : new MacFactory();const app = new Application(factory);app.createUI();app.paint();
Builder
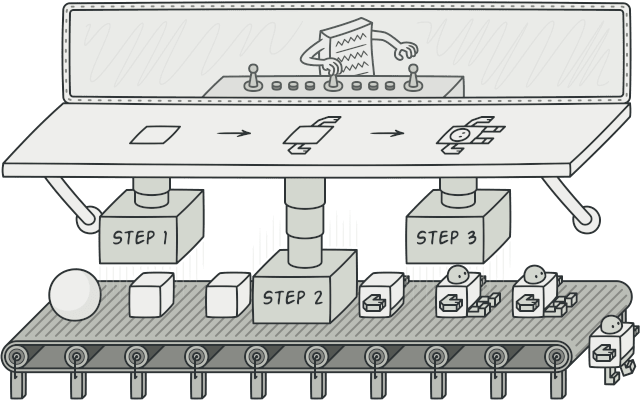
Intent: Builder lets you construct complex objects step by step and allows producing different representations using the same construction code.
Problem
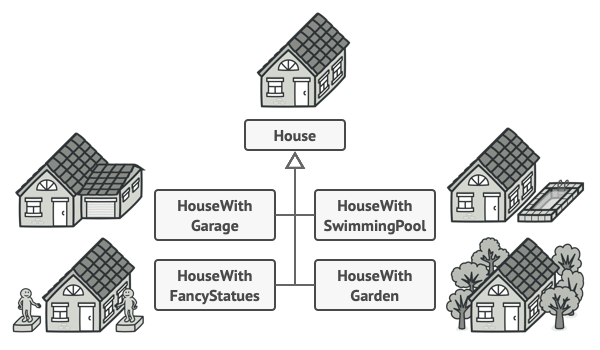
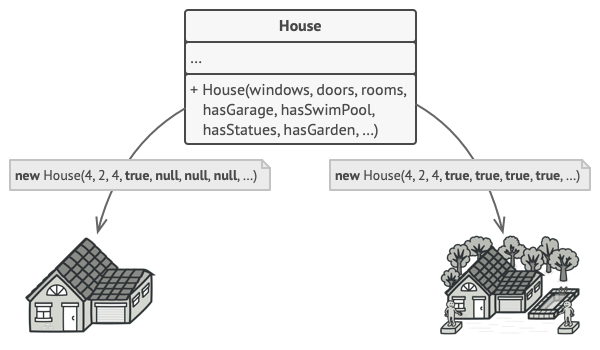
Creating a complex object often involves many parameters and nested objects. If you handle all combinations with subclasses, the class hierarchy blows up. Alternatively, a single telescoping constructor becomes hard to use and leaves many unused parameters.
Solution
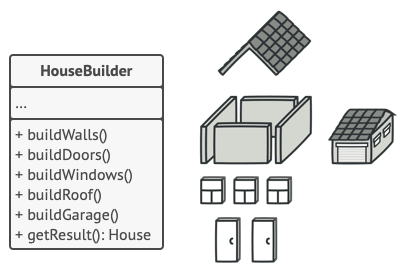
Move construction code into separate builder objects. The client calls a set of building steps to assemble a product; each step may differ across builder implementations, allowing varied products from the same process.
Structure
The Builder interface declares product construction steps common to all builders.
Concrete Builders implement the steps and produce particular representations of a product.
Products are the resulting objects; products built by different builders need not share a class hierarchy.
The Director defines the order in which to call construction steps so you can reuse specific configurations of products.
The Client ties a builder to a director and triggers the construction process.
Code Example
// Builder: construct complex objects step by stepinterface Builder {fun reset()fun setSeats(n: Int)fun setEngine(s: String)fun setGPS(enable: Boolean)}data class Car(var seats: Int = 0, var engine: String = "", var gps: Boolean = false)class CarBuilder : Builder {private var car = Car()override fun reset() { car = Car() }override fun setSeats(n: Int) { car = car.copy(seats = n) }override fun setEngine(s: String) { car = car.copy(engine = s) }override fun setGPS(enable: Boolean) { car = car.copy(gps = enable) }fun getProduct(): Car { val p = car; reset(); return p }}class Director {fun constructSportsCar(b: Builder) {b.reset(); b.setSeats(2); b.setEngine("Sport"); b.setGPS(true)}}// Usageval director = Director()val builder = CarBuilder()director.constructSportsCar(builder)val car = builder.getProduct()
// Builder: construct complex objects step by stepinterface Builder {reset(): void;setSeats(n: number): void;setEngine(s: string): void;setGPS(enable: boolean): void;}class Car {seats = 0;engine = "";gps = false;}class CarBuilder implements Builder {private car = new Car();reset() { this.car = new Car(); }setSeats(n: number) { this.car.seats = n; }setEngine(s: string) { this.car.engine = s; }setGPS(enable: boolean) { this.car.gps = enable; }getProduct(): Car { const p = this.car; this.reset(); return p; }}class Director {constructSportsCar(b: Builder) {b.reset(); b.setSeats(2); b.setEngine("Sport"); b.setGPS(true);}}// Usageconst director = new Director();const builder = new CarBuilder();director.constructSportsCar(builder);const car = builder.getProduct();
Prototype
Intent: Prototype lets you copy existing objects without making your code dependent on their classes.

Problem
Naively duplicating an object requires knowing its class and copying each field. Private fields aren't accessible, and dependencies on concrete classes creep into your code.

Solution
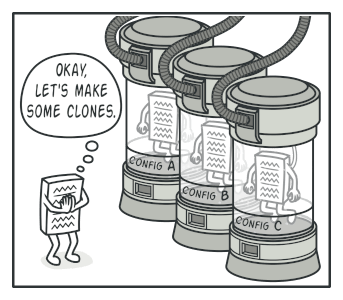
The pattern delegates cloning to the objects themselves. You define a common cloneinterface so the client can copy any prototype without depending on its class; the concrete prototype creates a new instance and transfers its state.

Structure
The Prototype interface declares cloning methods, usually a single
clonemethod.Concrete Prototypes implement the cloning method to return a copy of themselves, handling any special cases such as deep copies.
The Client can clone any object via the prototype interface without depending on concrete classes.
Code Example
// Prototype: copy existing objects without depending on their classesabstract class Shape(val x: Int, val y: Int, val color: String) {abstract fun clone(): Shape}class Rectangle(x: Int, y: Int, color: String, val width: Int, val height: Int): Shape(x, y, color) {override fun clone(): Shape = Rectangle(x, y, color, width, height)}class Circle(x: Int, y: Int, color: String, val radius: Int) : Shape(x, y, color) {override fun clone(): Shape = Circle(x, y, color, radius)}// Usage: clone without knowing concrete typeval shapes: List<Shape> = listOf(Rectangle(0, 0, "red", 10, 20),Circle(10, 10, "blue", 5))val copies = shapes.map { it.clone() }
// Prototype: copy existing objects without depending on their classesabstract class Shape {constructor(public x: number, public y: number, public color: string) {}abstract clone(): Shape;}class Rectangle extends Shape {constructor(x: number, y: number, color: string, public width: number, public height: number) {super(x, y, color);}clone(): Shape { return new Rectangle(this.x, this.y, this.color, this.width, this.height); }}class Circle extends Shape {constructor(x: number, y: number, color: string, public radius: number) {super(x, y, color);}clone(): Shape { return new Circle(this.x, this.y, this.color, this.radius); }}// Usage: clone without knowing concrete typeconst shapes: Shape[] = [new Rectangle(0, 0, "red", 10, 20),new Circle(10, 10, "blue", 5),];const copies = shapes.map(s => s.clone());
Singleton
design-patterns-singleton-intent
design-patterns-singleton-desc
Problem
The Singleton pattern solves two problems at the same time, violating the Single Responsibility Principle:
1. Ensure that a class has just a single instance. Why would anyone want to control how many instances a class has? The most common reason for this is to control access to some shared resource—for example, a database or a file.
Here's how it works: imagine that you created an object, but after a while decided to create a new one. Instead of receiving a fresh object, you'll get the one you already created.
Note that this behavior is impossible to implement with a regular constructor since a constructor call must always return a new object by design.
2. Provide a global access point to that instance. Remember those global variables that you (all right, me) used to store some essential objects? While they're very handy, they're also very unsafe since any code can potentially overwrite the contents of those variables and crash the app.
Just like a global variable, the Singleton pattern lets you access some object from anywhere in the program. However, it also protects that instance from being overwritten by other code.
There's another side to this problem: you don't want the code that solves problem #1 to be scattered all over your program. It's much better to have it within one class, especially if the rest of your code already depends on it.
Nowadays, the Singleton pattern has become so popular that people may call something a singleton even if it solves just one of the listed problems.
Solution
All implementations of the Singleton have these two steps in common:
1. Make the default constructor private, to prevent other objects from using the new operator with the Singleton class.
2. Create a static creation method that acts as a constructor. Under the hood, this method calls the private constructor to create an object and saves it in a static field. All following calls to this method return the cached object.
If your code has access to the Singleton class, then it's able to call the Singleton's static method. So whenever that method is called, the same object is always returned.
Real-World Analogy
The government is an excellent example of the Singleton pattern. A country can have only one official government. Regardless of the personal identities of the individuals who form governments, the title, "The Government of X", is a global point of access that identifies the group of people in charge.
Real-World Analogy: Government

Structure
The Singleton class declares the static method getInstance that returns the same instance of its own class.
The Singleton's constructor should be hidden from the client code. Calling the getInstance method should be the only way of getting the Singleton object.
Structure Diagram

Pseudocode
In this example, the database connection class acts as a Singleton. This class doesn't have a public constructor, so the only way to get its object is to call the getInstance method. This method caches the first created object and returns it in all subsequent calls.
// Singleton: one instance, global accessclass Database private constructor() {fun query(sql: String) { /* ... */ }companion object {@Volatile private var instance: Database? = nullfun getInstance(): Database {return instance ?: synchronized(this) {instance ?: Database().also { instance = it }}}}}// Usage: same instance everywhereval db1 = Database.getInstance()val db2 = Database.getInstance()// db1 === db2
// Singleton: one instance, global accessclass Database {private static instance: Database | null = null;private constructor() {}static getInstance(): Database {if (!Database.instance) {Database.instance = new Database();}return Database.instance;}query(sql: string) { /* ... */ }}// Usage: same instance everywhereconst db1 = Database.getInstance();const db2 = Database.getInstance();// db1 === db2
Applicability
• Use the Singleton pattern when a class in your program should have just a single instance available to all clients; for example, a single database object shared by different parts of the program.
The Singleton pattern disables all other means of creating objects of a class except for the special creation method. This method either creates a new object or returns an existing one if it has already been created.
• Use the Singleton pattern when you need stricter control over global variables.
Unlike global variables, the Singleton pattern guarantees that there's just one instance of a class. Nothing, except for the Singleton class itself, can replace the cached instance.
Note that you can always adjust this limitation and allow creating any number of Singleton instances. The only piece of code that needs changing is the body of the getInstance method.
How to Implement
1. Add a private static field to the class for storing the singleton instance.
2. Declare a public static creation method for getting the singleton instance.
3. Implement "lazy initialization" inside the static method. It should create a new object on its first call and put it into the static field. The method should always return that instance on all subsequent calls.
4. Make the constructor of the class private. The static method of the class will still be able to call the constructor, but not the other objects.
5. Go over the client code and replace all direct calls to the singleton's constructor with calls to its static creation method.
Pros and Cons
Pros
✓ You can be sure that a class has only a single instance.
✓ You gain a global access point to that instance.
✓ The singleton object is initialized only when it's requested for the first time.
Cons
✗ Violates the Single Responsibility Principle. The pattern solves two problems at the time.
✗ The Singleton pattern can mask bad design, for instance, when the components of the program know too much about each other.
✗ The pattern requires special treatment in a multithreaded environment so that multiple threads won't create a singleton object several times.
✗ It may be difficult to unit test the client code of the Singleton because many test frameworks rely on inheritance when producing mock objects. Since the constructor of the singleton class is private and overriding static methods is impossible in most languages, you will need to think of a creative way to mock the singleton. Or just don't write the tests. Or don't use the Singleton pattern.
Relations with Other Patterns
A Facade class can often be transformed into a Singleton since a single facade object is sufficient in most cases.
Flyweight would resemble Singleton if you somehow managed to reduce all shared states of the objects to just one flyweight object. But there are two fundamental differences between these patterns:
• There should be only one Singleton instance, whereas a Flyweight class can have multiple instances with different intrinsic states.
• The Singleton object can be mutable. Flyweight objects are immutable.
Adapter
design-patterns-adapter-aka
design-patterns-adapter-desc
Intent
Adapter allows objects with incompatible interfaces to collaborate by converting one interface into another. It's sometimes called the Wrapper pattern.
Problem
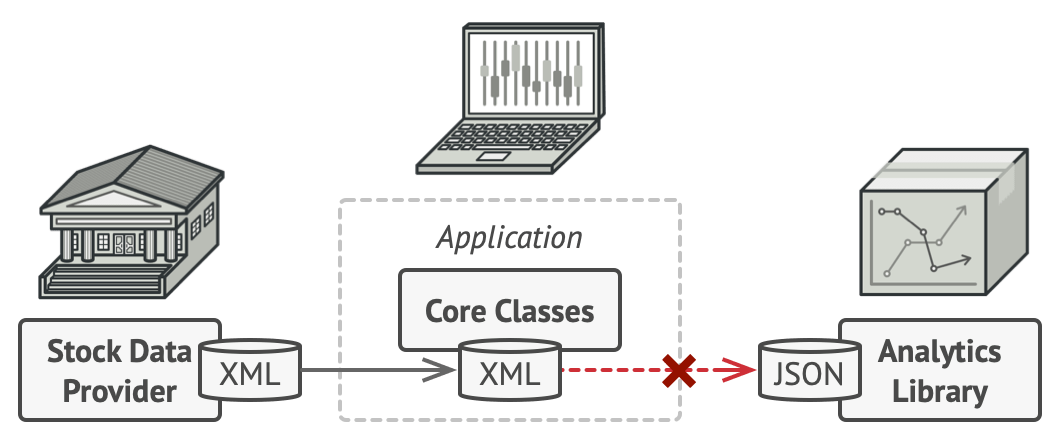
Imagine a stock‑market application that retrieves data in XML. A new analytics library you'd like to use expects JSON. Changing the library to work with XML may be impossible, and switching your application to JSON could break existing code.
Problem: Incompatible Interfaces
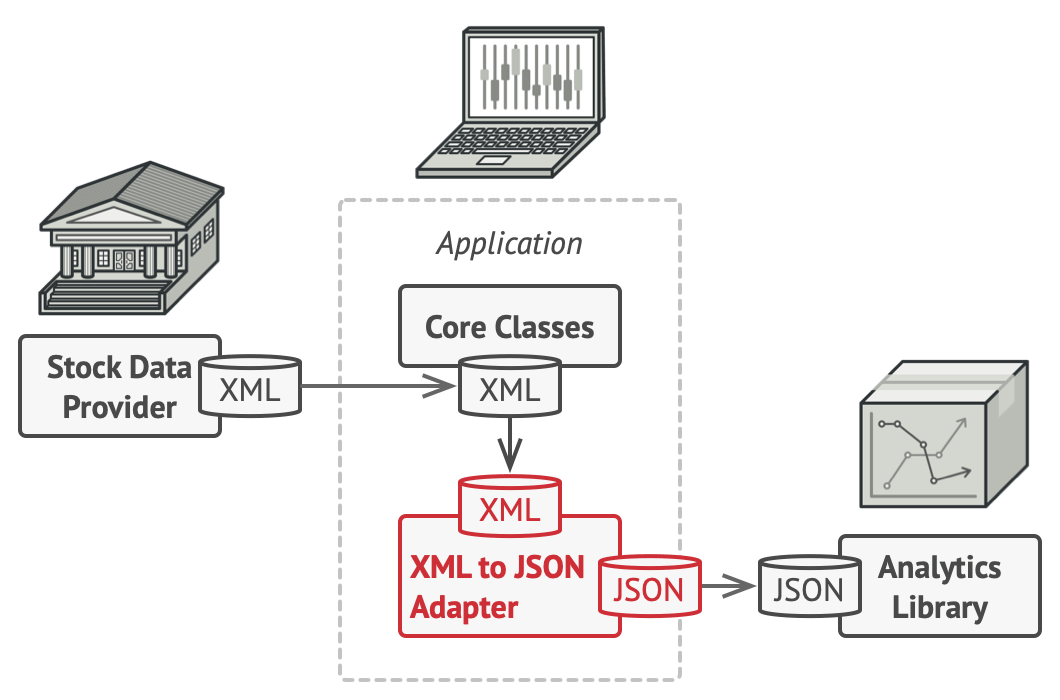
Solution: Adapter Pattern
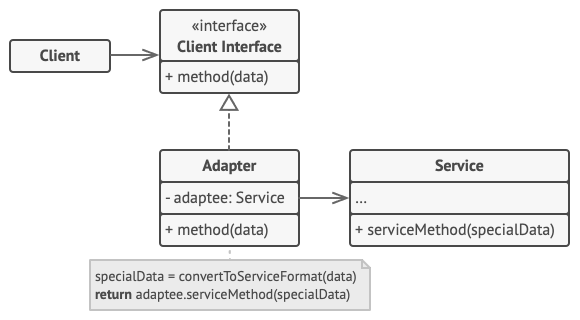
Structure: Object Adapter
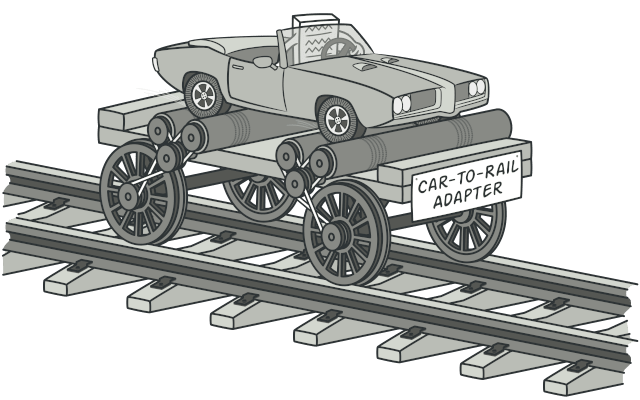
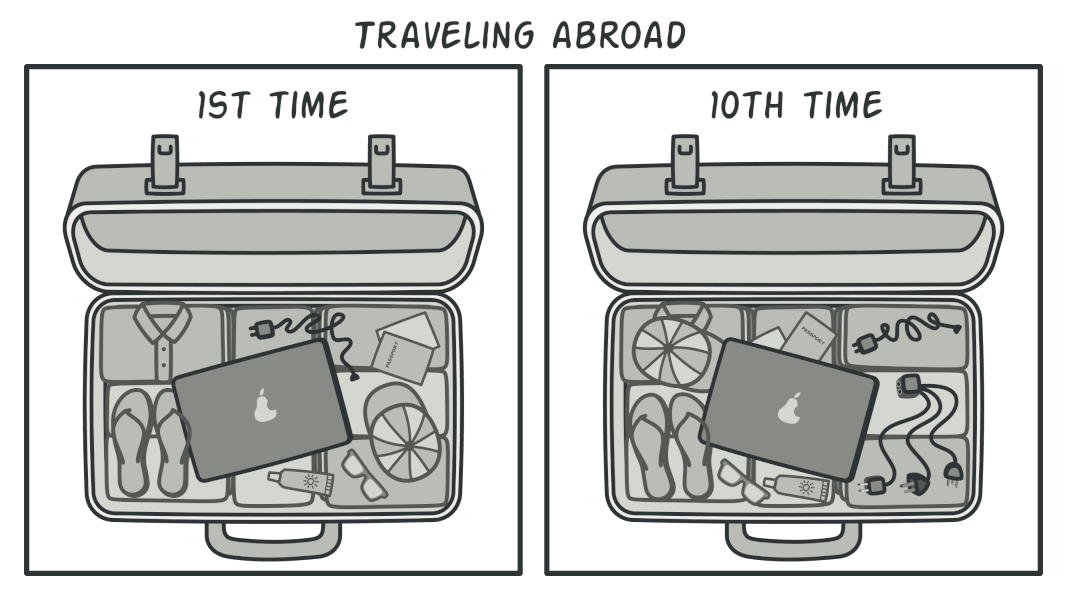
Real-World Analogy: Power Plug Adapter
Solution
You insert an adapter between the client and the service. The adapter implements the client's expected interface and wraps the service object. When the client calls the adapter, it converts the data and delegates the call to the wrapped service. This lets incompatible objects work together. Adapters can also convert calls in the opposite direction and may be chained to adapt multiple aspects at once.
// Adapter: SquarePeg used where RoundPeg is expected (object adapter)// Client interface: must have getRadius()interface RoundPeg { fun getRadius(): Double }class RoundHole(private val radius: Double) {fun getRadius() = radiusfun fits(peg: RoundPeg) = getRadius() >= peg.getRadius()}class StandardRoundPeg(private val radius: Double) : RoundPeg {override fun getRadius() = radius}class SquarePeg(private val width: Double) {fun getWidth() = width}// Adapter wraps SquarePeg, implements RoundPeg. getRadius() = width * sqrt(2) / 2// (radius of smallest circle that accommodates the square)class SquarePegAdapter(private val peg: SquarePeg) : RoundPeg {override fun getRadius() = peg.getWidth() * kotlin.math.sqrt(2.0) / 2}// Usageval hole = RoundHole(5.0)val rpeg = StandardRoundPeg(5.0)hole.fits(rpeg) // trueval smallSqpeg = SquarePeg(5.0)val largeSqpeg = SquarePeg(10.0)// hole.fits(smallSqpeg) // won't compile (incompatible types)val smallAdapter = SquarePegAdapter(smallSqpeg)val largeAdapter = SquarePegAdapter(largeSqpeg)hole.fits(smallAdapter) // truehole.fits(largeAdapter) // false
// Adapter: SquarePeg used where RoundPeg is expected (object adapter)// Client interface: must have getRadius()interface RoundPeg { getRadius(): number; }class RoundHole {constructor(private radius: number) {}getRadius() { return this.radius; }fits(peg: RoundPeg) { return this.getRadius() >= peg.getRadius(); }}class StandardRoundPeg implements RoundPeg {constructor(private radius: number) {}getRadius() { return this.radius; }}class SquarePeg {constructor(private width: number) {}getWidth() { return this.width; }}// Adapter wraps SquarePeg, implements RoundPeg. getRadius() = width * sqrt(2) / 2class SquarePegAdapter implements RoundPeg {constructor(private peg: SquarePeg) {}getRadius() { return this.peg.getWidth() * Math.SQRT2 / 2; }}// Usageconst hole = new RoundHole(5);const rpeg = new StandardRoundPeg(5);hole.fits(rpeg); // trueconst smallSqpeg = new SquarePeg(5);const largeSqpeg = new SquarePeg(10);// hole.fits(smallSqpeg); // won't compile (incompatible types)const smallAdapter = new SquarePegAdapter(smallSqpeg);const largeAdapter = new SquarePegAdapter(largeSqpeg);hole.fits(smallAdapter); // truehole.fits(largeAdapter); // false
Bridge
design-patterns-bridge-desc
Intent
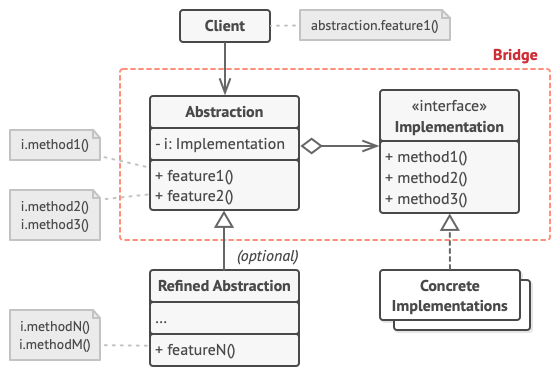
Bridge lets you split a large class or a set of closely related classes into two separate hierarchies—abstraction and implementation—which can be developed independently of each other.

Problem
If you attempt to extend a class hierarchy along two independent axes, such as shape type and colour, the number of subclasses grows exponentially. For example, adding red and blue variants of circles and squares requires four subclasses; adding a new shape multiplies the combinations even further.
Solution
The Bridge pattern replaces inheritance with composition. One dimension of variation is extracted into its own hierarchy, and the original classes hold a reference to an implementation object rather than containing all of its state and behaviour. A shape delegates colour handling to a colour object, forming a bridge between the two hierarchies. New colours or shapes can be added by extending either hierarchy independently.
// Bridge: Abstraction (Remote) and Implementation (Device) vary independently// Implementation: platform-specific, used by abstractioninterface Device {fun isEnabled(): Booleanfun enable()fun disable()fun getVolume(): Intfun setVolume(percent: Int)fun getChannel(): Intfun setChannel(ch: Int)}class Tv : Device {private var on = falseprivate var volume = 0private var channel = 0override fun isEnabled() = onoverride fun enable() { on = true }override fun disable() { on = false }override fun getVolume() = volumeoverride fun setVolume(p: Int) { volume = p.coerceIn(0, 100) }override fun getChannel() = channeloverride fun setChannel(c: Int) { channel = c }}class Radio : Device {private var on = falseprivate var volume = 0private var channel = 0override fun isEnabled() = onoverride fun enable() { on = true }override fun disable() { on = false }override fun getVolume() = volumeoverride fun setVolume(p: Int) { volume = p.coerceIn(0, 100) }override fun getChannel() = channeloverride fun setChannel(c: Int) { channel = c }}// Abstraction: high-level control, delegates to deviceopen class RemoteControl(protected val device: Device) {fun togglePower() { if (device.isEnabled()) device.disable() else device.enable() }fun volumeDown() { device.setVolume(device.getVolume() - 10) }fun volumeUp() { device.setVolume(device.getVolume() + 10) }fun channelDown() { device.setChannel(device.getChannel() - 1) }fun channelUp() { device.setChannel(device.getChannel() + 1) }}class AdvancedRemoteControl(device: Device) : RemoteControl(device) {fun mute() { device.setVolume(0) }}// Usage: link abstraction with implementationval tv = Tv()val remote = RemoteControl(tv)remote.togglePower()val radio = Radio()val advRemote = AdvancedRemoteControl(radio)advRemote.mute()
// Bridge: Abstraction (Remote) and Implementation (Device) vary independently// Implementation: platform-specific, used by abstractioninterface Device {isEnabled(): boolean;enable(): void;disable(): void;getVolume(): number;setVolume(percent: number): void;getChannel(): number;setChannel(channel: number): void;}class Tv implements Device {private on = false;private volume = 0;private channel = 0;isEnabled() { return this.on; }enable() { this.on = true; }disable() { this.on = false; }getVolume() { return this.volume; }setVolume(p: number) { this.volume = Math.max(0, Math.min(100, p)); }getChannel() { return this.channel; }setChannel(c: number) { this.channel = c; }}class Radio implements Device {private on = false;private volume = 0;private channel = 0;isEnabled() { return this.on; }enable() { this.on = true; }disable() { this.on = false; }getVolume() { return this.volume; }setVolume(p: number) { this.volume = Math.max(0, Math.min(100, p)); }getChannel() { return this.channel; }setChannel(c: number) { this.channel = c; }}// Abstraction: high-level control, delegates to deviceclass RemoteControl {constructor(protected device: Device) {}togglePower() {if (this.device.isEnabled()) this.device.disable();else this.device.enable();}volumeDown() { this.device.setVolume(this.device.getVolume() - 10); }volumeUp() { this.device.setVolume(this.device.getVolume() + 10); }channelDown() { this.device.setChannel(this.device.getChannel() - 1); }channelUp() { this.device.setChannel(this.device.getChannel() + 1); }}class AdvancedRemoteControl extends RemoteControl {constructor(device: Device) { super(device); }mute() { this.device.setVolume(0); }}// Usage: link abstraction with implementationconst tv = new Tv();const remote = new RemoteControl(tv);remote.togglePower();const radio = new Radio();const advRemote = new AdvancedRemoteControl(radio);advRemote.mute();
Composite
design-patterns-composite-aka
design-patterns-composite-desc
Intent
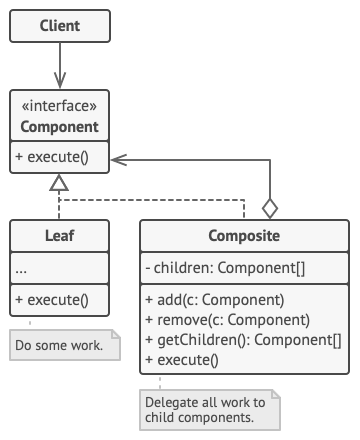
Composite lets you compose objects into tree structures and then work with these structures as if they were individual objects. It enables clients to treat both simple and complex elements uniformly.

Problem
The pattern applies when your data model is naturally a tree. For example, an order can contain products directly or boxes of products, and boxes can nest other boxes. Computing the total cost requires traversing an arbitrary number of nested containers. Without a common interface you'd need to know each element's concrete type and nesting level ahead of time.
Solution
Composite introduces a shared interface for both leaf objects (e.g. products) and container objects (boxes). For a product, the price‑calculating method simply returns its price; for a box, it iterates over child items and delegates the call to each of them, accumulating the total. Because clients use the common interface they don't care whether they're dealing with a single product or an entire hierarchy.
// Composite: Graphic = Component; Dot, Circle = Leaf; CompoundGraphic = Container// Component: common ops for simple and complex elementsinterface Graphic {fun move(dx: Int, dy: Int)fun draw(): String}// Leaf: end object, does the actual workclass Dot(var x: Int, var y: Int) : Graphic {override fun move(dx: Int, dy: Int) { x += dx; y += dy }override fun draw() = "Dot at ($x, $y)"}class Circle(x: Int, y: Int, private val radius: Int) : Dot(x, y) {override fun draw() = "Circle at (${this.x}, ${this.y}) r=$radius"}// Composite: has children, delegates to them and "sums up" the resultclass CompoundGraphic : Graphic {private val children = mutableListOf<Graphic>()fun add(child: Graphic) { children.add(child) }fun remove(child: Graphic) { children.remove(child) }override fun move(dx: Int, dy: Int) { children.forEach { it.move(dx, dy) } }override fun draw() = children.joinToString(" | ") { it.draw() }}// Client: works with all elements via the base interfaceclass ImageEditor {var all = CompoundGraphic()fun load() {all = CompoundGraphic()all.add(Dot(1, 2))all.add(Circle(5, 3, 10))}fun groupSelected(components: List<Graphic>) {val group = CompoundGraphic()components.forEach { group.add(it); all.remove(it) }all.add(group)all.draw()}}
// Composite: Graphic = Component; Dot, Circle = Leaf; CompoundGraphic = Container// Component: common ops for simple and complex elementsinterface Graphic {move(dx: number, dy: number): void;draw(): string;}// Leaf: end object, does the actual workclass Dot implements Graphic {constructor(public x: number, public y: number) {}move(dx: number, dy: number) { this.x += dx; this.y += dy; }draw() { return "Dot at (" + this.x + ", " + this.y + ")"; }}class Circle extends Dot implements Graphic {constructor(x: number, y: number, private radius: number) { super(x, y); }draw() { return "Circle at (" + this.x + ", " + this.y + ") r=" + this.radius; }}// Composite: has children, delegates to them and "sums up" the resultclass CompoundGraphic implements Graphic {private children: Graphic[] = [];add(child: Graphic) { this.children.push(child); }remove(child: Graphic) { this.children = this.children.filter(c => c !== child); }move(dx: number, dy: number) { this.children.forEach(c => c.move(dx, dy)); }draw() { return this.children.map(c => c.draw()).join(" | "); }}// Client: works with all elements via the base interfaceclass ImageEditor {all: CompoundGraphic = new CompoundGraphic();load() {this.all = new CompoundGraphic();this.all.add(new Dot(1, 2));this.all.add(new Circle(5, 3, 10));}groupSelected(components: Graphic[]) {const group = new CompoundGraphic();components.forEach(c => { group.add(c); this.all.remove(c); });this.all.add(group);this.all.draw();}}
Decorator
design-patterns-decorator-aka
design-patterns-decorator-desc
Intent
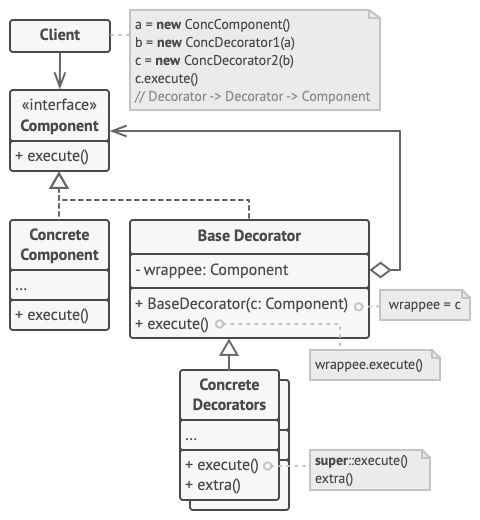
Decorator is a structural design pattern that lets you attach new behaviours to objects by placing them inside special wrapper objects that contain those behaviours. It's also known as the Wrapper pattern.

Problem
Suppose you build a notification library around a simple Notifier class with one method for sending emails. As clients request support for additional channels—SMS, Facebook, Slack and combinations thereof—you end up creating an explosion of subclasses to cover every possible combination of notification types. This approach bloats both the library and client code.
Problem: Class Explosion

Solution: Decorator Pattern

Real-World Analogy: Wearing Clothes


Solution
Instead of extending a base class for each new notification type, Decorator uses composition. You wrap a basic notifier object in one or more decorator objects, each adding a specific notification method. Since all decorators implement the same interface as the base notifier, clients can build stacks of decorators to combine behaviours dynamically at runtime. This avoids the static class explosion and allows flexible combinations of features.
// Decorator: DataSource + Encryption/Compression wrappers (same interface, delegate + add behavior)// Componentinterface DataSource {fun writeData(data: String)fun readData(): String}// Concrete componentclass FileDataSource(private val filename: String) : DataSource {private var data = ""override fun writeData(data: String) { this.data = data /* write to file */ }override fun readData() = data.ifEmpty { "data from $filename" }}// Base decorator: same interface, delegates to wrappeeabstract class DataSourceDecorator(protected val wrappee: DataSource) : DataSource {override fun writeData(data: String) = wrappee.writeData(data)override fun readData() = wrappee.readData()}// Concrete decorators: add behavior before/after delegatingclass EncryptionDecorator(wrappee: DataSource) : DataSourceDecorator(wrappee) {override fun writeData(data: String) = wrappee.writeData("encrypted(${data})")override fun readData() = "decrypted(${wrappee.readData()})"}class CompressionDecorator(wrappee: DataSource) : DataSourceDecorator(wrappee) {override fun writeData(data: String) = wrappee.writeData("compressed(${data})")override fun readData() = "decompressed(${wrappee.readData()})"}// Usage: stack = Encryption > Compression > FileDataSourcevar source: DataSource = FileDataSource("somefile.dat")source.writeData("plain")source = CompressionDecorator(source)source = EncryptionDecorator(source)source.writeData("salaryRecords") // file: encrypted(compressed(salaryRecords))
// Decorator: DataSource + Encryption/Compression wrappers (same interface, delegate + add behavior)// Componentinterface DataSource {writeData(data: string): void;readData(): string;}// Concrete componentclass FileDataSource implements DataSource {private data = "";constructor(private filename: string) {}writeData(data: string) { this.data = data; /* write to file */ }readData() { return this.data || "data from " + this.filename; }}// Base decorator: same interface, delegates to wrappeeabstract class DataSourceDecorator implements DataSource {constructor(protected wrappee: DataSource) {}writeData(data: string) { this.wrappee.writeData(data); }readData() { return this.wrappee.readData(); }}// Concrete decorators: add behavior before/after delegatingclass EncryptionDecorator extends DataSourceDecorator {constructor(wrappee: DataSource) { super(wrappee); }writeData(data: string) { this.wrappee.writeData("encrypted(" + data + ")"); }readData() { return "decrypted(" + this.wrappee.readData() + ")"; }}class CompressionDecorator extends DataSourceDecorator {constructor(wrappee: DataSource) { super(wrappee); }writeData(data: string) { this.wrappee.writeData("compressed(" + data + ")"); }readData() { return "decompressed(" + this.wrappee.readData() + ")"; }}// Usage: stack = Encryption > Compression > FileDataSourcelet source: DataSource = new FileDataSource("somefile.dat");source.writeData("plain");source = new CompressionDecorator(source);source = new EncryptionDecorator(source);source.writeData("salaryRecords"); // file: encrypted(compressed(salaryRecords))
Facade
design-patterns-facade-desc
Facade Pattern Overview
Structure
Example

Live Example
// Facade: VideoConverter hides complexity of video conversion framework// Complex subsystem (3rd-party framework - we don't control this)class VideoFile(val filename: String)class OggCompressionCodecclass MPEG4CompressionCodecclass CodecFactory { fun extract(file: VideoFile) = "codec-from-${file.filename}" }class BitrateReader {fun read(filename: String, codec: String) = "buffer-from-$filename-$codec"fun convert(buffer: String, codec: Any) = "converted-$buffer"}class AudioMixer { fun fix(result: String) = "fixed-$result" }// Facade: simple interface hiding subsystem complexityclass VideoConverter {fun convert(filename: String, format: String): String {val file = VideoFile(filename)val sourceCodec = CodecFactory().extract(file)val destinationCodec = if (format == "mp4") MPEG4CompressionCodec() else OggCompressionCodec()val buffer = BitrateReader().read(filename, sourceCodec)var result = BitrateReader().convert(buffer, destinationCodec)result = AudioMixer().fix(result)return result}}// Client: doesn't depend on framework classes, only facadeclass Application {fun main() {val converter = VideoConverter()val mp4 = converter.convert("funny-cats-video.ogg", "mp4")// mp4.save()}}
// Facade: VideoConverter hides complexity of video conversion framework// Complex subsystem (3rd-party framework - we don't control this)class VideoFile { constructor(public filename: string) {} }class OggCompressionCodec {}class MPEG4CompressionCodec {}class CodecFactory { extract(file: VideoFile) { return "codec-from-" + file.filename; } }class BitrateReader {read(filename: string, codec: string) { return "buffer-from-" + filename + "-" + codec; }convert(buffer: string, codec: any) { return "converted-" + buffer; }}class AudioMixer { fix(result: string) { return "fixed-" + result; } }// Facade: simple interface hiding subsystem complexityclass VideoConverter {convert(filename: string, format: string): string {const file = new VideoFile(filename);const sourceCodec = new CodecFactory().extract(file);const destinationCodec = format === "mp4" ? new MPEG4CompressionCodec() : new OggCompressionCodec();const buffer = new BitrateReader().read(filename, sourceCodec);let result = new BitrateReader().convert(buffer, destinationCodec);result = new AudioMixer().fix(result);return result;}}// Client: doesn't depend on framework classes, only facadeclass Application {main() {const converter = new VideoConverter();const mp4 = converter.convert("funny-cats-video.ogg", "mp4");// mp4.save();}}
Flyweight
design-patterns-flyweight-aka
design-patterns-flyweight-desc
Intent
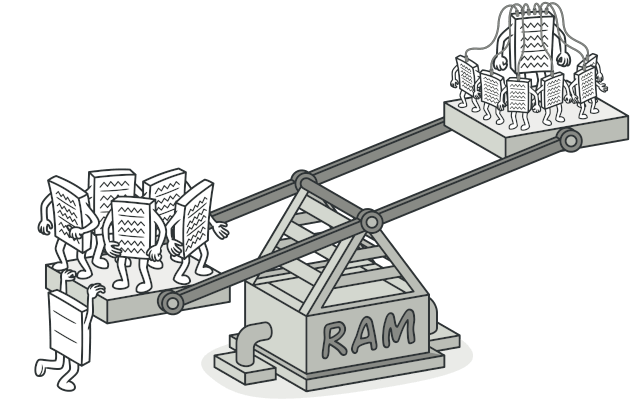
Flyweight is a structural design pattern that lets you fit more objects into the available amount of RAM by sharing common parts of state between multiple objects instead of keeping all of the data in each object.
Problem
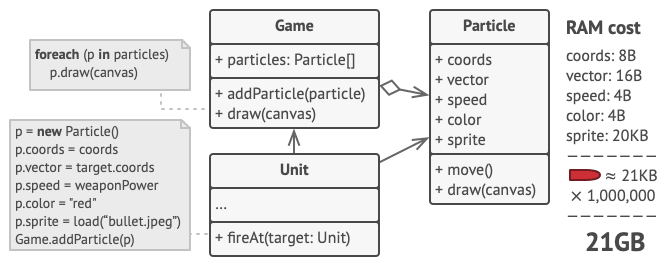
To have some fun after long working hours, you decided to create a simple video game where players move around a map and shoot each other. The particle system makes the game thrilling, but on less powerful machines the huge number of separate particle objects quickly consumes all available memory and causes the program to crash.
Solution
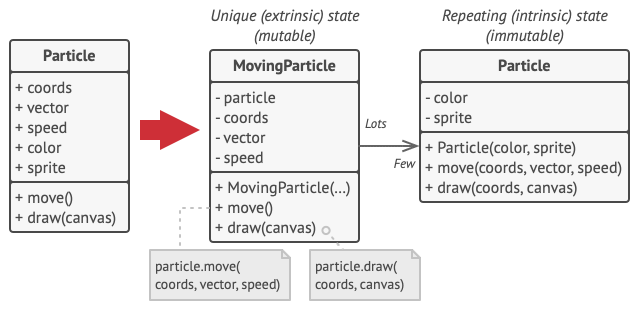
The flyweight approach splits the state of an object into intrinsic and extrinsic parts. Heavy, repeating data such as a particle's color and sprite become the intrinsic state stored inside a shared flyweight object. The changing context—coordinates, movement vectors and speed—is passed as extrinsic state via method parameters. As a result, a single flyweight instance can serve many contexts, drastically reducing memory consumption.
// Flyweight: TreeType (intrinsic/shared) + Tree (extrinsic/context) + TreeFactory (pool)// Flyweight: intrinsic state (shared, immutable)class TreeType(val name: String, val color: String, val texture: String) {fun draw(canvas: String, x: Int, y: Int) = "Draw $name tree ($color, $texture) at ($x, $y)"}// Flyweight Factory: manages pool, reuses existing or creates newobject TreeFactory {private val treeTypes = mutableMapOf<String, TreeType>()fun getTreeType(name: String, color: String, texture: String): TreeType {val key = "$name-$color-$texture"return treeTypes.getOrPut(key) { TreeType(name, color, texture) }}}// Context: extrinsic state (unique per instance) + reference to flyweightclass Tree(val x: Int, val y: Int, val type: TreeType) {fun draw(canvas: String) = type.draw(canvas, x, y)}// Client: Forest uses factory to get/reuse flyweightsclass Forest {private val trees = mutableListOf<Tree>()fun plantTree(x: Int, y: Int, name: String, color: String, texture: String) {val type = TreeFactory.getTreeType(name, color, texture)trees.add(Tree(x, y, type))}fun draw(canvas: String) = trees.forEach { it.draw(canvas) }}// Usage: millions of Tree objects share few TreeType flyweightsval forest = Forest()forest.plantTree(1, 2, "Oak", "green", "oak-texture")forest.plantTree(3, 4, "Oak", "green", "oak-texture") // reuses TreeType
// Flyweight: TreeType (intrinsic/shared) + Tree (extrinsic/context) + TreeFactory (pool)// Flyweight: intrinsic state (shared, immutable)class TreeType {constructor(public name: string, public color: string, public texture: string) {}draw(canvas: string, x: number, y: number) {return "Draw " + this.name + " tree (" + this.color + ", " + this.texture + ") at (" + x + ", " + y + ")";}}// Flyweight Factory: manages pool, reuses existing or creates newclass TreeFactory {private static treeTypes = new Map<string, TreeType>();static getTreeType(name: string, color: string, texture: string): TreeType {const key = name + "-" + color + "-" + texture;if (!this.treeTypes.has(key)) {this.treeTypes.set(key, new TreeType(name, color, texture));}return this.treeTypes.get(key)!;}}// Context: extrinsic state (unique per instance) + reference to flyweightclass Tree {constructor(public x: number, public y: number, public type: TreeType) {}draw(canvas: string) { return this.type.draw(canvas, this.x, this.y); }}// Client: Forest uses factory to get/reuse flyweightsclass Forest {private trees: Tree[] = [];plantTree(x: number, y: number, name: string, color: string, texture: string) {const type = TreeFactory.getTreeType(name, color, texture);this.trees.push(new Tree(x, y, type));}draw(canvas: string) { this.trees.forEach(t => t.draw(canvas)); }}// Usage: millions of Tree objects share few TreeType flyweightsconst forest = new Forest();forest.plantTree(1, 2, "Oak", "green", "oak-texture");forest.plantTree(3, 4, "Oak", "green", "oak-texture"); // reuses TreeType
Proxy
design-patterns-proxy-desc
Proxy Pattern Overview

Problem
Solution
Live Example
// Proxy: CachedYouTube adds caching to ThirdPartyYouTube (same interface, controls access)// Service interfaceinterface ThirdPartyYouTubeLib {fun listVideos(): List<String>fun getVideoInfo(id: String): Stringfun downloadVideo(id: String)}// Service: concrete implementation (3rd-party, can't modify)class ThirdPartyYouTubeClass : ThirdPartyYouTubeLib {override fun listVideos() = listOf("video1", "video2") // API requestoverride fun getVideoInfo(id: String) = "metadata for $id"override fun downloadVideo(id: String) { /* Download video file */ }}// Proxy: same interface, adds caching (or lazy init, access control, logging)class CachedYouTubeClass(private val service: ThirdPartyYouTubeLib) : ThirdPartyYouTubeLib {private var listCache: List<String>? = nullprivate val videoCache = mutableMapOf<String, String>()var needReset = falseoverride fun listVideos(): List<String> {if (listCache == null || needReset) listCache = service.listVideos()return listCache!!}override fun getVideoInfo(id: String): String {if (!videoCache.containsKey(id) || needReset) videoCache[id] = service.getVideoInfo(id)return videoCache[id]!!}override fun downloadVideo(id: String) {if (!downloadExists(id) || needReset) service.downloadVideo(id)}private fun downloadExists(id: String) = false // check if already downloaded}// Client: works with service through interface, doesn't know about proxyclass YouTubeManager(private val service: ThirdPartyYouTubeLib) {fun renderVideoPage(id: String) {val info = service.getVideoInfo(id)// Render video page}fun renderListPanel() {val list = service.listVideos()// Render list of video thumbnails}fun reactOnUserInput() {renderVideoPage("video1")renderListPanel()}}// Application: configures proxy on the flyclass Application {fun init() {val youTubeService = ThirdPartyYouTubeClass()val youTubeProxy = CachedYouTubeClass(youTubeService)val manager = YouTubeManager(youTubeProxy) // client gets proxy, not servicemanager.reactOnUserInput()}}
// Proxy: CachedYouTube adds caching to ThirdPartyYouTube (same interface, controls access)// Service interfaceinterface ThirdPartyYouTubeLib {listVideos(): string[];getVideoInfo(id: string): string;downloadVideo(id: string): void;}// Service: concrete implementation (3rd-party, can't modify)class ThirdPartyYouTubeClass implements ThirdPartyYouTubeLib {listVideos() { return ["video1", "video2"]; } // API requestgetVideoInfo(id: string) { return "metadata for " + id; }downloadVideo(id: string) { /* Download video file */ }}// Proxy: same interface, adds caching (or lazy init, access control, logging)class CachedYouTubeClass implements ThirdPartyYouTubeLib {private service: ThirdPartyYouTubeLib;private listCache: string[] | null = null;private videoCache = new Map<string, string>();needReset = false;constructor(service: ThirdPartyYouTubeLib) { this.service = service; }listVideos(): string[] {if (!this.listCache || this.needReset) this.listCache = this.service.listVideos();return this.listCache;}getVideoInfo(id: string): string {if (!this.videoCache.has(id) || this.needReset) {this.videoCache.set(id, this.service.getVideoInfo(id));}return this.videoCache.get(id)!;}downloadVideo(id: string) {if (!this.downloadExists(id) || this.needReset) this.service.downloadVideo(id);}private downloadExists(id: string) { return false; } // check if already downloaded}// Client: works with service through interface, doesn't know about proxyclass YouTubeManager {constructor(private service: ThirdPartyYouTubeLib) {}renderVideoPage(id: string) {const info = this.service.getVideoInfo(id);// Render video page}renderListPanel() {const list = this.service.listVideos();// Render list of video thumbnails}reactOnUserInput() {this.renderVideoPage("video1");this.renderListPanel();}}// Application: configures proxy on the flyclass Application {init() {const youTubeService = new ThirdPartyYouTubeClass();const youTubeProxy = new CachedYouTubeClass(youTubeService);const manager = new YouTubeManager(youTubeProxy); // client gets proxy, not servicemanager.reactOnUserInput();}}
Chain of Responsibility
Also known as: CoR, Chain of Command
Chain of Responsibility is a behavioral design pattern that lets you pass requests along a chain of handlers. Upon receiving a request, each handler decides either to process the request or to pass it to the next handler in the chain.

Problem
Imagine that you're working on an online ordering system. You want to restrict access to the system so only authenticated users can create orders. Also, users who have administrative permissions must have full access to all orders. After a bit of planning, you realized that these checks must be performed sequentially. The application can attempt to authenticate a user to the system whenever it receives a request that contains the user's credentials. However, if those credentials aren't correct and authentication fails, there's no reason to proceed with any other checks.
Problem: Sequential Checks Required
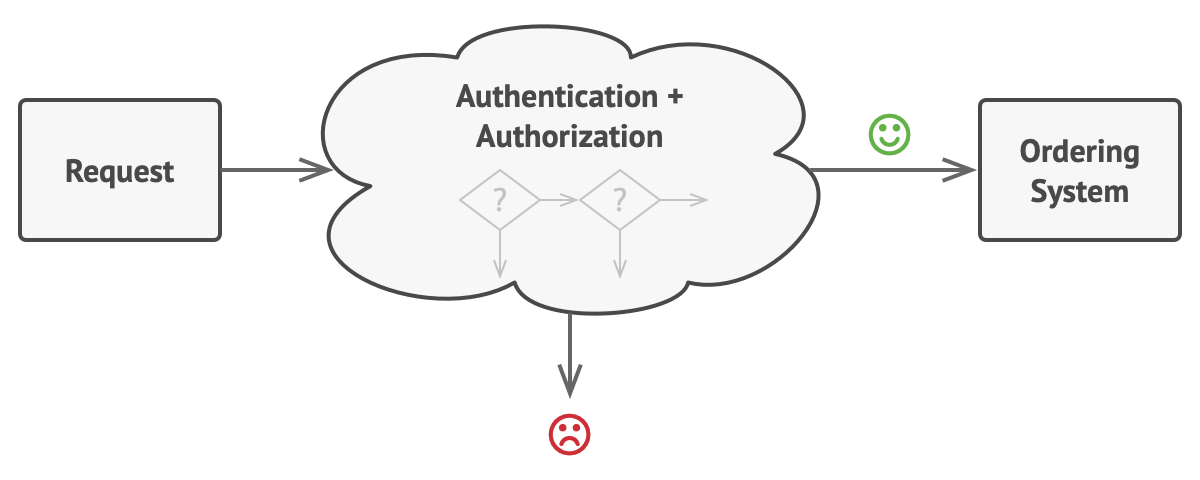
The request must pass a series of checks before the ordering system itself can handle it. During the next few months, you implemented several more of those sequential checks. One of your colleagues suggested that it's unsafe to pass raw data straight to the ordering system. So you added an extra validation step to sanitize the data in a request. Later, somebody noticed that the system is vulnerable to brute force password cracking. To negate this, you promptly added a check that filters repeated failed requests coming from the same IP address. Someone else suggested that you could speed up the system by returning cached results on repeated requests containing the same data. Hence, you added another check which lets the request pass through to the system only if there's no suitable cached response.
Problem: Growing Complexity
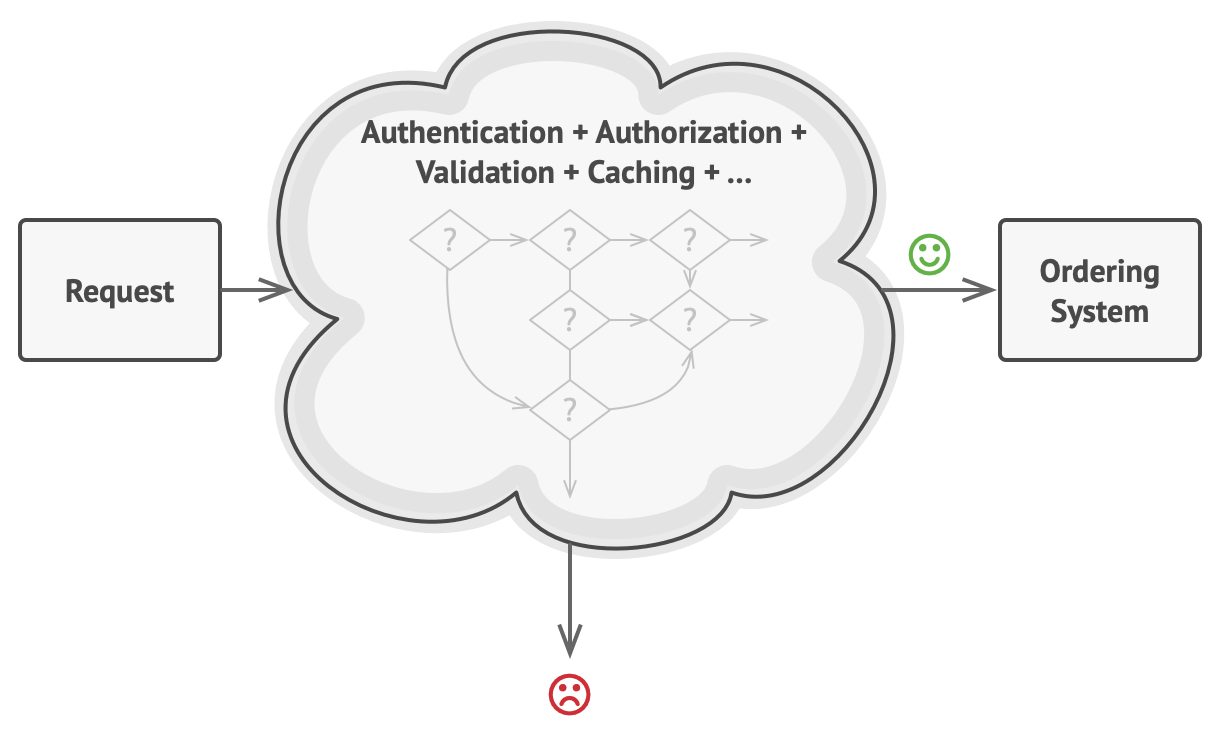
With each new check the code became bigger, messier, and uglier. The bigger the code grew, the messier it became. The code of the checks, which had already looked like a mess, became more and more bloated as you added each new feature. Changing one check sometimes affected the others. Worst of all, when you tried to reuse the checks to protect other components of the system, you had to duplicate some of the code since those components required some of the checks, but not all of them. The system became very hard to comprehend and expensive to maintain.
Solution
Like many other behavioral design patterns, the Chain of Responsibility relies on transforming particular behaviors into stand-alone objects called handlers. In our case, each check should be extracted to its own class with a single method that performs the check. The request, along with its data, is passed to this method as an argument. The pattern suggests that you link these handlers into a chain. Each linked handler has a field for storing a reference to the next handler in the chain. In addition to processing a request, handlers pass the request further along the chain. The request travels along the chain until all handlers have had a chance to process it.
Solution: Handler Chain

Here's the best part: a handler can decide not to pass the request further down the chain and effectively stop any further processing. In our example with ordering systems, a handler performs the processing and then decides whether to pass the request further down the chain. Assuming the request contains the right data, all the handlers can execute their primary behavior, whether it's authentication checks or caching.
Solution: Handlers Lined Up
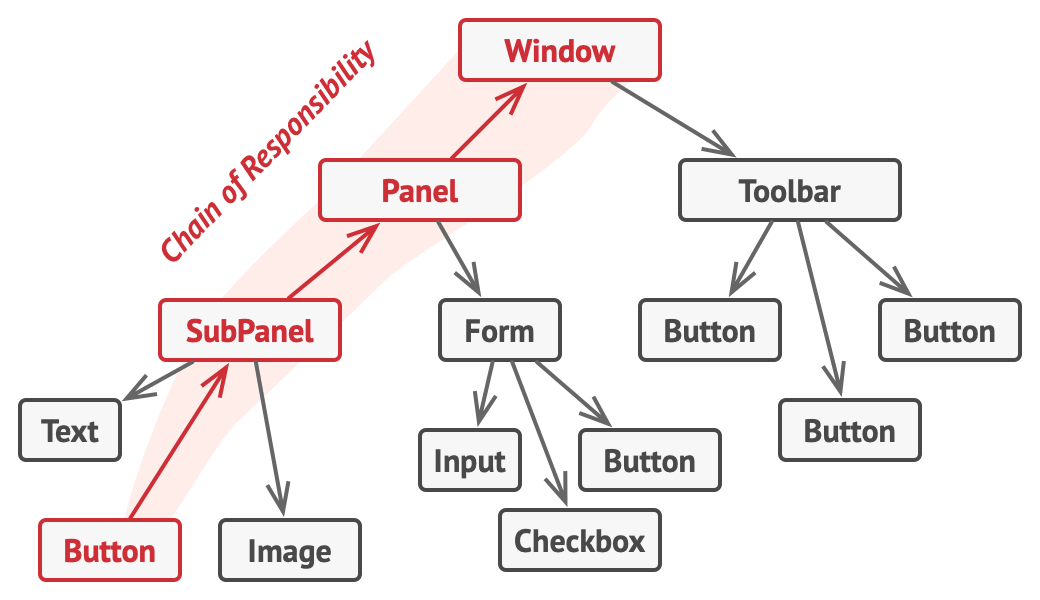
However, there's a slightly different approach (and it's a bit more canonical) in which, upon receiving a request, a handler decides whether it can process it. If it can, it doesn't pass the request any further. So it's either only one handler that processes the request or none at all. This approach is very common when dealing with events in stacks of elements within a graphical user interface. For instance, when a user clicks a button, the event propagates through the chain of GUI elements that starts with the button, goes along its containers (like forms or panels), and ends up with the main application window. The event is processed by the first element in the chain that's capable of handling it. This example is also noteworthy because it shows that a chain can always be extracted from an object tree. A chain can be formed from a branch of an object tree.
Real-World Analogy
A call to tech support can go through multiple operators. You've just bought and installed a new piece of hardware on your computer. Since you're a geek, the computer has several operating systems installed. You try to boot all of them to see whether the hardware is supported. Windows detects and enables the hardware automatically. However, your beloved Linux refuses to work with the new hardware. With a small flicker of hope, you decide to call the tech-support phone number written on the box. The first thing you hear is the robotic voice of the autoresponder. It suggests nine popular solutions to various problems, none of which are relevant to your case. After a while, the robot connects you to a live operator. Alas, the operator isn't able to suggest anything specific either. He keeps quoting lengthy excerpts from the manual, refusing to listen to your comments. After hearing the phrase "have you tried turning the computer off and on again?" for the 10th time, you demand to be connected to a proper engineer. Eventually, the operator passes your call to one of the engineers, who had probably longed for a live human chat for hours as he sat in his lonely server room in the dark basement of some office building. The engineer tells you where to download proper drivers for your new hardware and how to install them on Linux. Finally, the solution! You end the call, bursting with joy.
Real-World Analogy: Tech Support Chain

Structure
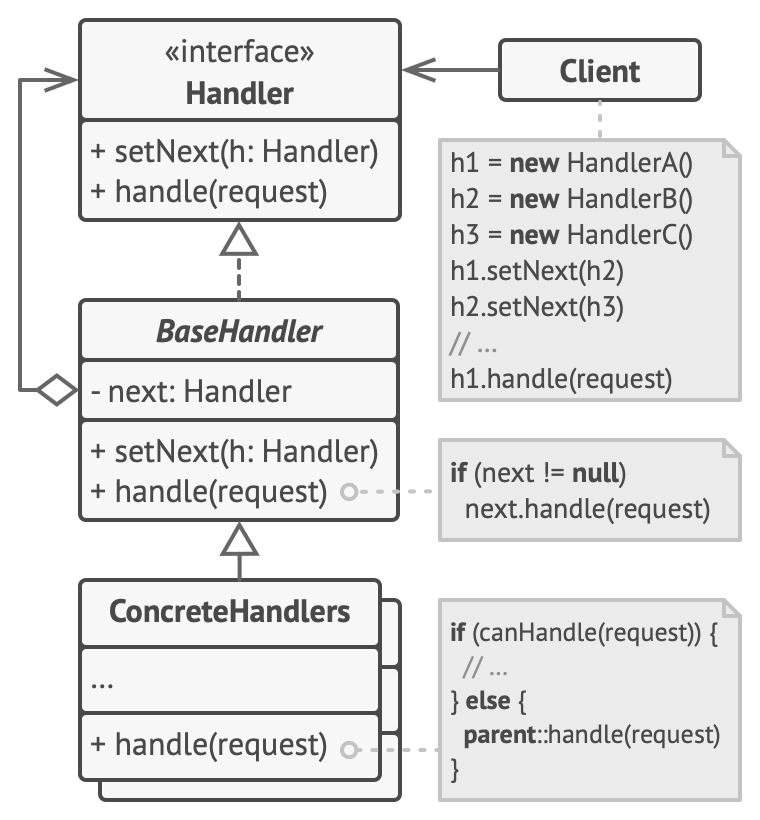
The Handler declares the interface, common for all concrete handlers. It usually contains just a single method for handling requests, but sometimes it may also have another method for setting the next handler on the chain.
The Base Handler is an optional class where you can put the boilerplate code that's common to all handler classes. Usually, this class defines a field for storing a reference to the next handler. The clients can build a chain by passing a handler to the constructor or setter of the previous handler. The class may also implement the default handling behavior: it can pass execution to the next handler after checking for its existence.
Concrete Handlers contain the actual code for processing requests. Upon receiving a request, each handler must decide whether to process it and, additionally, whether to pass it along the chain. Handlers are usually self-contained and immutable, accepting all necessary data just once via the constructor.
The Client may compose chains just once or compose them dynamically, depending on the application's logic. Note that a request can be sent to any handler in the chain—it doesn't have to be the first one.
Pseudocode
In this example, the Chain of Responsibility pattern is responsible for displaying contextual help information for active GUI elements. The GUI classes are built with the Composite pattern. Each element is linked to its container element. At any point, you can build a chain of elements that starts with the element itself and goes through all of its container elements.
Example: Help Request Traversing GUI Objects
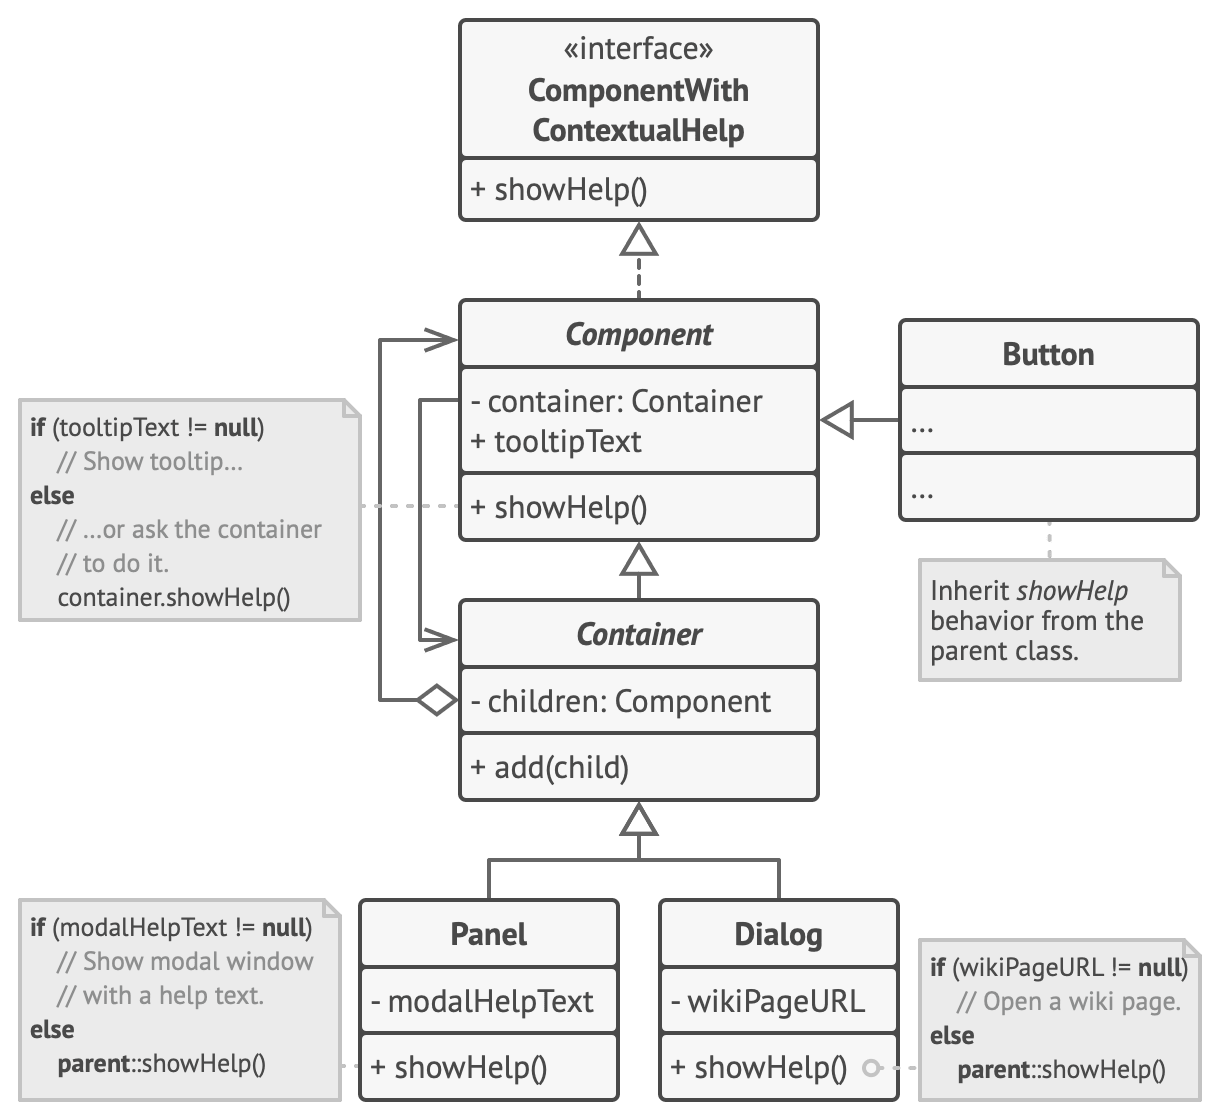
// The handler interface declares a method for executing a request.interface ComponentWithContextualHelp {fun showHelp()}// The base class for simple components.abstract class Component(protected var tooltipText: String?) : ComponentWithContextualHelp {// The component's container acts as the next link in the chain of handlers.protected var container: Container? = null// The component shows a tooltip if there's help text assigned to it.// Otherwise it forwards the call to the container, if it exists.override fun showHelp() {if (tooltipText != null) {// Show tooltip.} else {container?.showHelp()}}}// Containers can contain both simple components and other containers as children.// The chain relationships are established here.// The class inherits showHelp behavior from its parent.abstract class Container(tooltipText: String?) : Component(tooltipText) {protected val children = mutableListOf<Component>()fun add(child: Component) {children.add(child)child.container = this}}// Primitive components may be fine with default help implementation...class Button(tooltipText: String?) : Component(tooltipText)// But complex components may override the default implementation.// If the help text can't be provided in a new way, the component can always// call the base implementation (see Component class).class Panel(tooltipText: String?) : Container(tooltipText) {private var modalHelpText: String? = nulloverride fun showHelp() {if (modalHelpText != null) {// Show a modal window with the help text.} else {super.showHelp()}}}class Dialog(tooltipText: String?) : Container(tooltipText) {private var wikiPageURL: String? = nulloverride fun showHelp() {if (wikiPageURL != null) {// Open the wiki help page.} else {super.showHelp()}}}// Client code.class Application {// Every application configures the chain differently.fun createUI() {val dialog = Dialog(null)dialog.wikiPageURL = "http://..."val panel = Panel(null)panel.modalHelpText = "This panel does..."val ok = Button("This is an OK button that...")val cancel = Button("Cancel")panel.add(ok)panel.add(cancel)dialog.add(panel)}// Imagine what happens here.fun onF1KeyPress() {val component = getComponentAtMouseCoords()component?.showHelp()}private fun getComponentAtMouseCoords(): Component? = null}
// The handler interface declares a method for executing a request.interface ComponentWithContextualHelp {showHelp(): void;}// The base class for simple components.abstract class Component implements ComponentWithContextualHelp {protected tooltipText: string | null = null;// The component's container acts as the next link in the chain of handlers.protected container: Container | null = null;constructor(tooltipText: string | null = null) {this.tooltipText = tooltipText;}// The component shows a tooltip if there's help text assigned to it.// Otherwise it forwards the call to the container, if it exists.showHelp(): void {if (this.tooltipText != null) {// Show tooltip.} else {this.container?.showHelp();}}}// Containers can contain both simple components and other containers as children.// The chain relationships are established here.// The class inherits showHelp behavior from its parent.abstract class Container extends Component {protected children: Component[] = [];add(child: Component): void {this.children.push(child);child.container = this;}}// Primitive components may be fine with default help implementation...class Button extends Component {constructor(tooltipText: string | null = null) {super(tooltipText);}}// But complex components may override the default implementation.// If the help text can't be provided in a new way, the component can always// call the base implementation (see Component class).class Panel extends Container {private modalHelpText: string | null = null;constructor(tooltipText: string | null = null) {super(tooltipText);}showHelp(): void {if (this.modalHelpText != null) {// Show a modal window with the help text.} else {super.showHelp();}}}class Dialog extends Container {private wikiPageURL: string | null = null;constructor(tooltipText: string | null = null) {super(tooltipText);}showHelp(): void {if (this.wikiPageURL != null) {// Open the wiki help page.} else {super.showHelp();}}}// Client code.class Application {// Every application configures the chain differently.createUI(): void {const dialog = new Dialog(null);dialog.wikiPageURL = "http://...";const panel = new Panel(null);panel.modalHelpText = "This panel does...";const ok = new Button("This is an OK button that...");const cancel = new Button("Cancel");panel.add(ok);panel.add(cancel);dialog.add(panel);}// Imagine what happens here.onF1KeyPress(): void {const component = this.getComponentAtMouseCoords();component?.showHelp();}private getComponentAtMouseCoords(): Component | null {return null;}}
Applicability
Use the Chain of Responsibility pattern when your program is expected to process different kinds of requests in various ways, but the exact types of requests and their sequences are unknown beforehand. The pattern lets you link several handlers into one chain and, upon receiving a request, "ask" each handler whether it can process it. This way all handlers get a chance to process the request.
Use the pattern when it's essential to execute several handlers in a particular order. Since you can link the handlers in the chain in any order, all requests will get through the chain exactly as you planned.
Use the CoR pattern when the set of handlers and their order are supposed to change at runtime. If you provide setters for a reference field inside the handler classes, you'll be able to insert, remove or reorder handlers dynamically.
Pros and Cons
Pros:
- You can control the order of request handling.
- Single Responsibility Principle. You can decouple classes that invoke operations from classes that perform operations.
- Open/Closed Principle. You can introduce new handlers into the app without breaking the existing client code.
Cons:
- Some requests may end up unhandled.
Relations with Other Patterns
Chain of Responsibility, Command, Mediator and Observer address various ways of connecting senders and receivers of requests: Chain of Responsibility passes a request sequentially along a dynamic chain of potential receivers until one of them handles it. Command establishes unidirectional connections between senders and receivers. Mediator eliminates direct connections between senders and receivers, forcing them to communicate indirectly via a mediator object. Observer lets receivers dynamically subscribe to and unsubscribe from receiving requests.
Chain of Responsibility is often used in conjunction with Composite. In this case, when a leaf component gets a request, it may pass it through the chain of all of the parent components down to the root of the object tree.
Handlers in Chain of Responsibility can be implemented as Commands. In this case, you can execute a lot of different operations over the same context object, represented by a request. However, there's another approach, where the request itself is a Command object. In this case, you can execute the same operation in a series of different contexts linked into a chain.
Chain of Responsibility and Decorator have very similar class structures. Both patterns rely on recursive composition to pass the execution through a series of objects. However, there are several crucial differences. The CoR handlers can execute arbitrary operations independently of each other. They can also stop passing the request further at any point. On the other hand, various Decorators can extend the object's behavior while keeping it consistent with the base interface. In addition, decorators aren't allowed to break the flow of the request.
Command
Also known as: Action, Transaction
Command is a behavioral design pattern that turns a request into a stand-alone object that contains all information about the request. This transformation lets you pass requests as a method arguments, delay or queue a request's execution, and support undoable operations.

Problem
Imagine that you're working on a new text-editor app. Your current task is to create a toolbar with a bunch of buttons for various operations of the editor. You created a very neat Button class that can be used for buttons on the toolbar, as well as for generic buttons in various dialogs. While all of these buttons look similar, they're all supposed to do different things. Where would you put the code for the various click handlers of these buttons?
Problem: All Buttons Derived from Same Class

The simplest solution is to create tons of subclasses for each place where the button is used. These subclasses would contain the code that would have to be executed on a button click.
Problem: Lots of Button Subclasses

Before long, you realize that this approach is deeply flawed. First, you have an enormous number of subclasses, and that would be okay if you weren't risking breaking the code in these subclasses each time you modify the base Button class. Put simply, your GUI code has become awkwardly dependent on the volatile code of the business logic.
Problem: Several Classes Implement Same Functionality

And here's the ugliest part. Some operations, such as copying/pasting text, would need to be invoked from multiple places. For example, a user could click a small "Copy" button on the toolbar, or copy something via the context menu, or just hit Ctrl+C on the keyboard. Initially, when our app only had the toolbar, it was okay to place the implementation of various operations into the button subclasses. In other words, having the code for copying text inside the CopyButton subclass was fine. But then, when you implement context menus, shortcuts, and other stuff, you have to either duplicate the operation's code in many classes or make menus dependent on buttons, which is an even worse option.
Solution
Good software design is often based on the principle of separation of concerns, which usually results in breaking an app into layers. The most common example: a layer for the graphical user interface and another layer for the business logic. The GUI layer is responsible for rendering a beautiful picture on the screen, capturing any input and showing results of what the user and the app are doing. However, when it comes to doing something important, like calculating the trajectory of the moon or composing an annual report, the GUI layer delegates the work to the underlying layer of business logic.
Solution: GUI Layer Accessing Business Logic Directly

The Command pattern suggests that GUI objects shouldn't send these requests directly. Instead, you should extract all of the request details, such as the object being called, the name of the method and the list of arguments into a separate command class with a single method that triggers this request. Command objects serve as links between various GUI and business logic objects. From now on, the GUI object doesn't need to know what business logic object will receive the request and how it'll be processed. The GUI object just triggers the command, which handles all the details.
Solution: Accessing Business Logic via Command

The next step is to make your commands implement the same interface. Usually it has just a single execution method that takes no parameters. This interface lets you use various commands with the same request sender, without coupling it to concrete classes of commands. As a bonus, now you can switch command objects linked to the sender, effectively changing the sender's behavior at runtime.
Solution: GUI Objects Delegating to Commands

Let's get back to our text editor. After we apply the Command pattern, we no longer need all those button subclasses to implement various click behaviors. It's enough to put a single field into the base Button class that stores a reference to a command object and make the button execute that command on a click. You'll implement a bunch of command classes for every possible operation and link them with particular buttons, depending on the buttons' intended behavior. Other GUI elements, such as menus, shortcuts or entire dialogs, can be implemented in the same way. They'll be linked to a command which gets executed when a user interacts with the GUI element. As you've probably guessed by now, the elements related to the same operations will be linked to the same commands, preventing any code duplication. As a result, commands become a convenient middle layer that reduces coupling between the GUI and business logic layers. And that's only a fraction of the benefits that the Command pattern can offer!
Real-World Analogy
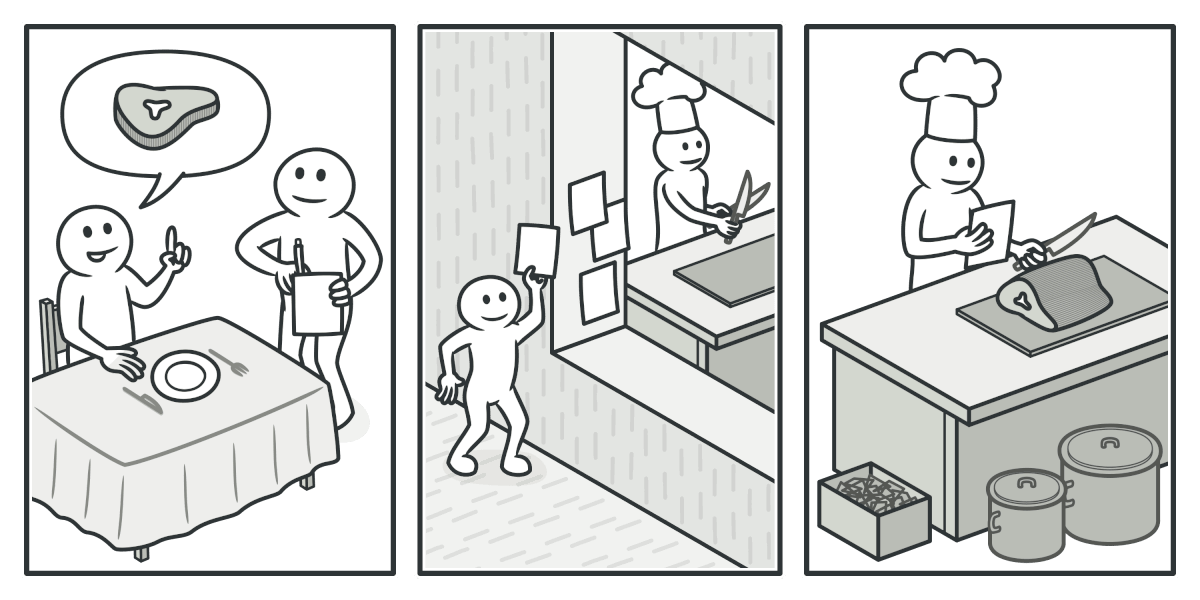
After a long walk through the city, you get to a nice restaurant and sit at the table by the window. A friendly waiter approaches you and quickly takes your order, writing it down on a piece of paper. The waiter goes to the kitchen and sticks the order on the wall. After a while, the order gets to the chef, who reads it and cooks the meal accordingly. The cook places the meal on a tray along with the order. The waiter discovers the tray, checks the order to make sure everything is as you wanted it, and brings everything to your table. The paper order serves as a command. It remains in a queue until the chef is ready to serve it. The order contains all the relevant information required to cook the meal. It allows the chef to start cooking right away instead of running around clarifying the order details from you directly.
Real-World Analogy: Making an Order in a Restaurant
Structure
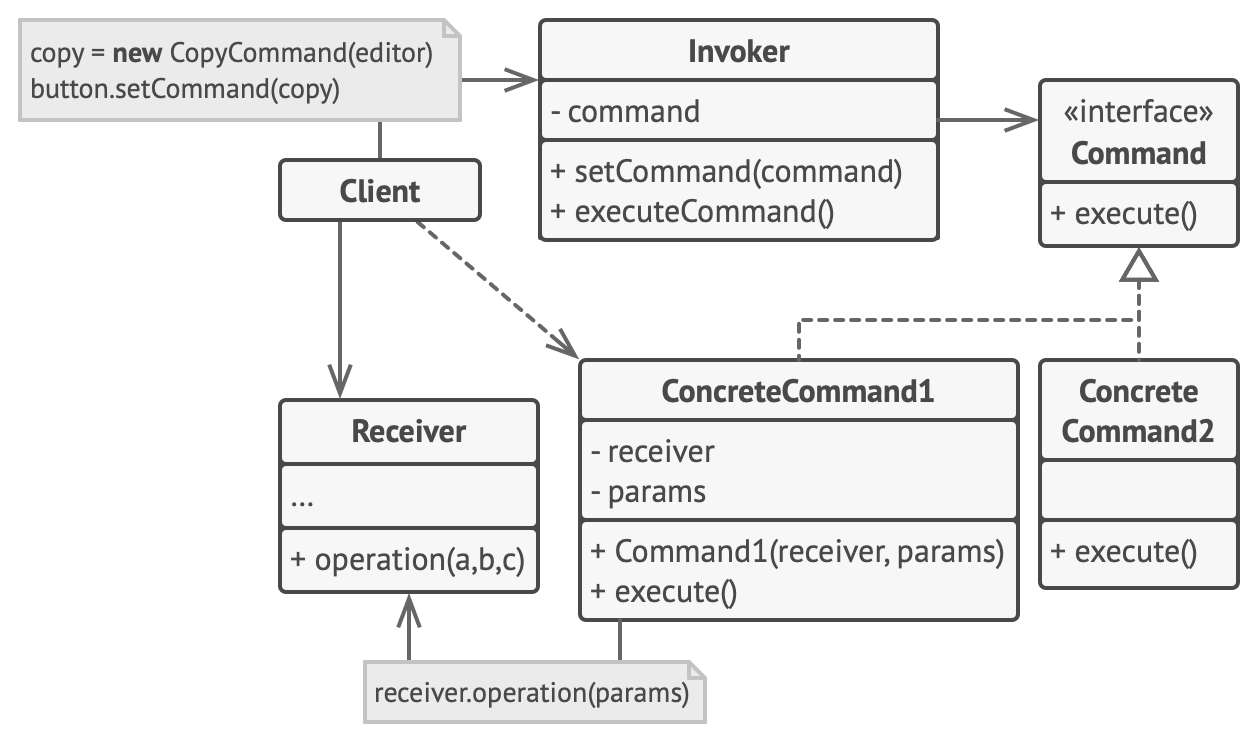
The Sender class (aka invoker) is responsible for initiating requests. This class must have a field for storing a reference to a command object. The sender triggers that command instead of sending the request directly to the receiver. Note that the sender isn't responsible for creating the command object. Usually, it gets a pre-created command from the client via the constructor.
The Command interface usually declares just a single method for executing the command.
Concrete Commands implement various kinds of requests. A concrete command isn't supposed to perform the work on its own, but rather to pass the call to one of the business logic objects. However, for the sake of simplifying the code, these classes can be merged. Parameters required to execute a method on a receiving object can be declared as fields in the concrete command. You can make command objects immutable by only allowing the initialization of these fields via the constructor.
The Receiver class contains some business logic. Almost any object may act as a receiver. Most commands only handle the details of how a request is passed to the receiver, while the receiver itself does the actual work.
The Client creates and configures concrete command objects. The client must pass all of the request parameters, including a receiver instance, into the command's constructor. After that, the resulting command may be associated with one or multiple senders.
Pseudocode
In this example, the Command pattern helps to track the history of executed operations and makes it possible to revert an operation if needed. Commands which result in changing the state of the editor (e.g., cutting and pasting) make a backup copy of the editor's state before executing an operation associated with the command. After a command is executed, it's placed into the command history (a stack of command objects) along with the backup copy of the editor's state at that point. Later, if the user needs to revert an operation, the app can take the most recent command from the history, read the associated backup of the editor's state, and restore it. The client code (GUI elements, command history, etc.) isn't coupled to concrete command classes because it works with commands via the command interface. This approach lets you introduce new commands into the app without breaking any existing code.
// The base command class defines the common interface for all concrete commands.abstract class Command(protected val app: Application,protected val editor: Editor) {protected var backup: String = ""// Make a backup of the editor's state.fun saveBackup() {backup = editor.text}// Restore the editor's state.fun undo() {editor.text = backup}// The execution method is declared abstract to force all// concrete commands to provide their own implementations.// The method must return true or false depending on whether// the command changes the editor's state.abstract fun execute(): Boolean}// The concrete commands go here.class CopyCommand(app: Application, editor: Editor) : Command(app, editor) {// The copy command isn't saved to the history since it// doesn't change the editor's state.override fun execute(): Boolean {app.clipboard = editor.getSelection()return false}}class CutCommand(app: Application, editor: Editor) : Command(app, editor) {// The cut command does change the editor's state, therefore// it must be saved to the history. And it'll be saved as// long as the method returns true.override fun execute(): Boolean {saveBackup()app.clipboard = editor.getSelection()editor.deleteSelection()return true}}class PasteCommand(app: Application, editor: Editor) : Command(app, editor) {override fun execute(): Boolean {saveBackup()editor.replaceSelection(app.clipboard)return true}}// The undo operation is also a command.class UndoCommand(app: Application, editor: Editor) : Command(app, editor) {override fun execute(): Boolean {app.undo()return false}}// The global command history is just a stack.class CommandHistory {private val history = mutableListOf<Command>()// Last in...fun push(c: Command) {// Push the command to the end of the history array.history.add(c)}// ...first outfun pop(): Command? {// Get the most recent command from the history.return if (history.isNotEmpty()) history.removeAt(history.size - 1) else null}}// The editor class has actual text editing operations. It plays// the role of a receiver: all commands end up delegating// execution to the editor's methods.class Editor {var text: String = ""fun getSelection(): String {// Return selected text.return text}fun deleteSelection() {// Delete selected text.text = ""}fun replaceSelection(text: String) {// Insert the clipboard's contents at the current position.this.text = text}}// The application class sets up object relations. It acts as a// sender: when something needs to be done, it creates a command// object and executes it.class Application {var clipboard: String = ""val editors = mutableListOf<Editor>()var activeEditor: Editor? = nullval history = CommandHistory()// The code which assigns commands to UI objects may look like this.fun createUI() {// ...val copy = { executeCommand(CopyCommand(this, activeEditor!!)) }// copyButton.setCommand(copy)// shortcuts.onKeyPress("Ctrl+C", copy)val cut = { executeCommand(CutCommand(this, activeEditor!!)) }// cutButton.setCommand(cut)// shortcuts.onKeyPress("Ctrl+X", cut)val paste = { executeCommand(PasteCommand(this, activeEditor!!)) }// pasteButton.setCommand(paste)// shortcuts.onKeyPress("Ctrl+V", paste)val undo = { executeCommand(UndoCommand(this, activeEditor!!)) }// undoButton.setCommand(undo)// shortcuts.onKeyPress("Ctrl+Z", undo)}// Execute a command and check whether it has to be added to the history.fun executeCommand(command: Command) {if (command.execute()) {history.push(command)}}// Take the most recent command from the history and run its// undo method. Note that we don't know the class of that// command. But we don't have to, since the command knows// how to undo its own action.fun undo() {val command = history.pop()command?.undo()}}
// The base command class defines the common interface for all concrete commands.abstract class Command {protected backup: string = "";constructor(protected app: Application,protected editor: Editor) {}// Make a backup of the editor's state.saveBackup(): void {this.backup = this.editor.text;}// Restore the editor's state.undo(): void {this.editor.text = this.backup;}// The execution method is declared abstract to force all// concrete commands to provide their own implementations.// The method must return true or false depending on whether// the command changes the editor's state.abstract execute(): boolean;}// The concrete commands go here.class CopyCommand extends Command {// The copy command isn't saved to the history since it// doesn't change the editor's state.execute(): boolean {this.app.clipboard = this.editor.getSelection();return false;}}class CutCommand extends Command {// The cut command does change the editor's state, therefore// it must be saved to the history. And it'll be saved as// long as the method returns true.execute(): boolean {this.saveBackup();this.app.clipboard = this.editor.getSelection();this.editor.deleteSelection();return true;}}class PasteCommand extends Command {execute(): boolean {this.saveBackup();this.editor.replaceSelection(this.app.clipboard);return true;}}// The undo operation is also a command.class UndoCommand extends Command {execute(): boolean {this.app.undo();return false;}}// The global command history is just a stack.class CommandHistory {private history: Command[] = [];// Last in...push(c: Command): void {// Push the command to the end of the history array.this.history.push(c);}// ...first outpop(): Command | null {// Get the most recent command from the history.return this.history.length > 0 ? this.history.pop()! : null;}}// The editor class has actual text editing operations. It plays// the role of a receiver: all commands end up delegating// execution to the editor's methods.class Editor {text: string = "";getSelection(): string {// Return selected text.return this.text;}deleteSelection(): void {// Delete selected text.this.text = "";}replaceSelection(text: string): void {// Insert the clipboard's contents at the current position.this.text = text;}}// The application class sets up object relations. It acts as a// sender: when something needs to be done, it creates a command// object and executes it.class Application {clipboard: string = "";editors: Editor[] = [];activeEditor: Editor | null = null;history = new CommandHistory();// The code which assigns commands to UI objects may look like this.createUI(): void {// ...const copy = () => { this.executeCommand(new CopyCommand(this, this.activeEditor!)); };// copyButton.setCommand(copy);// shortcuts.onKeyPress("Ctrl+C", copy);const cut = () => { this.executeCommand(new CutCommand(this, this.activeEditor!)); };// cutButton.setCommand(cut);// shortcuts.onKeyPress("Ctrl+X", cut);const paste = () => { this.executeCommand(new PasteCommand(this, this.activeEditor!)); };// pasteButton.setCommand(paste);// shortcuts.onKeyPress("Ctrl+V", paste);const undo = () => { this.executeCommand(new UndoCommand(this, this.activeEditor!)); };// undoButton.setCommand(undo);// shortcuts.onKeyPress("Ctrl+Z", undo);}// Execute a command and check whether it has to be added to the history.executeCommand(command: Command): void {if (command.execute()) {this.history.push(command);}}// Take the most recent command from the history and run its// undo method. Note that we don't know the class of that// command. But we don't have to, since the command knows// how to undo its own action.undo(): void {const command = this.history.pop();if (command != null) {command.undo();}}}
Applicability
Use the Command pattern when you want to parameterize objects with operations. The Command pattern can turn a specific method call into a stand-alone object. This change opens up a lot of interesting uses: you can pass commands as method arguments, store them inside other objects, switch linked commands at runtime, etc. Here's an example: you're developing a GUI component such as a context menu, and you want your users to be able to configure menu items that trigger operations when an end user clicks an item.
Use the Command pattern when you want to queue operations, schedule their execution, or execute them remotely. As with any other object, a command can be serialized, which means converting it to a string that can be easily written to a file or a database. Later, the string can be restored as the initial command object. Thus, you can delay and schedule command execution. But there's even more! In the same way, you can queue, log or send commands over the network.
Use the Command pattern when you want to implement reversible operations. Although there are many ways to implement undo/redo, the Command pattern is perhaps the most popular of all. To be able to revert operations, you need to implement the history of performed operations. The command history is a stack that contains all executed command objects along with related backups of the application's state. This method has two drawbacks. First, it isn't that easy to save an application's state because some of it can be private. This problem can be mitigated with the Memento pattern. Second, the state backups may consume quite a lot of RAM. Therefore, sometimes you can resort to an alternative implementation: instead of restoring the past state, the command performs the inverse operation. The reverse operation also has a price: it may turn out to be hard or even impossible to implement.
Pros and Cons
Pros:
- Single Responsibility Principle. You can decouple classes that invoke operations from classes that perform these operations.
- Open/Closed Principle. You can introduce new commands into the app without breaking existing client code.
- You can implement undo/redo.
- You can implement deferred execution of operations.
- You can assemble a set of simple commands into a complex one.
Cons:
- The code may become more complicated since you're introducing a whole new layer between senders and receivers.
Relations with Other Patterns
Chain of Responsibility, Command, Mediator and Observer address various ways of connecting senders and receivers of requests: Chain of Responsibility passes a request sequentially along a dynamic chain of potential receivers until one of them handles it. Command establishes unidirectional connections between senders and receivers. Mediator eliminates direct connections between senders and receivers, forcing them to communicate indirectly via a mediator object. Observer lets receivers dynamically subscribe to and unsubscribe from receiving requests.
Handlers in Chain of Responsibility can be implemented as Commands. In this case, you can execute a lot of different operations over the same context object, represented by a request. However, there's another approach, where the request itself is a Command object. In this case, you can execute the same operation in a series of different contexts linked into a chain.
You can use Command and Memento together when implementing "undo". In this case, commands are responsible for performing various operations over a target object, while mementos save the state of that object just before a command gets executed.
Command and Strategy may look similar because you can use both to parameterize an object with some action. However, they have very different intents. You can use Command to convert any operation into an object. The operation's parameters become fields of that object. The conversion lets you defer execution of the operation, queue it, store the history of commands, send commands to remote services, etc. On the other hand, Strategy usually describes different ways of doing the same thing, letting you swap these algorithms within a single context class.
Prototype can help when you need to save copies of Commands into history.
You can treat Visitor as a powerful version of the Command pattern. Its objects can execute operations over various objects of different classes.
Iterator
Iterator is a behavioral design pattern that lets you traverse elements of a collection without exposing its underlying representation (list, stack, tree, etc.).

Problem
Collections are one of the most used data types in programming. Nonetheless, a collection is just a container for a group of objects.
Most collections store their elements in simple lists
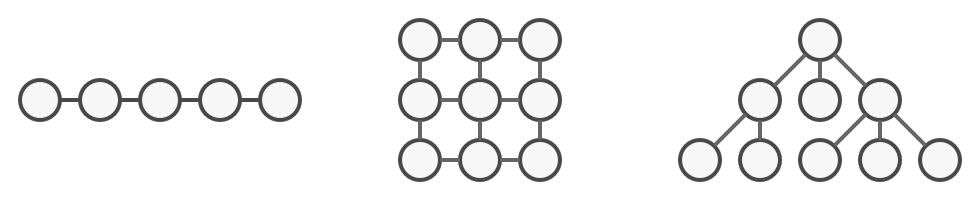
However, some of them are based on stacks, trees, graphs and other complex data structures. But no matter how a collection is structured, it must provide some way of accessing its elements so that other code can use these elements. There should be a way to go through each element of the collection without accessing the same elements over and over. This may sound like an easy job if you have a collection based on a list. You just loop over all of the elements. But how do you sequentially traverse elements of a complex data structure, such as a tree? For example, one day you might be just fine with depth-first traversal of a tree. Yet the next day you might require breadth-first traversal. And the next week, you might need something else, like random access to the tree elements.
Adding more and more traversal algorithms to the collection gradually blurs its primary responsibility
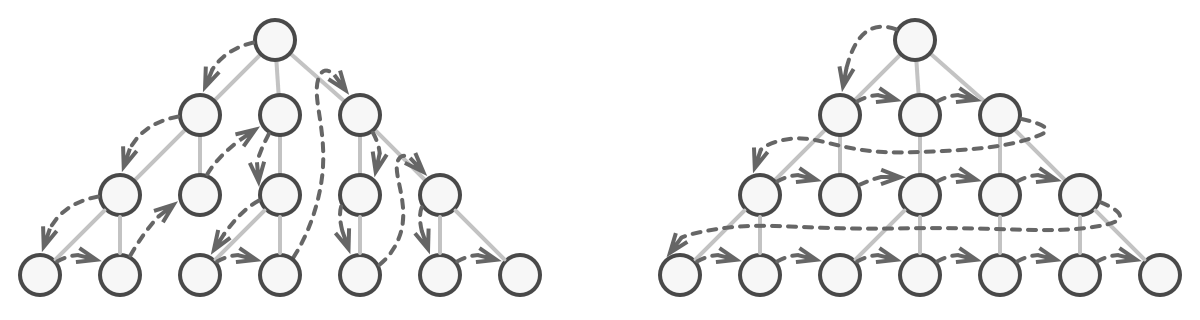
Adding more and more traversal algorithms to the collection gradually blurs its primary responsibility, which is efficient data storage. Additionally, some algorithms might be tailored for a specific application, so including them into a generic collection class would be weird. On the other hand, the client code that's supposed to work with various collections may not even care how they store their elements. However, since collections all provide different ways of accessing their elements, you have no option other than to couple your code to the specific collection classes.
Solution
The main idea of the Iterator pattern is to extract the traversal behavior of a collection into a separate object called an iterator.
The main idea of the Iterator pattern is to extract the traversal behavior of a collection into a separate object called an iterator
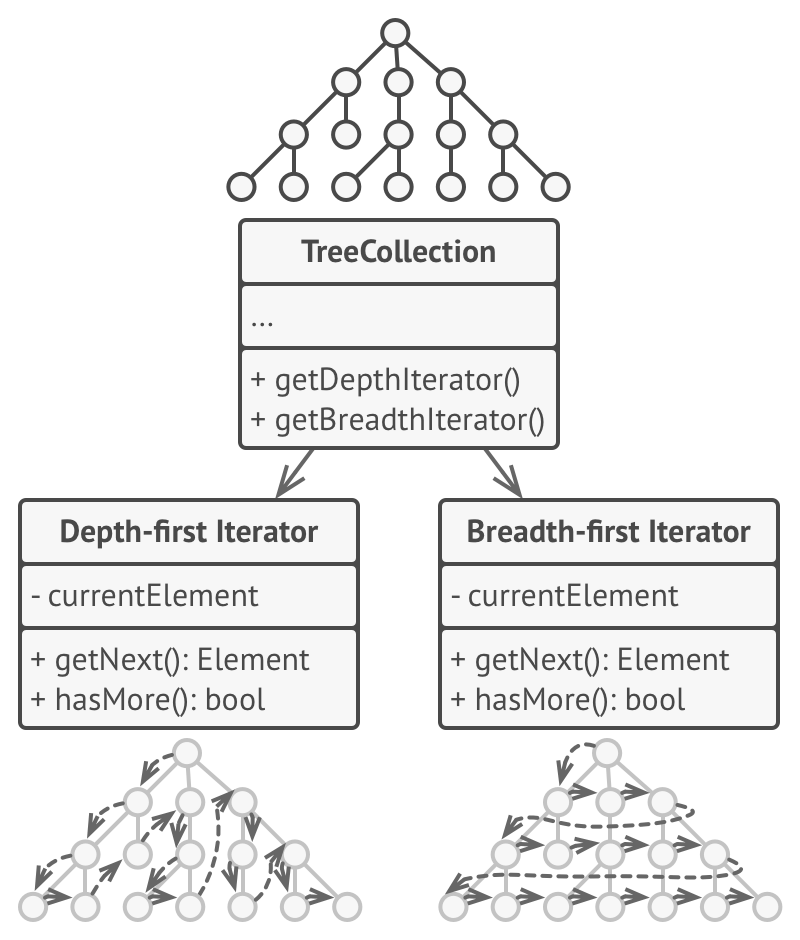
In addition to implementing the algorithm itself, an iterator object encapsulates all of the traversal details, such as the current position and how many elements are left till the end. Because of this, several iterators can go through the same collection at the same time, independently of each other. Usually, iterators provide one primary method for fetching elements of the collection. The client can keep running this method until it doesn't return anything, which means that the iterator has traversed all of the elements. All iterators must implement the same interface. This makes the client code compatible with any collection type or any traversal algorithm as long as there's a proper iterator. If you need a special way to traverse a collection, you just create a new iterator class, without having to change the collection or the client.
Real-World Analogy
You plan to visit Rome for a few days and visit all of its main sights and attractions. But once there, you could waste a lot of time walking in circles, unable to find even the Colosseum. On the other hand, you could buy a virtual guide app for your smartphone and use it for navigation. It's smart and inexpensive, and you could be staying at some interesting places for as long as you want. A third alternative is that you could spend some of the trip's budget and hire a local guide who knows the city like the back of his hand. The guide would be able to tailor the tour to your likings, show you every attraction and tell a lot of exciting stories. That'll be even more fun; but, alas, more expensive, too. All of these options—the random directions born in your head, the smartphone navigator or the human guide—act as iterators over the vast collection of sights and attractions located in Rome.
Real-World Analogy: Making an Order in a Restaurant

Structure

The Collection interface declares one or multiple methods for getting iterators compatible with the collection. Note that the return type of the methods must be declared as the iterator interface so that the concrete collections can return various kinds of iterators.
Concrete Collections return new instances of a particular concrete iterator class each time the client requests one. You might be wondering, where's the rest of the collection's code? Don't worry, it should be in the same class. It's just that these details aren't crucial to the actual pattern, so we're omitting them.
The Iterator interface declares the operations required for traversing a collection: fetching the next element, retrieving the current position, restarting iteration, etc.
Concrete Iterators implement specific algorithms for traversing a collection. The iterator object must track the traversal progress on its own. This allows several iterators to traverse the same collection independently of each other.
The Client must work with both collections and iterators via their interfaces. This way you don't couple the code to concrete classes, allowing you to use various collections and iterators with the same client code. Typically, clients don't create iterators on their own, but instead get them from collections. Yet, in some cases, the client can create one directly; for example, when the client defines its own special iterator.
Pseudocode
In this example, the Iterator pattern is used to walk through a special kind of collection which encapsulates access to Facebook's social graph. The collection provides several iterators that can traverse profiles in various ways.
Iterator pattern for Facebook's social graph
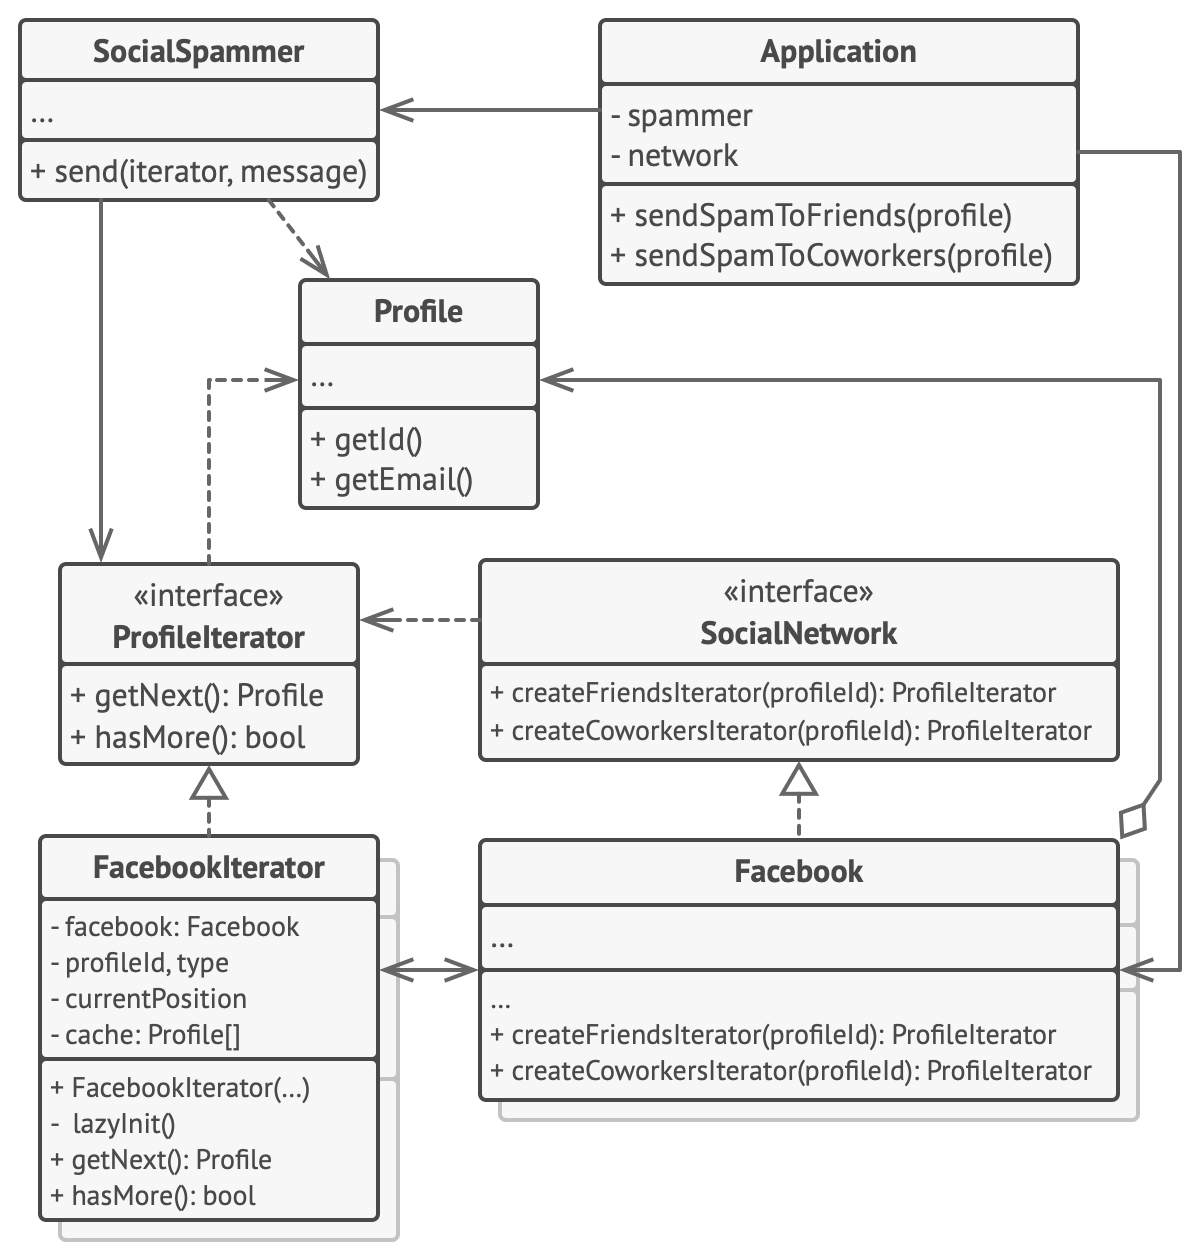
The 'friends' iterator can be used to go over the friends of a given profile. The 'colleagues' iterator does the same, except it omits friends who don't work at the same company as a target person. Both iterators implement a common interface which allows clients to fetch profiles without diving into implementation details such as authentication and sending REST requests. The client code isn't coupled to concrete classes because it works with collections and iterators only through interfaces. If you decide to connect your app to a new social network, you simply need to provide new collection and iterator classes without changing the existing code.
// The collection interface must declare a factory method for// producing iterators. You can declare several methods if there// are different kinds of iteration available in your program.interface SocialNetwork {fun createFriendsIterator(profileId: String): ProfileIteratorfun createCoworkersIterator(profileId: String): ProfileIterator}// Each concrete collection is coupled to a set of concrete// iterator classes it returns. But the client isn't, since the// signature of these methods returns iterator interfaces.class Facebook(private val profiles: List<Profile>) : SocialNetwork {// ... The bulk of the collection's code should go here ...// Iterator creation code.override fun createFriendsIterator(profileId: String): ProfileIterator {return FacebookIterator(this, profileId, "friends")}override fun createCoworkersIterator(profileId: String): ProfileIterator {return FacebookIterator(this, profileId, "coworkers")}fun socialGraphRequest(profileId: String, type: String): List<Profile> {// Placeholder for actual API callreturn profiles.filter { it.id != profileId }}}// The common interface for all iterators.interface ProfileIterator {fun getNext(): Profile?fun hasMore(): Boolean}// The concrete iterator class.class FacebookIterator(private val facebook: Facebook,private val profileId: String,private val type: String) : ProfileIterator {// The iterator needs a reference to the collection that it// traverses.// An iterator object traverses the collection independently// from other iterators. Therefore it has to store the// iteration state.private var currentPosition = 0private var cache: List<Profile>? = nullprivate fun lazyInit() {if (cache == null) {cache = facebook.socialGraphRequest(profileId, type)}}// Each concrete iterator class has its own implementation// of the common iterator interface.override fun getNext(): Profile? {if (hasMore()) {val result = cache!![currentPosition]currentPosition++return result}return null}override fun hasMore(): Boolean {lazyInit()return currentPosition < cache!!.size}}// Here is another useful trick: you can pass an iterator to a// client class instead of giving it access to a whole// collection. This way, you don't expose the collection to the// client.// And there's another benefit: you can change the way the// client works with the collection at runtime by passing it a// different iterator. This is possible because the client code// isn't coupled to concrete iterator classes.class SocialSpammer {fun send(iterator: ProfileIterator, message: String) {while (iterator.hasMore()) {val profile = iterator.getNext()// System.sendEmail(profile.getEmail(), message)println("Sending message to ${profile} with: $message")}}}// The application class configures collections and iterators// and then passes them to the client code.class Application {private var network: SocialNetwork? = nullprivate val spammer = SocialSpammer()fun config() {// if working with Facebooknetwork = Facebook(emptyList())// if working with LinkedIn// network = LinkedIn()}fun sendSpamToFriends(profileId: String) {val iterator = network!!.createFriendsIterator(profileId)spammer.send(iterator, "Very important message to friends")}fun sendSpamToCoworkers(profileId: String) {val iterator = network!!.createCoworkersIterator(profileId)spammer.send(iterator, "Very important message to coworkers")}}// Placeholder Profile classdata class Profile(val id: String, val email: String)
// The collection interface must declare a factory method for// producing iterators. You can declare several methods if there// are different kinds of iteration available in your program.interface SocialNetwork {createFriendsIterator(profileId: string): ProfileIterator;createCoworkersIterator(profileId: string): ProfileIterator;}// Each concrete collection is coupled to a set of concrete// iterator classes it returns. But the client isn't, since the// signature of these methods returns iterator interfaces.class Facebook implements SocialNetwork {// ... The bulk of the collection's code should go here ...// Iterator creation code.createFriendsIterator(profileId: string): ProfileIterator {return new FacebookIterator(this, profileId, "friends");}createCoworkersIterator(profileId: string): ProfileIterator {return new FacebookIterator(this, profileId, "coworkers");}socialGraphRequest(profileId: string, type: string): Profile[] {// Placeholder for actual API callreturn [];}}// The common interface for all iterators.interface ProfileIterator {getNext(): Profile | null;hasMore(): boolean;}// The concrete iterator class.class FacebookIterator implements ProfileIterator {// The iterator needs a reference to the collection that it// traverses.private facebook: Facebook;private profileId: string;private type: string;// An iterator object traverses the collection independently// from other iterators. Therefore it has to store the// iteration state.private currentPosition: number = 0;private cache: Profile[] | null = null;constructor(facebook: Facebook, profileId: string, type: string) {this.facebook = facebook;this.profileId = profileId;this.type = type;}private lazyInit(): void {if (this.cache === null) {// Assuming facebook.socialGraphRequest exists and returns Profile[]this.cache = this.facebook.socialGraphRequest(this.profileId, this.type);}}// Each concrete iterator class has its own implementation// of the common iterator interface.getNext(): Profile | null {if (this.hasMore()) {const result = this.cache![this.currentPosition];this.currentPosition++;return result;}return null;}hasMore(): boolean {this.lazyInit();return this.currentPosition < this.cache!.length;}}// Here is another useful trick: you can pass an iterator to a// client class instead of giving it access to a whole// collection. This way, you don't expose the collection to the// client.// And there's another benefit: you can change the way the// client works with the collection at runtime by passing it a// different iterator. This is possible because the client code// isn't coupled to concrete iterator classes.class SocialSpammer {send(iterator: ProfileIterator, message: string): void {while (iterator.hasMore()) {const profile = iterator.getNext();// System.sendEmail(profile.getEmail(), message);console.log(`Sending message to ${profile} with: ${message}`);}}}// The application class configures collections and iterators// and then passes them to the client code.class Application {network: SocialNetwork | null = null;spammer: SocialSpammer = new SocialSpammer();config(): void {// if working with Facebookthis.network = new Facebook();// if working with LinkedIn// this.network = new LinkedIn();}sendSpamToFriends(profileId: string): void {const iterator = this.network!.createFriendsIterator(profileId);this.spammer.send(iterator, "Very important message to friends");}sendSpamToCoworkers(profileId: string): void {const iterator = this.network!.createCoworkersIterator(profileId);this.spammer.send(iterator, "Very important message to coworkers");}}// Placeholder Profile interfaceinterface Profile {id: string;email: string;}
Applicability
Use the Iterator pattern when your collection has a complex data structure under the hood, but you want to hide its complexity from clients (either for convenience or security reasons). The iterator encapsulates the details of working with a complex data structure, providing the client with several simple methods of accessing the collection elements. While this approach is very convenient for the client, it also protects the collection from careless or malicious actions which the client would be able to perform if working with the collection directly.
Use the pattern to reduce duplication of the traversal code across your app. The code of non-trivial iteration algorithms tends to be very bulky. When placed within the business logic of an app, it may blur the responsibility of the original code and make it less maintainable. Moving the traversal code to designated iterators can help you make the code of the application more lean and clean.
Use the Iterator when you want your code to be able to traverse different data structures or when types of these structures are unknown beforehand. The pattern provides a couple of generic interfaces for both collections and iterators. Given that your code now uses these interfaces, it'll still work if you pass it various kinds of collections and iterators that implement these interfaces.
How to Implement
Declare the iterator interface. At the very least, it must have a method for fetching the next element from a collection. But for the sake of convenience you can add a couple of other methods, such as fetching the previous element, tracking the current position, and checking the end of the iteration.
Declare the collection interface and describe a method for fetching iterators. The return type should be equal to that of the iterator interface. You may declare similar methods if you plan to have several distinct groups of iterators.
Implement concrete iterator classes for the collections that you want to be traversable with iterators. An iterator object must be linked with a single collection instance. Usually, this link is established via the iterator's constructor.
Implement the collection interface in your collection classes. The main idea is to provide the client with a shortcut for creating iterators, tailored for a particular collection class. The collection object must pass itself to the iterator's constructor to establish a link between them.
Go over the client code to replace all of the collection traversal code with the use of iterators. The client fetches a new iterator object each time it needs to iterate over the collection elements.
Pros and Cons
Pros:
- Single Responsibility Principle. You can clean up the client code and the collections by extracting bulky traversal algorithms into separate classes.
- Open/Closed Principle. You can implement new types of collections and iterators and pass them to existing code without breaking anything.
- You can iterate over the same collection in parallel because each iterator object contains its own iteration state.
- For the same reason, you can delay an iteration and continue it when needed.
Cons:
- Applying the pattern can be an overkill if your app only works with simple collections.
- Using an iterator may be less efficient than going through elements of some specialized collections directly.
Relations with Other Patterns
You can use Iterators to traverse Composite trees.
You can use Factory Method along with Iterator to let collection subclasses return different types of iterators that are compatible with the collections.
You can use Memento along with Iterator to capture the current iteration state and roll it back if necessary.
You can use Visitor along with Iterator to traverse a complex data structure and execute some operation over its elements, even if they all have different classes.
Memento
Also known as: Snapshot
Memento is a behavioral design pattern that lets you save and restore the previous state of an object without revealing the details of its implementation.
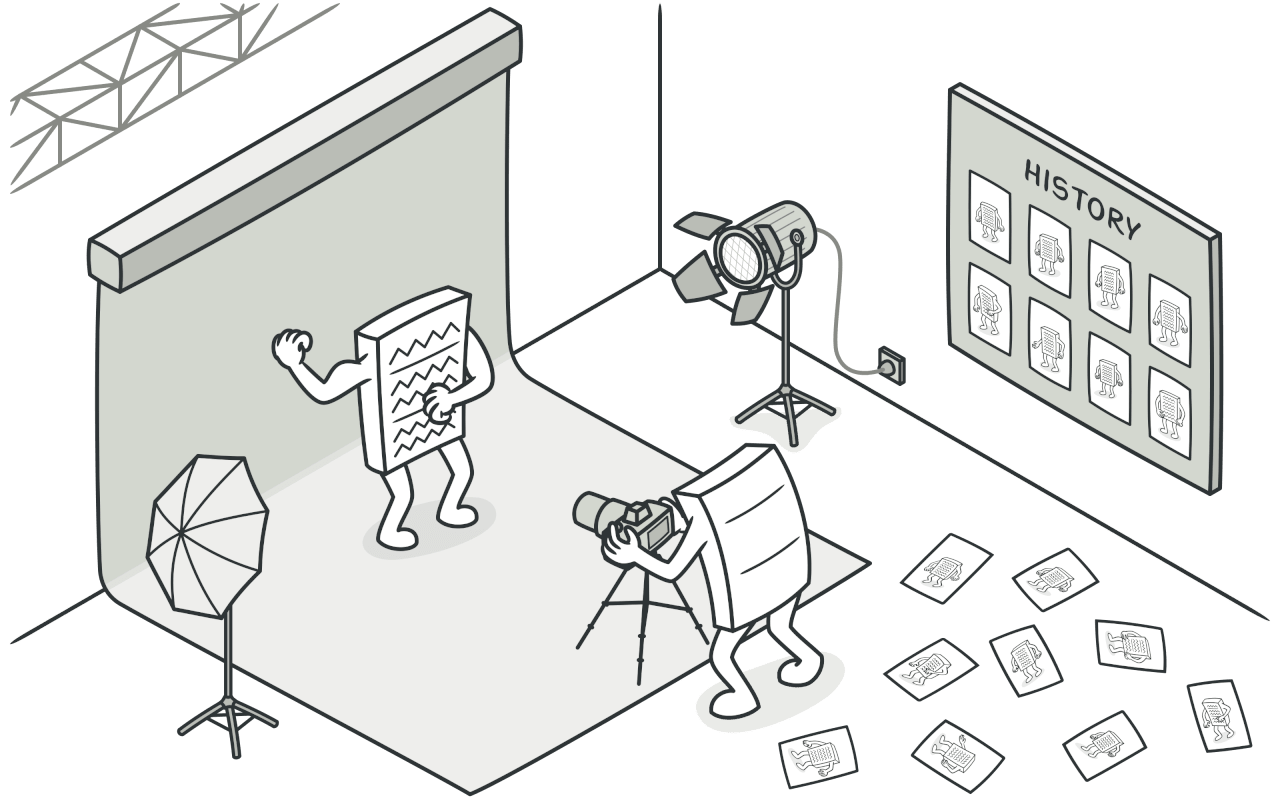
Problem
Imagine that you're creating a text editor app. In addition to simple text editing, your editor can format text, insert inline images, etc.
At some point, you decided to let users undo any operations carried out on the text. This feature has become so common over the years that nowadays people expect every app to have it. For the implementation, you chose to take the direct approach. Before performing any operation, the app records the state of all objects and saves it in some storage. Later, when a user decides to revert an action, the app fetches the latest snapshot from the history and uses it to restore the state of all objects.
Before executing an operation, the app saves a snapshot of the objects' state

Let's think about those state snapshots. How exactly would you produce one? You'd probably need to go over all the fields in an object and copy their values into storage. However, this would only work if the object had quite relaxed access restrictions to its contents. Unfortunately, most real objects won't let others peek inside them that easily, hiding all significant data in private fields.
Ignore that problem for now and let's assume that our objects behave like hippies: preferring open relations and keeping their state public. While this approach would solve the immediate problem and let you produce snapshots of objects' states at will, it still has some serious issues. In the future, you might decide to refactor some of the editor classes, or add or remove some of the fields. Sounds easy, but this would also require changing the classes responsible for copying the state of the affected objects.
Problem: Changing classes requires updating snapshot logic
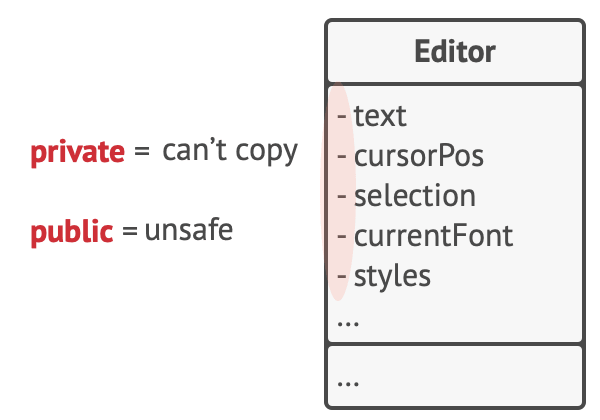
But there's more. Let's consider the actual "snapshots" of the editor's state. What data does it contain? At a bare minimum, it must contain the actual text, cursor coordinates, current scroll position, etc. To make a snapshot, you'd need to collect these values and put them into some kind of container.
Most likely, you're going to store lots of these container objects inside some list that would represent the history. Therefore the containers would probably end up being objects of one class. The class would have almost no methods, but lots of fields that mirror the editor's state. To allow other objects to write and read data to and from a snapshot, you'd probably need to make its fields public. That would expose all the editor's states, private or not. Other classes would become dependent on every little change to the snapshot class, which would otherwise happen within private fields and methods without affecting outer classes.
It looks like we've reached a dead end: you either expose all internal details of classes, making them too fragile, or restrict access to their state, making it impossible to produce snapshots. Is there any other way to implement the "undo"?
Solution
All problems that we've just experienced are caused by broken encapsulation. Some objects try to do more than they are supposed to. To collect the data required to perform some action, they invade the private space of other objects instead of letting these objects perform the actual action.
The Memento pattern delegates creating the state snapshots to the actual owner of that state, the originator object. Hence, instead of other objects trying to copy the editor's state from the "outside," the editor class itself can make the snapshot since it has full access to its own state.
The pattern suggests storing the copy of the object's state in a special object called memento. The contents of the memento aren't accessible to any other object except the one that produced it. Other objects must communicate with mementos using a limited interface which may allow fetching the snapshot's metadata (creation time, the name of the performed operation, etc.), but not the original object's state contained in the snapshot.
Solution: Originator has full access to memento, caretaker only accesses metadata

Such a restrictive policy lets you store mementos inside other objects, usually called caretakers. Since the caretaker works with the memento only via the limited interface, it's not able to tamper with the state stored inside the memento. At the same time, the originator has access to all fields inside the memento, allowing it to restore its previous state at will.
In our text editor example, we can create a separate history class to act as the caretaker. A stack of mementos stored inside the caretaker will grow each time the editor is about to execute an operation. You could even render this stack within the app's UI, displaying the history of previously performed operations to a user.
When a user triggers the undo, the history grabs the most recent memento from the stack and passes it back to the editor, requesting a roll-back. Since the editor has full access to the memento, it changes its own state with the values taken from the memento.
Structure
Implementation based on nested classes

Implementation based on an intermediate interface
There's an alternative implementation, suitable for programming languages that don't support nested classes (yeah, PHP, I'm talking about you).
Structure: Intermediate interface implementation

Structure: Command objects as caretakers
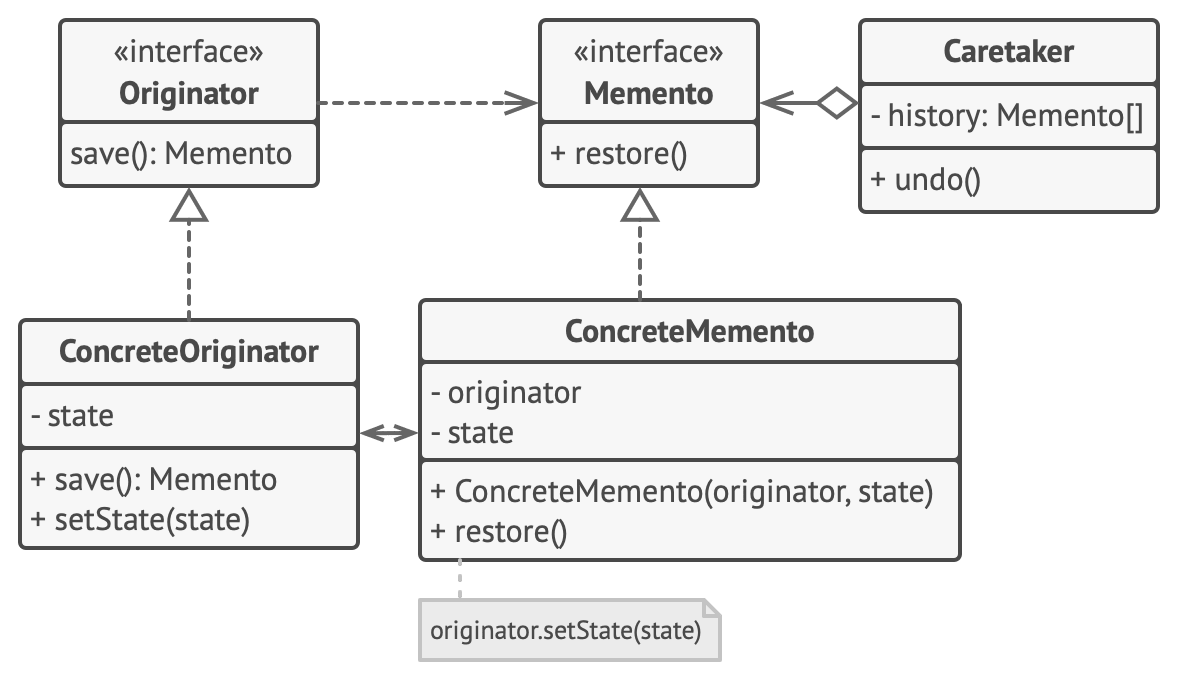
The command objects act as caretakers. They fetch the editor's memento before executing operations related to commands. When a user attempts to undo the most recent command, the editor can use the memento stored in that command to revert itself to the previous state.
The memento class doesn't declare any public fields, getters or setters. Therefore no object can alter its contents. Mementos are linked to the editor object that created them. This lets a memento restore the linked editor's state by passing the data via setters on the editor object. Since mementos are linked to specific editor objects, you can make your app support several independent editor windows with a centralized undo stack.
Pseudocode Example
// The originator holds some important data that may change over// time. It also defines a method for saving its state inside a// memento and another method for restoring the state from it.class Editor {private var text: String = ""private var curX: Int = 0private var curY: Int = 0private var selectionWidth: Int = 0fun setText(text: String) {this.text = text}fun setCursor(x: Int, y: Int) {this.curX = xthis.curY = y}fun setSelectionWidth(width: Int) {this.selectionWidth = width}// Saves the current state inside a memento.fun createSnapshot(): Snapshot {// Memento is an immutable object; that's why the// originator passes its state to the memento's// constructor parameters.return Snapshot(this, text, curX, curY, selectionWidth)}}// The memento class stores the past state of the editor.class Snapshot(private val editor: Editor,private val text: String,private val curX: Int,private val curY: Int,private val selectionWidth: Int) {// At some point, a previous state of the editor can be// restored using a memento object.fun restore() {editor.setText(text)editor.setCursor(curX, curY)editor.setSelectionWidth(selectionWidth)}}// A command object can act as a caretaker. In that case, the// command gets a memento just before it changes the// originator's state. When undo is requested, it restores the// originator's state from a memento.class Command(private val editor: Editor) {private var backup: Snapshot? = nullfun makeBackup() {backup = editor.createSnapshot()}fun undo() {backup?.restore()}// ...}
// The originator holds some important data that may change over// time. It also defines a method for saving its state inside a// memento and another method for restoring the state from it.class Editor {private text: string = "";private curX: number = 0;private curY: number = 0;private selectionWidth: number = 0;setText(text: string): void {this.text = text;}setCursor(x: number, y: number): void {this.curX = x;this.curY = y;}setSelectionWidth(width: number): void {this.selectionWidth = width;}// Saves the current state inside a memento.createSnapshot(): Snapshot {// Memento is an immutable object; that's why the// originator passes its state to the memento's// constructor parameters.return new Snapshot(this, this.text, this.curX, this.curY, this.selectionWidth);}}// The memento class stores the past state of the editor.class Snapshot {private editor: Editor;private text: string;private curX: number;private curY: number;private selectionWidth: number;constructor(editor: Editor, text: string, curX: number, curY: number, selectionWidth: number) {this.editor = editor;this.text = text;this.curX = curX;this.curY = curY;this.selectionWidth = selectionWidth;}// At some point, a previous state of the editor can be// restored using a memento object.restore(): void {this.editor.setText(this.text);this.editor.setCursor(this.curX, this.curY);this.editor.setSelectionWidth(this.selectionWidth);}}// A command object can act as a caretaker. In that case, the// command gets a memento just before it changes the// originator's state. When undo is requested, it restores the// originator's state from a memento.class Command {private editor: Editor;private backup: Snapshot | null = null;constructor(editor: Editor) {this.editor = editor;}makeBackup(): void {this.backup = this.editor.createSnapshot();}undo(): void {if (this.backup !== null) {this.backup.restore();}}// ...}
Applicability
Use the Memento pattern when you want to produce snapshots of the object's state to be able to restore a previous state of the object.
The Memento pattern lets you make full copies of an object's state, including private fields, and store them separately from the object. While most people remember this pattern thanks to the "undo" use case, it's also indispensable when dealing with transactions (i.e., if you need to roll back an operation on error).
Use the pattern when direct access to the object's fields/getters/setters violates its encapsulation.
The Memento makes the object itself responsible for creating a snapshot of its state. No other object can read the snapshot, making the original object's state data safe and secure.
How to Implement
Determine what class will play the role of the originator. It's important to know whether the program uses one central object of this type or multiple smaller ones.
Create the memento class. One by one, declare a set of fields that mirror the fields declared inside the originator class.
Make the memento class immutable. A memento should accept the data just once, via the constructor. The class should have no setters.
If your programming language supports nested classes, nest the memento inside the originator. If not, extract a blank interface from the memento class and make all other objects use it to refer to the memento. You may add some metadata operations to the interface, but nothing that exposes the originator's state.
Add a method for producing mementos to the originator class. The originator should pass its state to the memento via one or multiple arguments of the memento's constructor.
The return type of the method should be of the interface you extracted in the previous step (assuming that you extracted it at all). Under the hood, the memento-producing method should work directly with the memento class.
Add a method for restoring the originator's state to its class. It should accept a memento object as an argument. If you extracted an interface in the previous step, make it the type of the parameter. In this case, you need to typecast the incoming object to the memento class, since the originator needs full access to that object.
The caretaker, whether it represents a command object, a history, or something entirely different, should know when to request new mementos from the originator, how to store them and when to restore the originator with a particular memento.
The link between caretakers and originators may be moved into the memento class. In this case, each memento must be connected to the originator that had created it. The restoration method would also move to the memento class. However, this would all make sense only if the memento class is nested into originator or the originator class provides sufficient setters for overriding its state.
Pros and Cons
Pros:
You can produce snapshots of the object's state without violating its encapsulation.
You can simplify the originator's code by letting the caretaker maintain the history of the originator's state.
Cons:
The app might consume lots of RAM if clients create mementos too often.
Caretakers should track the originator's lifecycle to be able to destroy obsolete mementos.
Most dynamic programming languages, such as PHP, Python and JavaScript, can't guarantee that the state within the memento stays untouched.
Relations with Other Patterns
You can use Command and Memento together when implementing "undo". In this case, commands are responsible for performing various operations over a target object, while mementos save the state of that object just before a command gets executed.
You can use Memento along with Iterator to capture the current iteration state and roll it back if necessary.
Sometimes Prototype can be a simpler alternative to Memento. This works if the object, the state of which you want to store in the history, is fairly straightforward and doesn't have links to external resources, or the links are easy to re-establish.
Mediator
Also known as: Intermediary, Controller
Mediator is a behavioral design pattern that lets you reduce chaotic dependencies between objects. The pattern restricts direct communications between the objects and forces them to collaborate only via a mediator object.

Problem
Say you have a dialog for creating and editing customer profiles. It consists of various form controls such as text fields, checkboxes, buttons, etc.
Problem: Dialog with Various Form Controls

Some of the form elements may interact with others. For instance, selecting the "I have a dog" checkbox may reveal a hidden text field for entering the dog's name. Another example is the submit button that has to validate values of all fields before saving the data.
Problem: Elements Have Lots of Relations with Other Elements
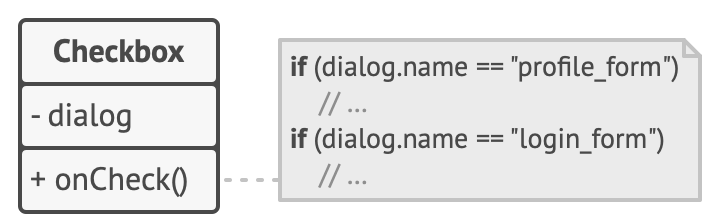
Elements can have lots of relations with other elements. Hence, changes to some elements may affect the others.
By having this logic implemented directly inside the code of the form elements you make these elements' classes much harder to reuse in other forms of the app. For example, you won't be able to use that checkbox class inside another form, because it's coupled to the dog's text field. You can use either all the classes involved in rendering the profile form, or none at all.
Solution
The Mediator pattern suggests that you should cease all direct communication between the components which you want to make independent of each other. Instead, these components must collaborate indirectly, by calling a special mediator object that redirects the calls to appropriate components. As a result, the components depend only on a single mediator class instead of being coupled to dozens of their colleagues.
In our example with the profile editing form, the dialog class itself may act as the mediator. Most likely, the dialog class is already aware of all of its sub-elements, so you won't even need to introduce new dependencies into this class.
Solution: Components Communicate via Mediator

The most significant change happens to the actual form elements. Let's consider the submit button. Previously, each time a user clicked the button, it had to validate the values of all individual form elements. Now its single job is to notify the dialog about the click. Upon receiving this notification, the dialog itself performs the validations or passes the task to the individual elements. Thus, instead of being tied to a dozen form elements, the button is only dependent on the dialog class.
You can go further and make the dependency even looser by extracting the common interface for all types of dialogs. The interface would declare the notification method which all form elements can use to notify the dialog about events happening to those elements. Thus, our submit button should now be able to work with any dialog that implements that interface.
This way, the Mediator pattern lets you encapsulate a complex web of relations between various objects inside a single mediator object. The fewer dependencies a class has, the easier it becomes to modify, extend or reuse that class.
Live Example
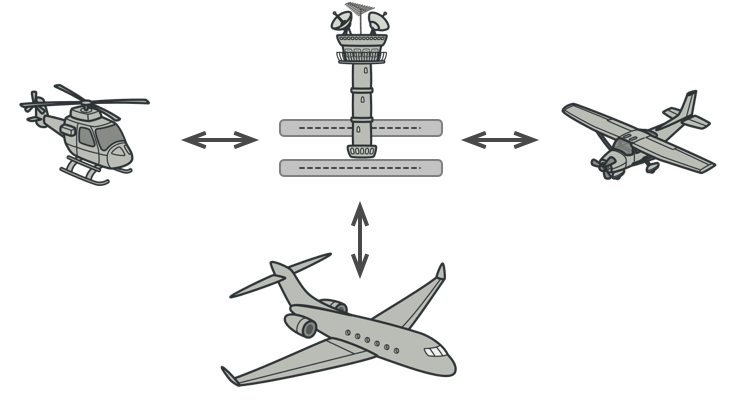
Real-World Analogy
Air traffic control tower
Aircraft pilots don't talk to each other directly when deciding who gets to land their plane next. All communication goes through the control tower.
Pilots of aircraft that approach or depart the airport control area don't communicate directly with each other. Instead, they speak to an air traffic controller, who sits in a tall tower somewhere near the airstrip. Without the air traffic controller, pilots would need to be aware of every plane in the vicinity of the airport, discussing landing priorities with a committee of dozens of other pilots. That would probably skyrocket the airplane crash statistics.
The tower doesn't need to control the whole flight. It exists only to enforce constraints in the terminal area because the number of involved actors there might be overwhelming to a pilot.
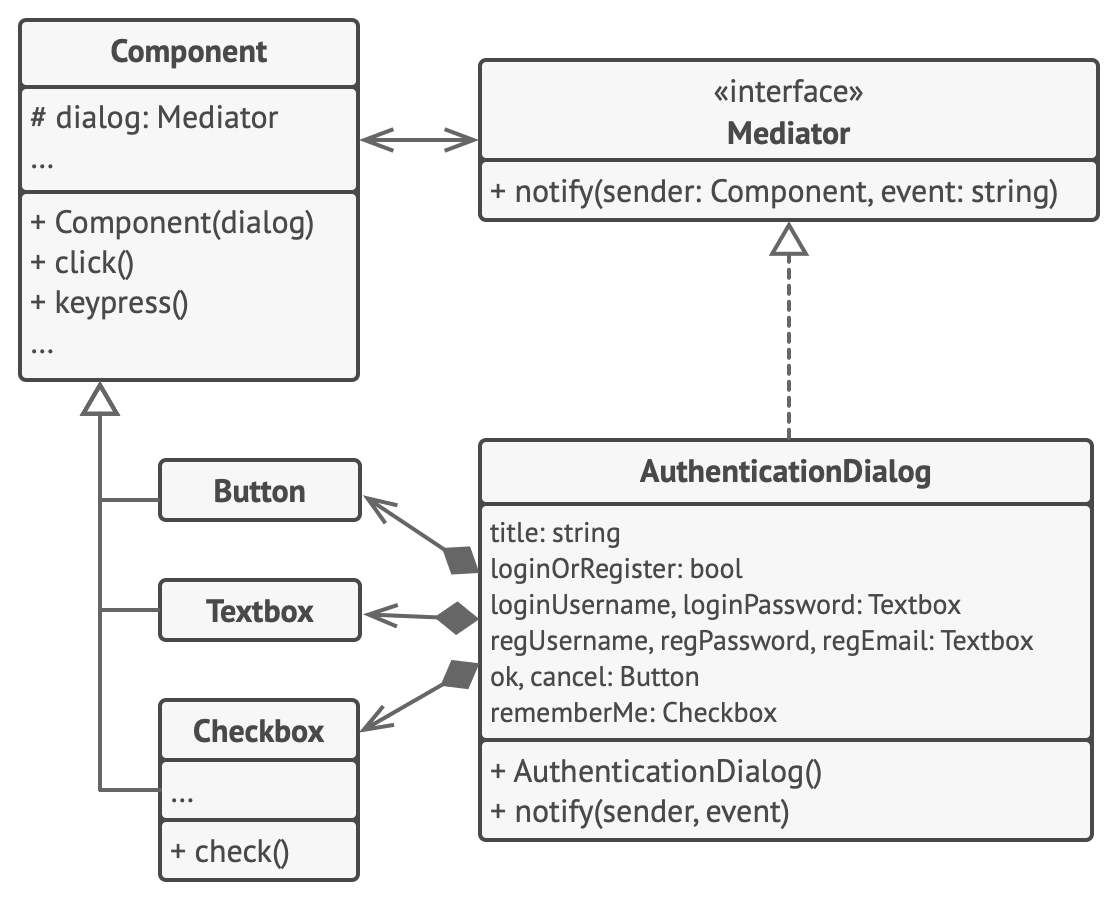
An element, triggered by a user, doesn't communicate with other elements directly, even if it looks like it's supposed to. Instead, the element only needs to let its mediator know about the event, passing any contextual info along with that notification.
In this example, the whole authentication dialog acts as the mediator. It knows how concrete elements are supposed to collaborate and facilitates their indirect communication. Upon receiving a notification about an event, the dialog decides what element should address the event and redirects the call accordingly.
Structure
// The mediator interface declares a method used by components// to notify the mediator about various events. The mediator may// react to these events and pass the execution to other// components.interface Mediator {fun notify(sender: Component, event: String)}// The concrete mediator class. The intertwined web of// connections between individual components has been untangled// and moved into the mediator.class AuthenticationDialog : Mediator {private var title: String = ""private lateinit var loginOrRegisterChkBx: Checkboxprivate lateinit var loginUsername: Textboxprivate lateinit var loginPassword: Textboxprivate lateinit var registrationUsername: Textboxprivate lateinit var registrationPassword: Textboxprivate lateinit var registrationEmail: Textboxprivate lateinit var okBtn: Buttonprivate lateinit var cancelBtn: Buttoninit {// Create all component objects by passing the current// mediator into their constructors to establish links.}// When something happens with a component, it notifies the// mediator. Upon receiving a notification, the mediator may// do something on its own or pass the request to another// component.override fun notify(sender: Component, event: String) {if (sender == loginOrRegisterChkBx && event == "check") {if (loginOrRegisterChkBx.checked) {title = "Log in"// 1. Show login form components.// 2. Hide registration form components.} else {title = "Register"// 1. Show registration form components.// 2. Hide login form components}}if (sender == okBtn && event == "click") {if (loginOrRegisterChkBx.checked) {// Try to find a user using login credentials.// if (!found) {// // Show an error message above the login// // field.// }} else {// 1. Create a user account using data from the// registration fields.// 2. Log that user in.// ...}}}}// Components communicate with a mediator using the mediator// interface. Thanks to that, you can use the same components in// other contexts by linking them with different mediator// objects.abstract class Component(protected val dialog: Mediator) {fun click() {dialog.notify(this, "click")}fun keypress() {dialog.notify(this, "keypress")}}// Concrete components don't talk to each other. They have only// one communication channel, which is sending notifications to// the mediator.class Button(dialog: Mediator) : Component(dialog) {// ...}class Textbox(dialog: Mediator) : Component(dialog) {// ...}class Checkbox(dialog: Mediator) : Component(dialog) {var checked: Boolean = falseprivate setfun check() {checked = !checkeddialog.notify(this, "check")}// ...}
// The mediator interface declares a method used by components// to notify the mediator about various events. The mediator may// react to these events and pass the execution to other// components.interface Mediator {notify(sender: Component, event: string): void;}// The concrete mediator class. The intertwined web of// connections between individual components has been untangled// and moved into the mediator.class AuthenticationDialog implements Mediator {private title: string = "";private loginOrRegisterChkBx!: Checkbox;private loginUsername!: Textbox;private loginPassword!: Textbox;private registrationUsername!: Textbox;private registrationPassword!: Textbox;private registrationEmail!: Textbox;private okBtn!: Button;private cancelBtn!: Button;constructor() {// Create all component objects by passing the current// mediator into their constructors to establish links.}// When something happens with a component, it notifies the// mediator. Upon receiving a notification, the mediator may// do something on its own or pass the request to another// component.notify(sender: Component, event: string): void {if (sender === this.loginOrRegisterChkBx && event === "check") {if (this.loginOrRegisterChkBx.checked) {this.title = "Log in";// 1. Show login form components.// 2. Hide registration form components.} else {this.title = "Register";// 1. Show registration form components.// 2. Hide login form components}}if (sender === this.okBtn && event === "click") {if (this.loginOrRegisterChkBx.checked) {// Try to find a user using login credentials.// if (!found) {// // Show an error message above the login// // field.// }} else {// 1. Create a user account using data from the// registration fields.// 2. Log that user in.// ...}}}}// Components communicate with a mediator using the mediator// interface. Thanks to that, you can use the same components in// other contexts by linking them with different mediator// objects.abstract class Component {constructor(protected dialog: Mediator) {}click(): void {this.dialog.notify(this, "click");}keypress(): void {this.dialog.notify(this, "keypress");}}// Concrete components don't talk to each other. They have only// one communication channel, which is sending notifications to// the mediator.class Button extends Component {// ...}class Textbox extends Component {// ...}class Checkbox extends Component {private _checked: boolean = false;get checked(): boolean {return this._checked;}check(): void {this._checked = !this._checked;this.dialog.notify(this, "check");}// ...}
Applicability
Use the Mediator pattern when it's hard to change some of the classes because they are tightly coupled to a bunch of other classes.
The pattern lets you extract all the relationships between classes into a separate class, isolating any changes to a specific component from the rest of the components.
Use the pattern when you can't reuse a component in a different program because it's too dependent on other components.
After you apply the Mediator, individual components become unaware of the other components. They could still communicate with each other, albeit indirectly, through a mediator object. To reuse a component in a different app, you need to provide it with a new mediator class.
Use the Mediator when you find yourself creating tons of component subclasses just to reuse some basic behavior in various contexts.
Since all relations between components are contained within the mediator, it's easy to define entirely new ways for these components to collaborate by introducing new mediator classes, without having to change the components themselves.
How to Implement
1. Identify a group of tightly coupled classes which would benefit from being more independent (e.g., for easier maintenance or simpler reuse of these classes).
2. Declare the mediator interface and describe the desired communication protocol between mediators and various components. In most cases, a single method for receiving notifications from components is sufficient.
This interface is crucial when you want to reuse component classes in different contexts. As long as the component works with its mediator via the generic interface, you can link the component with a different implementation of the mediator.
3. Implement the concrete mediator class. Consider storing references to all components inside the mediator. This way, you could call any component from the mediator's methods.
You can go even further and make the mediator responsible for the creation and destruction of component objects. After this, the mediator may resemble a factory or a facade.
4. Components should store a reference to the mediator object. The connection is usually established in the component's constructor, where a mediator object is passed as an argument.
5. Change the components' code so that they call the mediator's notification method instead of methods on other components. Extract the code that involves calling other components into the mediator class. Execute this code whenever the mediator receives notifications from that component.
Pros and Cons
Pros:
- Single Responsibility Principle. You can extract the communications between various components into a single place, making it easier to comprehend and maintain.
- Open/Closed Principle. You can introduce new mediators without having to change the actual components.
- You can reduce coupling between various components of a program.
- You can reuse individual components more easily.
Cons:
- Over time a mediator can evolve into a God Object.
Relations with Other Patterns
Chain of Responsibility, Command, Mediator and Observer address various ways of connecting senders and receivers of requests:
- Chain of Responsibility passes a request sequentially along a dynamic chain of potential receivers until one of them handles it.
- Command establishes unidirectional connections between senders and receivers.
- Mediator eliminates direct connections between senders and receivers, forcing them to communicate indirectly via a mediator object.
- Observer lets receivers dynamically subscribe to and unsubscribe from receiving requests.
Facade and Mediator have similar jobs: they try to organize collaboration between lots of tightly coupled classes.
- Facade defines a simplified interface to a subsystem of objects, but it doesn't introduce any new functionality. The subsystem itself is unaware of the facade. Objects within the subsystem can communicate directly.
- Mediator centralizes communication between components of the system. The components only know about the mediator object and don't communicate directly.
The difference between Mediator and Observer is often elusive. In most cases, you can implement either of these patterns; but sometimes you can apply both simultaneously. Let's see how we can do that.
The primary goal of Mediator is to eliminate mutual dependencies among a set of system components. Instead, these components become dependent on a single mediator object. The goal of Observer is to establish dynamic one-way connections between objects, where some objects act as subordinates of others.
There's a popular implementation of the Mediator pattern that relies on Observer. The mediator object plays the role of publisher, and the components act as subscribers which subscribe to and unsubscribe from the mediator's events. When Mediator is implemented this way, it may look very similar to Observer.
When you're confused, remember that you can implement the Mediator pattern in other ways. For example, you can permanently link all the components to the same mediator object. This implementation won't resemble Observer but will still be an instance of the Mediator pattern.
Now imagine a program where all components have become publishers, allowing dynamic connections between each other. There won't be a centralized mediator object, only a distributed set of observers.
Observer
design-patterns-observer-desc
Observer Pattern Overview
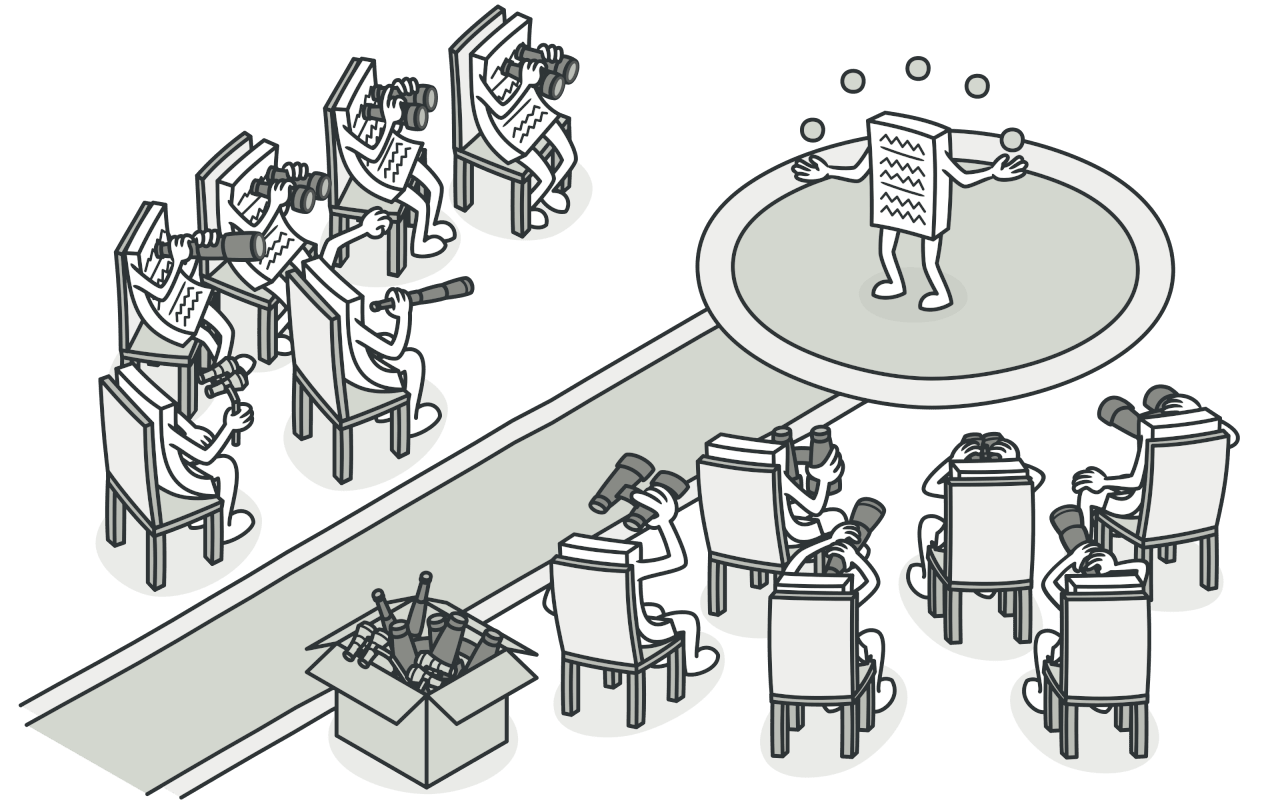
Intent
The observer pattern defines a subscription mechanism that lets one object notify multiple other objects about events that happen to the object it's observing.
Problem
Imagine two objects: a customer and a store. A customer eagerly awaits a new product. They could visit the store every day, wasting time, or the store could email every customer whenever a new product arrives, spamming uninterested people.
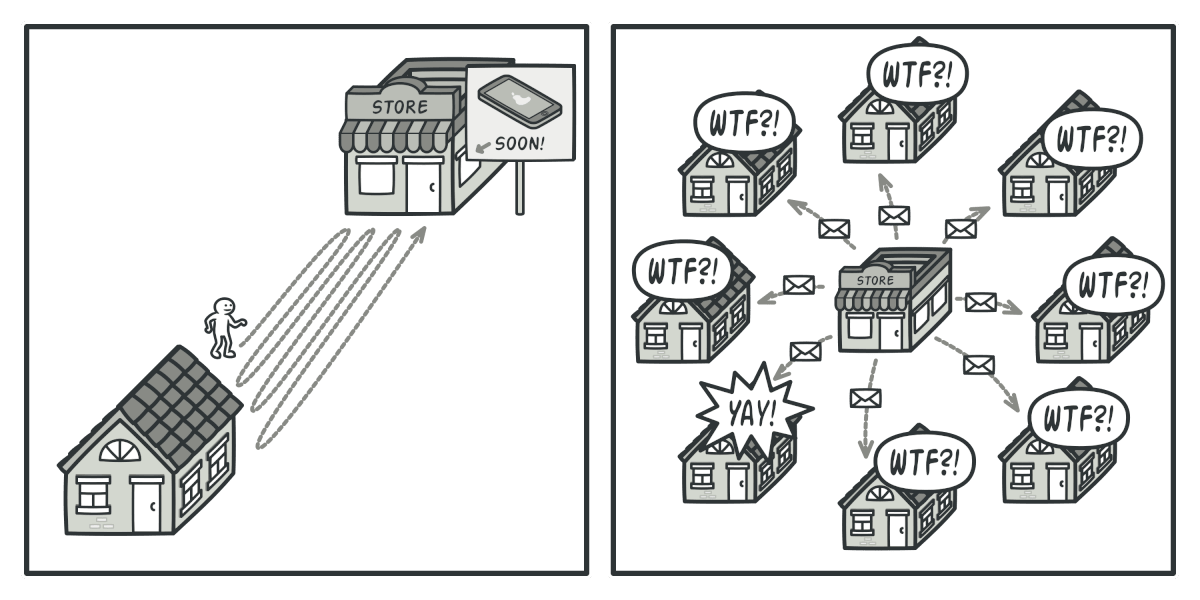
Solution
The object with interesting state is called the publisher; objects that track its state are subscribers. Add a subscription mechanism to the publisher—a list of subscriber references and methods for adding and removing subscribers—so subscribers can be notified of events.
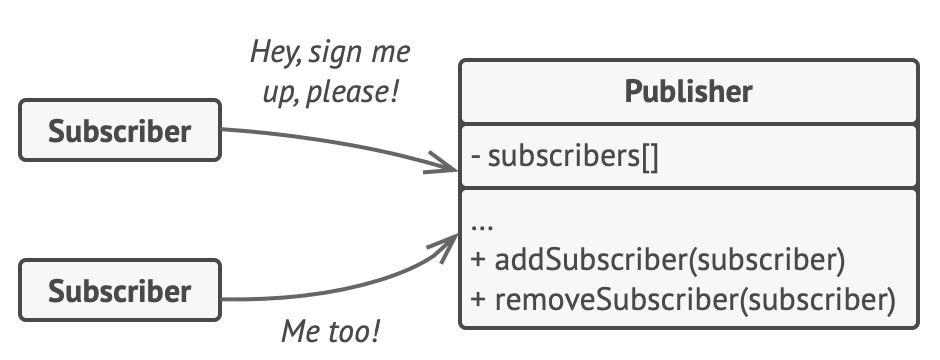
The publisher notifies subscribers by calling a notification method on each subscriber. All subscribers should implement the same interface so the publisher isn't coupled to concrete classes.
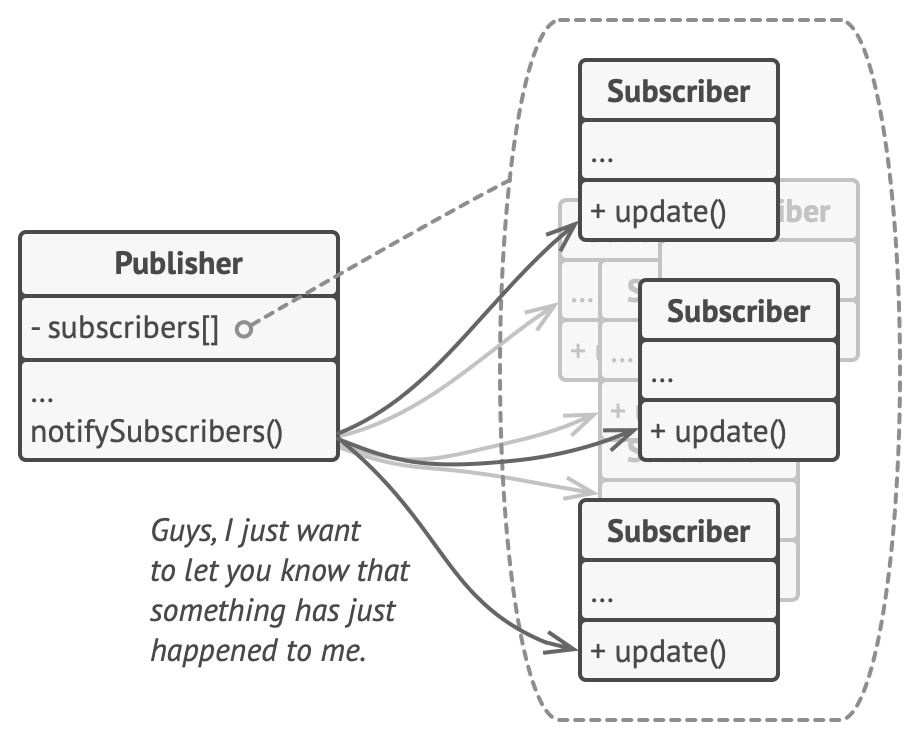
Real-World Analogy

Magazine and newspaper subscriptions work the same way. Instead of checking newsstands for a new issue, subscribers receive each issue automatically from the publisher. The publisher keeps a list of subscribers and can add or remove them at any time.
Structure
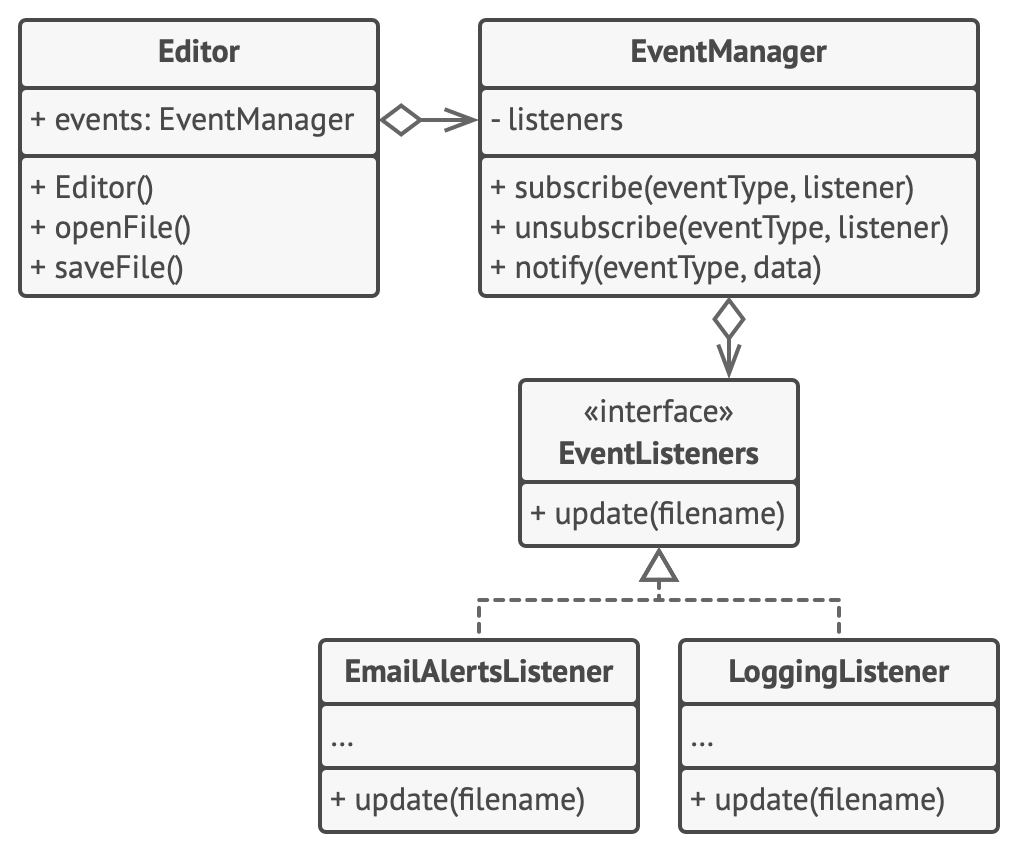
A publisher issues events when its state changes and maintains a subscription list. When an event happens, the publisher calls the update method declared in the subscriber interface on each subscriber. Concrete subscribers implement this interface to react to updates. A client creates publishers and subscribers and registers subscribers for publisher updates.
Code Example
// Observer: one-to-many; when subject changes, observers notifiedinterface Observer { fun update(data: String) }class Subject {private val observers = mutableListOf<Observer>()fun attach(o: Observer) { observers.add(o) }fun setState(s: String) { observers.forEach { it.update(s) } }}class ConcreteObserver(private val name: String) : Observer {override fun update(data: String) = println("$name: $data")}// Usageval sub = Subject()sub.attach(ConcreteObserver("A"))sub.setState("hello")
// Observer: one-to-many; when subject changes, observers notifiedinterface Observer { update(data: string): void; }class Subject {private observers: Observer[] = [];attach(o: Observer) { this.observers.push(o); }setState(s: string) { this.observers.forEach(o => o.update(s)); }}class ConcreteObserver implements Observer {constructor(private name: string) {}update(data: string) { console.log(this.name + ": " + data); }}// Usageconst sub = new Subject();sub.attach(new ConcreteObserver("A"));sub.setState("hello");
State
design-patterns-state-desc
State Pattern Overview

Intent
The state pattern lets an object alter its behavior when its internal state changes; it appears as if the object changed its class.
Problem
Programs often have a finite set of states, each with different behavior, and rules that define what transitions are allowed. Implementing these behaviors with conditional statements leads to bloated, hard‑to‑maintain code, especially as the number of states grows.
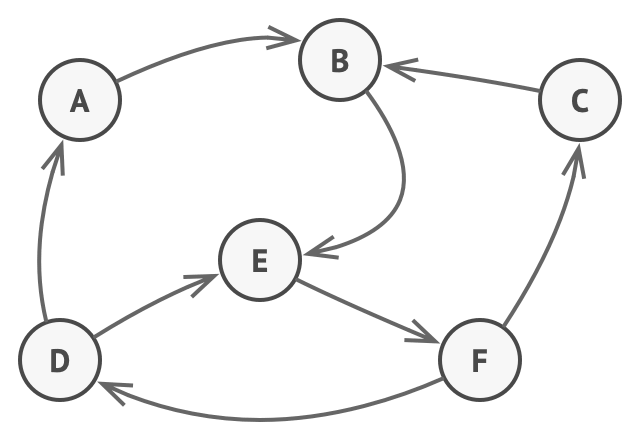
For example, a Document can be in Draft, Moderation or Published. Its publish method behaves differently in each state: it moves to moderation, publishes the document, or does nothing.
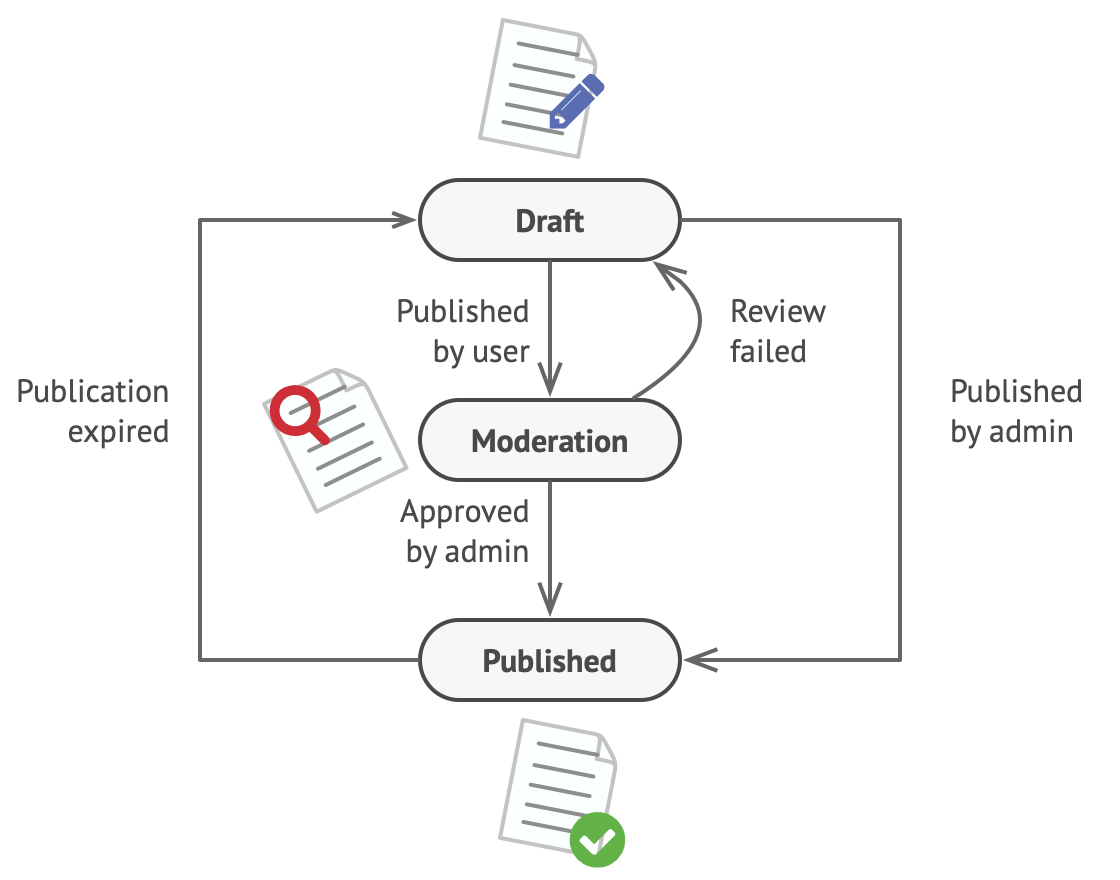
Solution
Define a separate class for each possible state and move state‑specific behavior into these classes. The original object (the context) stores a reference to a state object and delegates state‑dependent work to it.
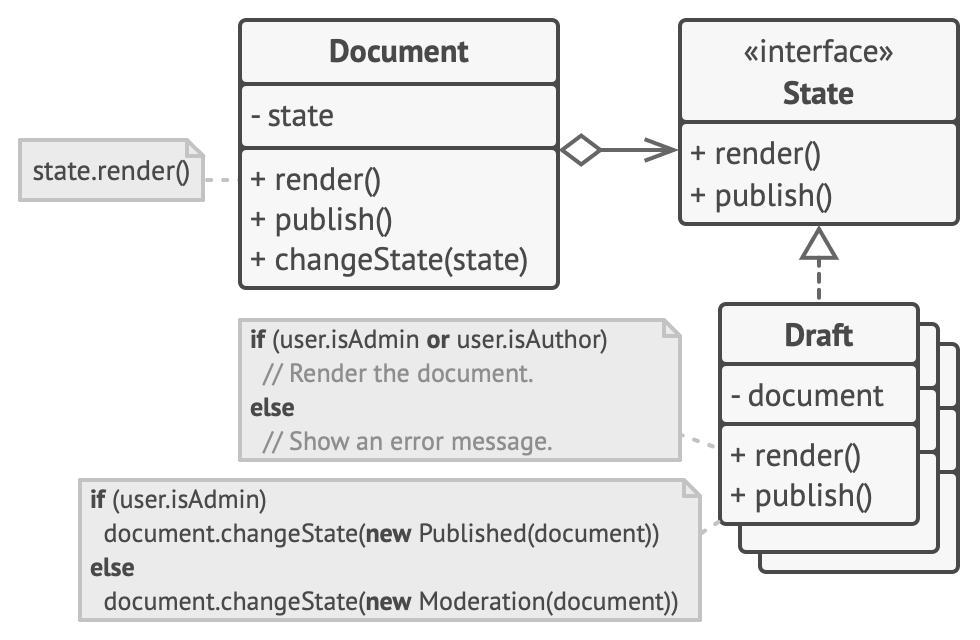
To change the state, the context replaces its current state object with another one that implements the same interface. Unlike strategies, states can know about and trigger transitions to other states.
Real-World Analogy
The buttons and switches on your smartphone behave differently depending on the phone's current state. When unlocked, buttons perform functions; when locked, buttons show the unlock screen; when the battery is low, they show the charging screen.
Structure
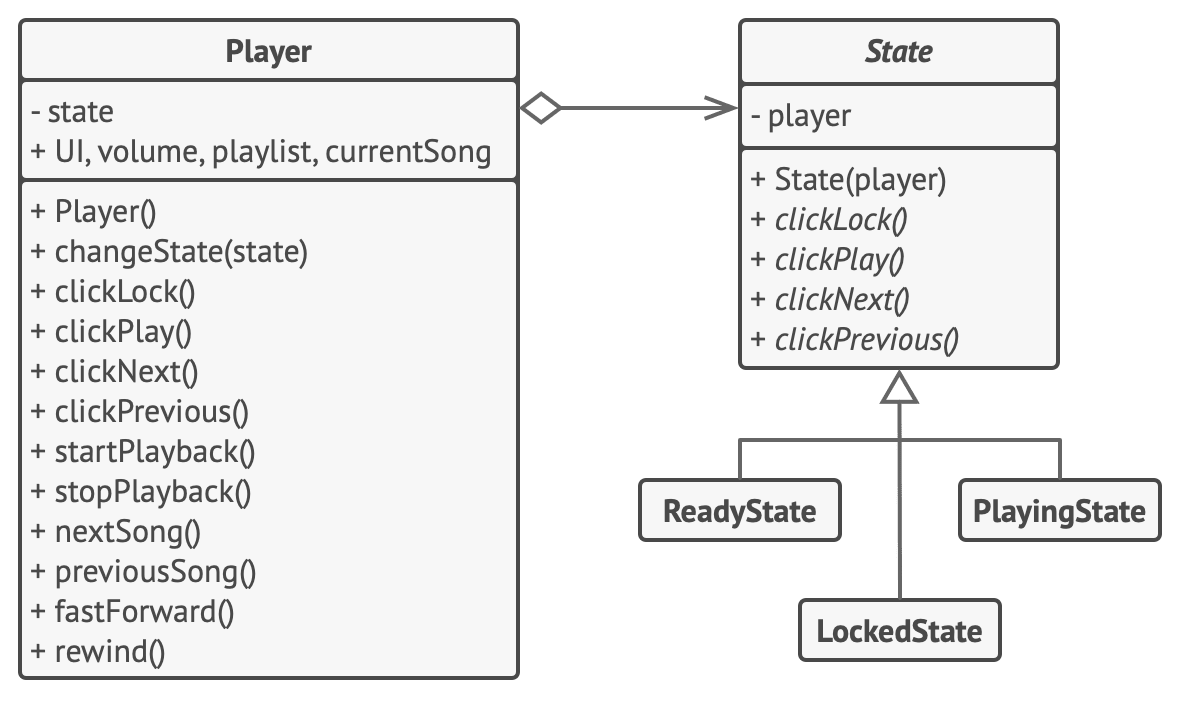
A context holds a reference to a state object and delegates to it all state‑specific work. The state interface declares methods common to all states. Concrete states implement these methods and can reference the context to trigger transitions. Both context and states can change the active state by replacing the state object.
Code Example
// State: object changes behavior when internal state changesinterface State { fun handle(context: Context): String }class Context(private var state: State) {fun setState(s: State) { state = s }fun request() = state.handle(this)}class ConcreteStateA : State {override fun handle(ctx: Context): String {ctx.setState(ConcreteStateB()); return "A"}}class ConcreteStateB : State {override fun handle(ctx: Context): String {ctx.setState(ConcreteStateA()); return "B"}}
// State: object changes behavior when internal state changesinterface State { handle(context: Context): string; }class Context {constructor(private state: State) {}setState(s: State) { this.state = s; }request() { return this.state.handle(this); }}class ConcreteStateA implements State {handle(ctx: Context) { ctx.setState(new ConcreteStateB()); return "A"; }}class ConcreteStateB implements State {handle(ctx: Context) { ctx.setState(new ConcreteStateA()); return "B"; }}
Strategy
design-patterns-strategy-desc
Strategy Pattern Overview

Intent
The strategy pattern defines a family of algorithms, encapsulates each in a separate class, and makes the algorithms interchangeable.
Problem
Consider a navigation app that must provide routes for driving, walking, public transport, cycling and more. Implementing every algorithm in a single class causes the class to grow dramatically and become difficult to maintain, with each change risking bugs and merge conflicts.
Solution
Extract each routing algorithm into its own strategy class. The original class (the context) stores a reference to a strategy object and delegates the route building to it. The context doesn't choose the algorithm itself; clients provide the desired strategy, and the context uses all strategies through a common interface.
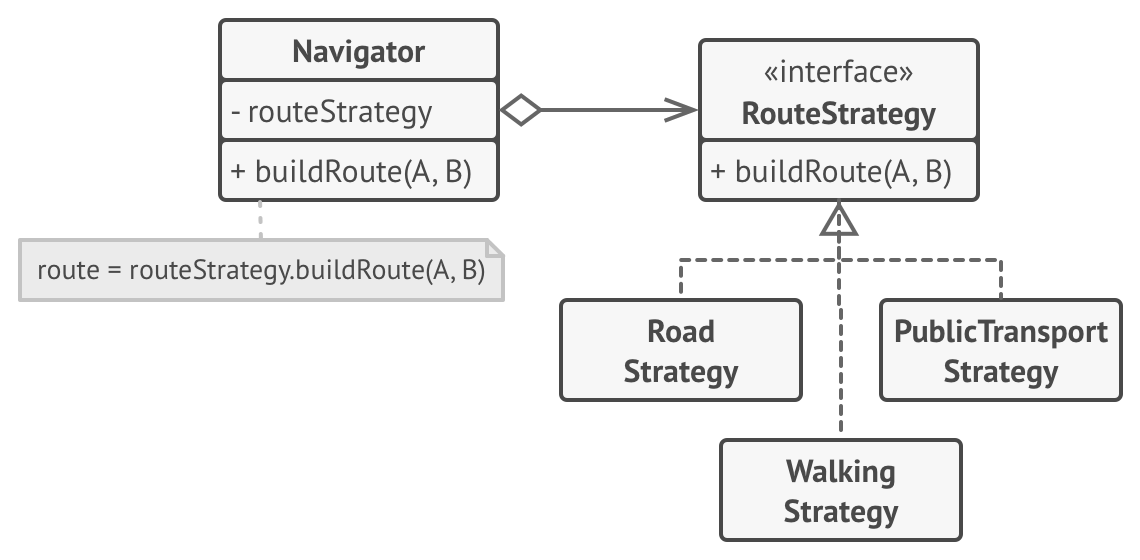
Because the context communicates with strategies via an interface, you can add new algorithms or modify existing ones without changing the context. Clients can switch strategies at runtime through a setter or similar mechanism.
Real-World Analogy

Getting to the airport offers multiple strategies. You might take a bus, order a cab or ride a bicycle. Each method is a different strategy you choose based on factors like budget or time.
Structure
A context holds a reference to a strategy and communicates with it through the strategy interface. Concrete strategies implement different versions of the algorithm. The context invokes the strategy's method whenever it needs the algorithm. Clients create strategies and assign them to the context, which can change strategies dynamically.
Code Example
// Strategy: family of algorithms, interchangeableinterface Strategy { fun execute(a: Int, b: Int): Int }class Add : Strategy { override fun execute(a: Int, b: Int) = a + b }class Multiply : Strategy { override fun execute(a: Int, b: Int) = a * b }class Context(private var strategy: Strategy) {fun setStrategy(s: Strategy) { strategy = s }fun run(a: Int, b: Int) = strategy.execute(a, b)}// Usageval ctx = Context(Add())ctx.run(2, 3) // 5ctx.setStrategy(Multiply())ctx.run(2, 3) // 6
// Strategy: family of algorithms, interchangeableinterface Strategy { execute(a: number, b: number): number; }class Add implements Strategy { execute(a: number, b: number) { return a + b; } }class Multiply implements Strategy { execute(a: number, b: number) { return a * b; } }class Context {constructor(private strategy: Strategy) {}setStrategy(s: Strategy) { this.strategy = s; }run(a: number, b: number) { return this.strategy.execute(a, b); }}// Usageconst ctx = new Context(new Add());ctx.run(2, 3); // 5ctx.setStrategy(new Multiply());ctx.run(2, 3); // 6
Template Method
design-patterns-template-method-desc
Template Method Pattern Overview
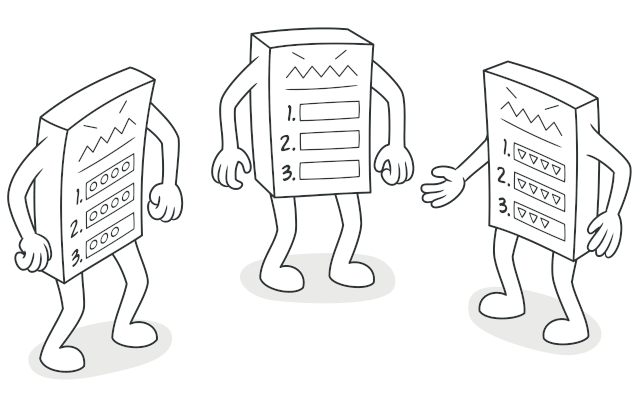
Intent
design-patterns-template-method-intent
Problem
design-patterns-template-method-problem
design-patterns-template-method-problem-2

design-patterns-template-method-problem-3
design-patterns-template-method-problem-4
Solution
design-patterns-template-method-solution
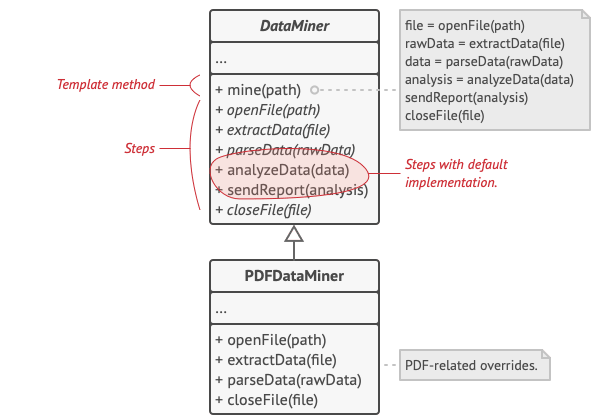
design-patterns-template-method-solution-2
- design-patterns-template-method-abstract-steps
- design-patterns-template-method-optional-steps
- design-patterns-template-method-hooks
Real-World Analogy

design-patterns-template-method-analogy
Structure
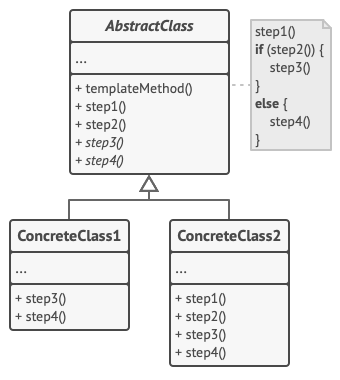
- The Abstract Class design-patterns-template-method-structure-1
- Concrete Classes design-patterns-template-method-structure-2
Code Example
// Template Method: skeleton in base, steps overriddenabstract class DataMiner {// Template method - defines the algorithm structurefun mine(path: String) {openFile(path)val rawData = extractData(path)val parsedData = parseData(rawData)analyzeData(parsedData)generateReport(parsedData)closeFile(path)}// Abstract step - must be implementedprotected abstract fun extractData(path: String): String// Optional steps with default implementationprotected open fun parseData(rawData: String): String {println("Parsing raw data...")return rawData.uppercase()}protected open fun analyzeData(data: String) {println("Analyzing data...")println("Found ${data.length} characters")}protected open fun generateReport(data: String) {println("Generating report...")println("Report: $data")}// Hooks - optional stepsprotected open fun openFile(path: String) {println("Opening file: $path")}protected open fun closeFile(path: String) {println("Closing file")}}class DOCDataMiner : DataMiner() {override fun extractData(path: String): String {println("Extracting data from DOC format...")return "DOC: Document content"}override fun openFile(path: String) {println("Opening DOC file: $path")}}// UsageDOCDataMiner().mine("document.doc")
// Template Method: skeleton in base, steps overriddenabstract class DataMiner {// Template method - defines the algorithm structuremine(path: string): void {this.openFile(path);const rawData = this.extractData(path);const parsedData = this.parseData(rawData);this.analyzeData(parsedData);this.generateReport(parsedData);this.closeFile(path);}// Abstract step - must be implementedprotected abstract extractData(path: string): string;// Optional steps with default implementationprotected parseData(rawData: string): string {console.log("Parsing raw data...");return rawData.toUpperCase();}protected analyzeData(data: string): void {console.log("Analyzing data...");console.log("Found " + data.length + " characters");}protected generateReport(data: string): void {console.log("Generating report...");console.log("Report: " + data);}// Hooks - optional stepsprotected openFile(path: string): void {console.log("Opening file: " + path);}protected closeFile(path: string): void {console.log("Closing file");}}class DOCDataMiner extends DataMiner {protected extractData(path: string): string {console.log("Extracting data from DOC format...");return "DOC: Document content";}protected openFile(path: string): void {console.log("Opening DOC file: " + path);}}// Usagenew DOCDataMiner().mine("document.doc");
Pseudocode Example
design-patterns-template-method-pseudocode
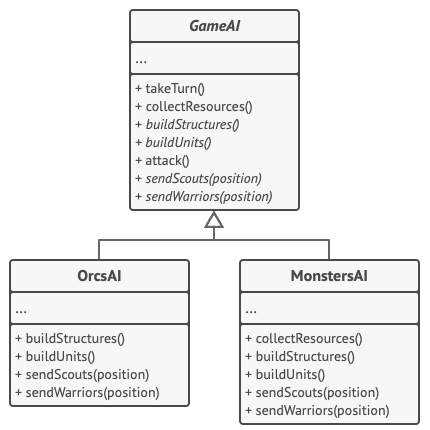
// Game AI example using Template Methodabstract class GameAI {// Template method - defines the skeletonfun turn() {collectResources()buildStructures()buildUnits()attack()}// Some steps implemented in base classfun collectResources() {builtStructures.forEach { it.collect() }}// Abstract steps - must be implementedabstract fun buildStructures()abstract fun buildUnits()// Template method with hooksfun attack() {val enemy = closestEnemy()if (enemy == null) {sendScouts(map.center)} else {sendWarriors(enemy.position)}}abstract fun sendScouts(position: Position)abstract fun sendWarriors(position: Position)}class OrcsAI : GameAI() {override fun buildStructures() {// Build farms, barracks, then stronghold}override fun buildUnits() {// Build units depending on resources}override fun sendScouts(position: Position) {// Send scouts to position}override fun sendWarriors(position: Position) {// Send warriors to position}}class MonstersAI : GameAI() {override fun collectResources() {// Monsters don't collect resources}override fun buildStructures() {// Monsters don't build structures}override fun buildUnits() {// Monsters don't build units}override fun sendScouts(position: Position) {// Monster scouting behavior}override fun sendWarriors(position: Position) {// Monster attack behavior}}
// Game AI example using Template Methodabstract class GameAI {// Template method - defines the skeletonturn(): void {this.collectResources();this.buildStructures();this.buildUnits();this.attack();}// Some steps implemented in base classcollectResources(): void {this.builtStructures.forEach(s => s.collect());}// Abstract steps - must be implementedprotected abstract buildStructures(): void;protected abstract buildUnits(): void;// Template method with hooksattack(): void {const enemy = this.closestEnemy();if (enemy == null) {this.sendScouts(this.map.center);} else {this.sendWarriors(enemy.position);}}protected abstract sendScouts(position: Position): void;protected abstract sendWarriors(position: Position): void;}class OrcsAI extends GameAI {protected buildStructures(): void {// Build farms, barracks, then stronghold}protected buildUnits(): void {// Build units depending on resources}protected sendScouts(position: Position): void {// Send scouts to position}protected sendWarriors(position: Position): void {// Send warriors to position}}class MonstersAI extends GameAI {collectResources(): void {// Monsters don't collect resources}protected buildStructures(): void {// Monsters don't build structures}protected buildUnits(): void {// Monsters don't build units}protected sendScouts(position: Position): void {// Monster scouting behavior}protected sendWarriors(position: Position): void {// Monster attack behavior}}
Applicability
- design-patterns-template-method-applicability-1
- design-patterns-template-method-applicability-2
- design-patterns-template-method-applicability-3
How to Implement
- design-patterns-template-method-implement-1
- design-patterns-template-method-implement-2
- design-patterns-template-method-implement-3
- design-patterns-template-method-implement-4
- design-patterns-template-method-implement-5
Pros and Cons
Pros:
- design-patterns-template-method-pros-1
- design-patterns-template-method-pros-2
Cons:
- design-patterns-template-method-cons-1
- design-patterns-template-method-cons-2
- design-patterns-template-method-cons-3
Relations with Other Patterns
design-patterns-template-method-relations-1
design-patterns-template-method-relations-2
Visitor
design-patterns-visitor-desc
// Visitor: add ops to objects without modifying theminterface Visitor { fun visitA(e: ElementA): String; fun visitB(e: ElementB): String }interface Element { fun accept(v: Visitor): String }class ElementA : Element {override fun accept(v: Visitor) = v.visitA(this)}class ElementB : Element {override fun accept(v: Visitor) = v.visitB(this)}class ConcreteVisitor : Visitor {override fun visitA(e: ElementA) = "visitA"override fun visitB(e: ElementB) = "visitB"}// UsageElementA().accept(ConcreteVisitor())
// Visitor: add ops to objects without modifying theminterface Visitor {visitA(e: ElementA): string;visitB(e: ElementB): string;}interface Element { accept(v: Visitor): string; }class ElementA implements Element {accept(v: Visitor) { return v.visitA(this); }}class ElementB implements Element {accept(v: Visitor) { return v.visitB(this); }}class ConcreteVisitor implements Visitor {visitA(e: ElementA) { return "visitA"; }visitB(e: ElementB) { return "visitB"; }}// Usagenew ElementA().accept(new ConcreteVisitor());