Docker from Zero to Hero: Complete Practical Guide
Master Docker containerization from the ground up. This comprehensive tutorial covers everything from basic concepts to production-ready deployments, with extensive code examples, best practices, and hands-on challenges to solidify your knowledge.
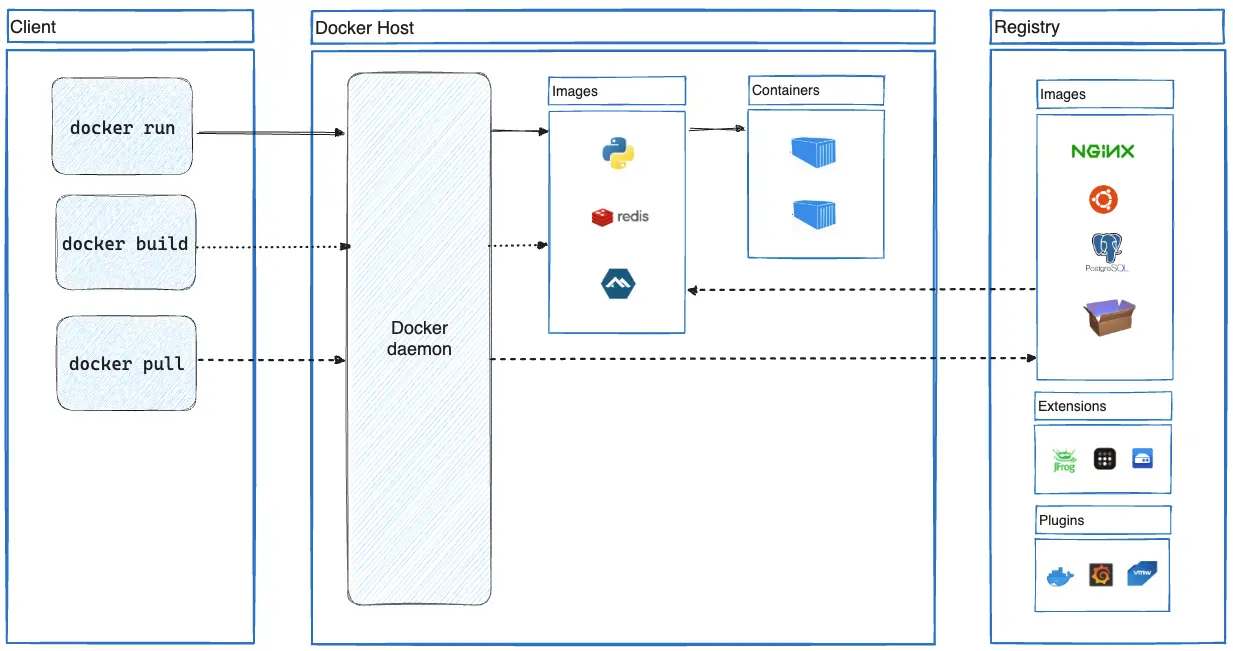
Table of Contents
1. What is Docker? (Containers vs VMs)

Docker is a platform for developing, shipping, and running applications in containers. Unlike virtual machines that virtualize hardware, containers virtualize the operating system, making them lightweight, fast, and portable.
Consistency: "Works on my machine" → "Works everywhere"
Isolation: Each container is isolated from others
Efficiency: Lightweight (MBs vs GBs), starts in seconds
Portability: Run on any system with Docker installed
Understanding Docker Concepts
# Docker is NOT a virtual machine!# Docker = Application Containerization Platform# Key differences from VMs:# - VMs virtualize HARDWARE (full OS per VM)# - Containers virtualize the OS (share kernel)# - Containers are LIGHTWEIGHT (MBs vs GBs)# - Containers start in SECONDS (vs minutes)# The problem Docker solves:# "Works on my machine" → "Works EVERYWHERE"# Your app + dependencies = Container# Runs identically on:# - Your laptop (macOS/Windows/Linux)# - CI/CD pipeline# - Production servers# - Cloud platforms (AWS, GCP, Azure)
Essential Terminology
# Essential Docker Terminology# IMAGE# - Blueprint/template for containers# - Read-only, immutable# - Built from a Dockerfile# - Stored in registries (Docker Hub, GHCR, ECR)# - Has layers (each instruction = layer)# CONTAINER# - Running instance of an image# - Isolated process with its own filesystem# - Can be started, stopped, removed# - Ephemeral by default (data lost when removed)# DOCKERFILE# - Text file with instructions to build an image# - Each instruction creates a layer# - Defines base image, files, commands, ports# REGISTRY# - Storage for Docker images# - Docker Hub (public), GHCR, AWS ECR, Google GCR# - Push/pull images like git push/pull# VOLUME# - Persistent data storage# - Survives container removal# - Can be shared between containers# NETWORK# - Virtual network for containers# - Containers on same network can communicate# - Isolation from host and other networks

2. Installing Docker
Docker Desktop is the easiest way to get started on macOS and Windows. For Linux, install the Docker Engine directly. After installation, verify everything works correctly.
Installation Commands
# Installation varies by OS:# macOS / Windows:# Download Docker Desktop from https://docker.com/products/docker-desktop# Install and start Docker Desktop# Ubuntu/Debian:sudo apt-get updatesudo apt-get install docker-ce docker-ce-cli containerd.io docker-compose-plugin# Add yourself to docker group (avoids sudo):sudo usermod -aG docker $USER# Log out and back in for this to take effect# Verify installation:docker --version# Docker version 24.0.7, build afdd53bdocker compose version# Docker Compose version v2.23.0
Verify Installation
# Verify Docker is working correctly:# 1. Check Docker daemon is runningdocker info# 2. Run the hello-world test containerdocker run hello-world# Expected output:# Hello from Docker!# This message shows that your installation appears to be working correctly.# 3. Check Docker Composedocker compose version# If all commands work, you're ready to go!
If docker run hello-world shows "Hello from Docker!", your installation is working. You're ready to start containerizing!
3. Essential Docker Commands
Master these commands and you can handle 90% of daily Docker operations. The most important command is docker run - it creates and starts containers from images.
Running Containers (docker run)
# docker run - The most important command# Syntax: docker run [OPTIONS] IMAGE [COMMAND]# Run nginx web server (foreground)docker run nginx# Run in DETACHED mode (background) with -ddocker run -d nginx# Give it a NAME with --namedocker run -d --name my-nginx nginx# Map PORTS with -p (host:container)docker run -d -p 8080:80 --name my-nginx nginx# Access at http://localhost:8080# Run and REMOVE automatically when stoppeddocker run --rm -d -p 8080:80 nginx# Run with ENVIRONMENT variablesdocker run -d -e MY_VAR=value nginx# Run with a specific TAG (version)docker run -d nginx:1.25-alpine# Run INTERACTIVELY with -it (for debugging)docker run -it ubuntu bash# You're now inside the container!
Container Management
# ========== CONTAINER MANAGEMENT ==========# List RUNNING containersdocker ps# List ALL containers (including stopped)docker ps -a# Stop a container (graceful shutdown)docker stop my-nginx# Start a stopped containerdocker start my-nginx# Restart a containerdocker restart my-nginx# Kill a container (force stop)docker kill my-nginx# Remove a container (must be stopped first)docker rm my-nginx# Force remove a running containerdocker rm -f my-nginx# Remove ALL stopped containersdocker container prune# Remove ALL containers (running and stopped)docker rm -f $(docker ps -aq)
Inspection & Debugging
# ========== INSPECT & DEBUG ==========# View container logsdocker logs my-nginx# Follow logs in real-time (like tail -f)docker logs -f my-nginx# Show last 100 linesdocker logs --tail 100 my-nginx# Show logs with timestampsdocker logs -t my-nginx# Execute command INSIDE running containerdocker exec my-nginx ls -la# Get interactive shell inside containerdocker exec -it my-nginx /bin/bash# Or for Alpine images:docker exec -it my-nginx /bin/sh# Inspect container details (JSON output)docker inspect my-nginx# Get specific field from inspectdocker inspect --format='{{.NetworkSettings.IPAddress}}' my-nginx# Show container resource usagedocker stats# Show processes inside containerdocker top my-nginx
Image Management
# ========== IMAGE MANAGEMENT ==========# List all local imagesdocker images# Pull an image from registrydocker pull nginxdocker pull nginx:1.25-alpinedocker pull node:20-alpine# Search for images on Docker Hubdocker search nginx# Remove an imagedocker rmi nginx# Remove unused imagesdocker image prune# Remove ALL imagesdocker rmi $(docker images -q)# Tag an image (for pushing to registry)docker tag my-app:latest myregistry/my-app:v1.0# Push to registry (must be logged in)docker push myregistry/my-app:v1.0# Login to Docker Hubdocker login# Login to other registriesdocker login ghcr.iodocker login ecr.aws
Use docker exec -it container_name sh to get a shell inside any running container. This is invaluable for debugging! Use /bin/bash if available, /bin/sh for Alpine images.
4. Dockerfile Deep Dive
A Dockerfile is a text file with instructions to build a Docker image. Each instruction creates a layer in the image. Understanding Dockerfile syntax is crucial for creating efficient, secure, and production-ready containers.
Dockerfile Instructions Reference
# ========== DOCKERFILE BASICS ==========
# A Dockerfile is a recipe to build an image

# FROM - Base image (REQUIRED, must be first)
FROM node:20-alpine

# WORKDIR - Set working directory (creates if not exists)
WORKDIR /app

# COPY - Copy files from host to image
COPY package.json ./
COPY . .

# ADD - Like COPY, but can also:
# - Extract tar archives
# - Download from URLs (not recommended)
ADD archive.tar.gz /app/

# RUN - Execute commands during build
RUN npm install
RUN apt-get update && apt-get install -y curl

# ENV - Set environment variables
ENV NODE_ENV=production
ENV PORT=3000

# ARG - Build-time variables (not available at runtime)
ARG VERSION=1.0
RUN echo "Building version $VERSION"

# EXPOSE - Document which ports the container listens on
# (doesn't actually publish the port!)
EXPOSE 3000

# CMD - Default command when container starts
# Only ONE CMD per Dockerfile (last one wins)
CMD ["npm", "start"]

# ENTRYPOINT - Like CMD, but harder to override
ENTRYPOINT ["npm"]
CMD ["start"]
# Running: docker run my-app test → runs "npm test"
Production Node.js Dockerfile
This Dockerfile follows best practices: non-root user, health check, proper layer ordering, and security considerations.
# Production-ready Node.js Dockerfile
FROM node:20-alpine

# Create non-root user for security
RUN addgroup -g 1001 -S nodejs && \
    adduser -S nodejs -u 1001

# Set working directory
WORKDIR /app

# Copy package files first (better layer caching)
COPY package.json package-lock.json ./

# Install dependencies
RUN npm ci --only=production && \
    npm cache clean --force

# Copy application code
COPY --chown=nodejs:nodejs . .

# Switch to non-root user
USER nodejs

# Set environment variables
ENV NODE_ENV=production
ENV PORT=3000

# Expose port (documentation)
EXPOSE 3000

# Health check
HEALTHCHECK --interval=30s --timeout=3s --start-period=5s --retries=3 \
    CMD wget --no-verbose --tries=1 --spider http://localhost:3000/health || exit 1

# Start the application
CMD ["node", "server.js"]
Production Python Dockerfile
# Production-ready Python Dockerfile
FROM python:3.12-slim

# Prevent Python from writing .pyc files
ENV PYTHONDONTWRITEBYTECODE=1
# Prevent Python from buffering stdout/stderr
ENV PYTHONUNBUFFERED=1

# Create non-root user
RUN useradd --create-home --shell /bin/bash appuser

# Set working directory
WORKDIR /app

# Install system dependencies
RUN apt-get update && apt-get install -y --no-install-recommends \
    gcc \
    && rm -rf /var/lib/apt/lists/*

# Copy requirements first (layer caching)
COPY requirements.txt .

# Install Python dependencies
RUN pip install --no-cache-dir -r requirements.txt

# Copy application code
COPY --chown=appuser:appuser . .

# Switch to non-root user
USER appuser

# Expose port
EXPOSE 8000

# Health check
HEALTHCHECK --interval=30s --timeout=3s \
    CMD curl -f http://localhost:8000/health || exit 1

# Run with gunicorn for production
CMD ["gunicorn", "--bind", "0.0.0.0:8000", "--workers", "4", "app:app"]
Production Go Dockerfile (Multi-Stage)
Go applications can use scratch as the base image for minimal container size. The resulting image contains only the static binary!
# Production-ready Go Dockerfile (multi-stage)
# Stage 1: Build
FROM golang:1.22-alpine AS builder

WORKDIR /app

# Copy go mod files first
COPY go.mod go.sum ./
RUN go mod download

# Copy source code
COPY . .

# Build the binary
# CGO_ENABLED=0 for static binary
# -ldflags="-w -s" strips debug info (smaller binary)
RUN CGO_ENABLED=0 GOOS=linux go build -ldflags="-w -s" -o /app/server .

# Stage 2: Runtime (minimal image)
FROM scratch

# Copy SSL certificates for HTTPS
COPY --from=builder /etc/ssl/certs/ca-certificates.crt /etc/ssl/certs/

# Copy the binary
COPY --from=builder /app/server /server

# Expose port
EXPOSE 8080

# Run as non-root (numeric UID for scratch)
USER 65534

# Run the binary
ENTRYPOINT ["/server"]
Dockerfile Best Practices
# ========== DOCKERFILE BEST PRACTICES ==========

# 1. Use specific base image tags (not :latest)
# BAD:
FROM node:latest

# GOOD:
FROM node:20.11-alpine3.19

# 2. Order instructions by change frequency
# (less frequent changes first for better caching)
FROM node:20-alpine
WORKDIR /app
COPY package*.json ./      # Changes less often
RUN npm ci
COPY . .                   # Changes more often

# 3. Combine RUN commands (fewer layers)
# BAD:
RUN apt-get update
RUN apt-get install -y curl
RUN apt-get install -y git

# GOOD:
RUN apt-get update && apt-get install -y \
    curl \
    git \
    && rm -rf /var/lib/apt/lists/*

# 4. Use .dockerignore
# Create .dockerignore file:
# node_modules
# .git
# .env
# *.log
# Dockerfile
# docker-compose.yml

# 5. Don't run as root
RUN addgroup -S appgroup && adduser -S appuser -G appgroup
USER appuser

# 6. Use COPY instead of ADD (unless you need tar extraction)

# 7. Use multi-stage builds for smaller images

# 8. Set proper labels
LABEL maintainer="you@example.com"
LABEL version="1.0"
LABEL description="My awesome app"
.dockerignore File
Always create a .dockerignore file to exclude unnecessary files from the build context. This speeds up builds and prevents sensitive files from being included.
# .dockerignore - Files to exclude from build context# Dependenciesnode_modulesnpm-debug.logyarn-error.log# Build outputsdistbuild*.egg-info# Version control.git.gitignore.svn# IDE and editors.idea.vscode*.swp*.swo# Environment and secrets.env.env.local.env.*.local*.pem*.key# Docker files (not needed in image)Dockerfile*docker-compose*.dockerignore# DocumentationREADME.mddocs*.md# Teststests__tests__*.test.js*.spec.jscoverage# Misc.DS_StoreThumbs.db*.log
5. Understanding Image Layers & Caching
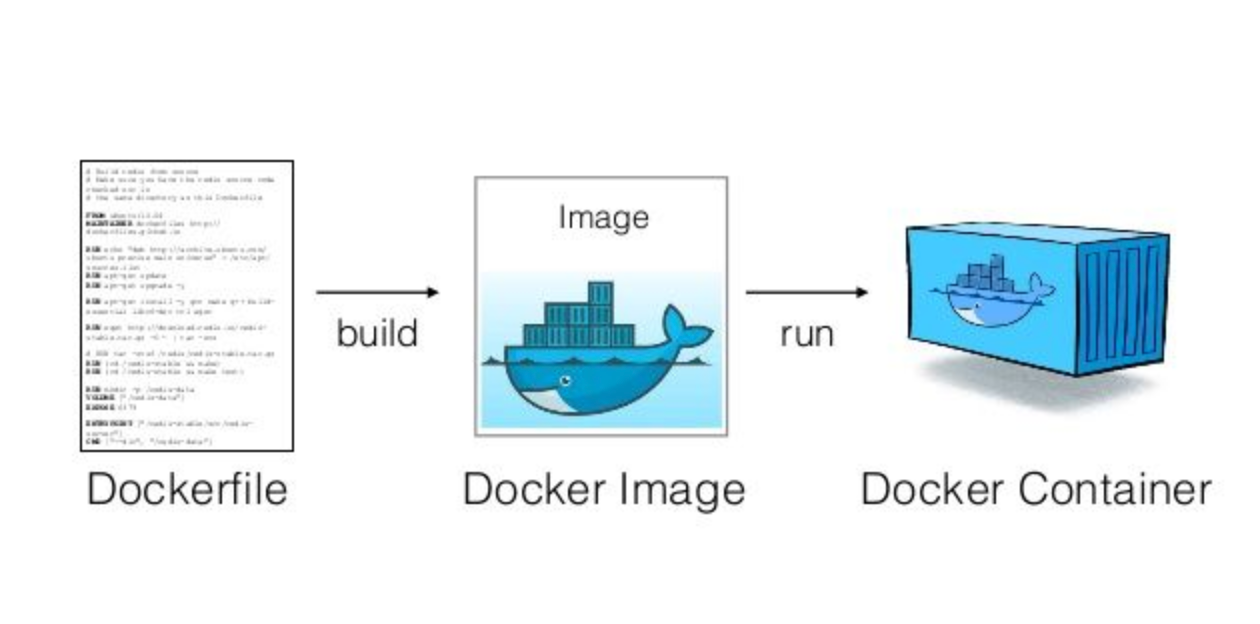
Docker images are made of layers. Each Dockerfile instruction creates a new layer. Understanding layers is key to creating efficient images and leveraging Docker's build cache.
How Layers Work
# ========== UNDERSTANDING IMAGE LAYERS ==========# Each Dockerfile instruction creates a LAYER# Layers are cached and reused# Example Dockerfile:FROM node:20-alpine # Layer 1: Base imageWORKDIR /app # Layer 2: Set workdirCOPY package.json ./ # Layer 3: Copy package.jsonRUN npm install # Layer 4: Install depsCOPY . . # Layer 5: Copy sourceCMD ["npm", "start"] # Layer 6: Set command# View image layers:docker history my-app:latest# Key caching rules:# 1. If a layer changes, ALL subsequent layers rebuild# 2. COPY/ADD invalidate cache if file contents change# 3. RUN commands always produce same layer if command unchanged# This is why we copy package.json BEFORE source code:# - package.json rarely changes# - source code changes often# - npm install layer is cached when package.json unchanged
Build Cache Optimization
# ========== BUILD CACHE OPTIMIZATION ==========# Build with cache (default)docker build -t my-app .# Build without cache (force rebuild)docker build --no-cache -t my-app .# See cache usage during builddocker build --progress=plain -t my-app .# Use BuildKit for better caching (recommended)DOCKER_BUILDKIT=1 docker build -t my-app .# Mount cache for package managers (BuildKit feature)# Dockerfile:# syntax=docker/dockerfile:1FROM node:20-alpineWORKDIR /appCOPY package*.json ./RUN --mount=type=cache,target=/root/.npm npm ciCOPY . .CMD ["npm", "start"]# This caches npm packages between builds!
Order Dockerfile instructions from least to most frequently changing. Copy package.json before source code, install dependencies, then copy the rest. This way, dependency installation is cached when only source code changes.
6. Volumes & Data Persistence
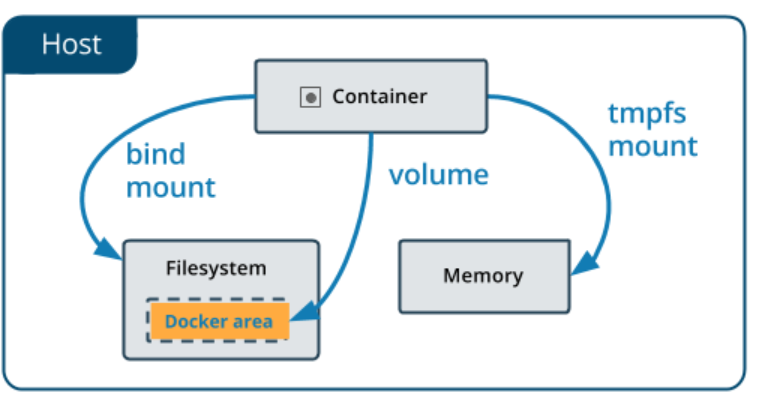

Containers are ephemeral - when you remove them, their data is gone. Volumes provide persistent storage that survives container lifecycle. Use named volumes for databases and bind mounts for development workflows.
Volume Types
# ========== VOLUME TYPES ==========# 1. NAMED VOLUMES (recommended for data)# Managed by Docker, stored in Docker's storage areadocker volume create mydatadocker run -v mydata:/app/data my-app# 2. BIND MOUNTS (for development)# Maps host directory to container directorydocker run -v /host/path:/container/path my-appdocker run -v $(pwd):/app my-app# 3. TMPFS MOUNTS (temporary, in memory)# Data only exists while container runsdocker run --tmpfs /app/temp my-app# Key differences:# Named Volume: Docker manages location, good for databases# Bind Mount: You control location, good for dev (live reload)# tmpfs: In memory only, good for secrets/temp files
Volume Management
# ========== VOLUME MANAGEMENT ==========# Create a named volumedocker volume create mydata# List all volumesdocker volume ls# Inspect a volume (see where it's stored)docker volume inspect mydata# Remove a volume (fails if in use)docker volume rm mydata# Remove ALL unused volumesdocker volume prune# Run container with named volumedocker run -d \--name postgres-db \-v pgdata:/var/lib/postgresql/data \-e POSTGRES_PASSWORD=secret \postgres:16# The data persists even if container is removed!docker rm -f postgres-dbdocker run -d \--name postgres-db-new \-v pgdata:/var/lib/postgresql/data \-e POSTGRES_PASSWORD=secret \postgres:16# Your data is still there!
Bind Mounts for Development
# ========== BIND MOUNTS FOR DEVELOPMENT ==========# Mount current directory for live code reloaddocker run -d \--name dev-app \-p 3000:3000 \-v $(pwd):/app \-v /app/node_modules \node:20-alpine npm run dev# The second -v creates an anonymous volume for node_modules# This prevents host node_modules from overwriting container's# Read-only bind mount (container can't modify)docker run -v $(pwd)/config:/app/config:ro my-app# Common development setup:docker run -d \--name my-dev \-p 3000:3000 \-v $(pwd)/src:/app/src \-v $(pwd)/public:/app/public \-e NODE_ENV=development \my-app
Named Volumes: Database data, persistent application state
Bind Mounts: Development (live code reload), config files
tmpfs: Sensitive data that shouldn't persist
7. Docker Networking


Docker creates virtual networks for containers to communicate. By default, containers are isolated. Create custom networks to enable container-to-container communication using hostnames.
Networking Basics
# ========== DOCKER NETWORKING BASICS ==========# Docker network types:# 1. bridge (default) - Isolated network on host# 2. host - Use host's network directly# 3. none - No networking# 4. overlay - Multi-host networking (Swarm)# List networksdocker network ls# Create a custom bridge networkdocker network create my-network# Inspect a networkdocker network inspect my-network# Remove a networkdocker network rm my-network# Remove all unused networksdocker network prune
Container Communication
# ========== CONTAINERS TALKING TO EACH OTHER ==========# Create a network for your appdocker network create app-network# Run database on the networkdocker run -d \--name postgres \--network app-network \-e POSTGRES_PASSWORD=secret \-e POSTGRES_USER=app \-e POSTGRES_DB=myapp \postgres:16# Run your app on the same networkdocker run -d \--name api \--network app-network \-p 3000:3000 \-e DATABASE_URL=postgres://app:secret@postgres:5432/myapp \my-app# Key insight: Container name = hostname on the network# 'api' can reach 'postgres' using hostname 'postgres'# Connect existing container to networkdocker network connect app-network existing-container# Disconnect from networkdocker network disconnect app-network existing-container
Port Mapping
# ========== PORT MAPPING ==========# Syntax: -p HOST_PORT:CONTAINER_PORT# Map port 8080 on host to 80 in containerdocker run -p 8080:80 nginx# Map multiple portsdocker run -p 8080:80 -p 8443:443 nginx# Map to specific host interfacedocker run -p 127.0.0.1:8080:80 nginx # localhost onlydocker run -p 0.0.0.0:8080:80 nginx # all interfaces# Random host port (Docker chooses)docker run -p 80 nginx# Check which port was assigned:docker port container_name# Expose all ports defined in Dockerfiledocker run -P nginx# UDP port mappingdocker run -p 53:53/udp dns-server
On a user-defined network, containers can reach each other using their container names as hostnames. This is how your app connects to the database: postgres://db:5432
8. Docker Compose: Multi-Container Applications
Docker Compose lets you define and run multi-container applications with a single YAML file. Instead of running multiple docker run commands, define everything indocker-compose.yml and use docker compose up.
Basic docker-compose.yml
# docker-compose.yml - Define multi-container apps# File: docker-compose.ymlservices:# Web applicationweb:build: .ports:- "3000:3000"environment:- NODE_ENV=production- DATABASE_URL=postgres://app:secret@db:5432/myappdepends_on:- db- redisrestart: unless-stopped# PostgreSQL databasedb:image: postgres:16-alpineenvironment:POSTGRES_USER: appPOSTGRES_PASSWORD: secretPOSTGRES_DB: myappvolumes:- pgdata:/var/lib/postgresql/dataports:- "5432:5432"# Redis cacheredis:image: redis:7-alpineports:- "6379:6379"# Named volumes (persist data)volumes:pgdata:
Compose Commands
# ========== DOCKER COMPOSE COMMANDS ==========# Start all services (detached)docker compose up -d# Start and rebuild imagesdocker compose up -d --build# Start specific servicedocker compose up -d web# Stop all servicesdocker compose stop# Stop and remove containersdocker compose down# Stop and remove containers + volumes (deletes data!)docker compose down -v# View running servicesdocker compose ps# View logsdocker compose logsdocker compose logs -f web # Follow specific service# Execute command in servicedocker compose exec web sh# Scale a servicedocker compose up -d --scale web=3# Pull latest imagesdocker compose pull# Build images without startingdocker compose build
Advanced Configuration
Production-ready compose file with health checks, secrets, resource limits, and more.
# Advanced docker-compose.yml featuresservices:api:build:context: .dockerfile: Dockerfileargs:- NODE_ENV=productionimage: my-api:latestcontainer_name: my-apiports:- "3000:3000"environment:- NODE_ENV=productionenv_file:- .envvolumes:- ./logs:/app/logsnetworks:- frontend- backenddepends_on:db:condition: service_healthyhealthcheck:test: ["CMD", "curl", "-f", "http://localhost:3000/health"]interval: 30stimeout: 10sretries: 3start_period: 40srestart: unless-stoppeddeploy:resources:limits:cpus: '0.5'memory: 512Mdb:image: postgres:16-alpinevolumes:- pgdata:/var/lib/postgresql/data- ./init.sql:/docker-entrypoint-initdb.d/init.sqlenvironment:POSTGRES_PASSWORD_FILE: /run/secrets/db_passwordsecrets:- db_passwordhealthcheck:test: ["CMD-SHELL", "pg_isready -U postgres"]interval: 5stimeout: 5sretries: 5networks:- backendnetworks:frontend:backend:driver: bridgevolumes:pgdata:secrets:db_password:file: ./secrets/db_password.txt
Compose Profiles
Use profiles to enable services conditionally (dev tools, debug containers, etc.)
# Compose profiles - Enable services conditionallyservices:web:build: .ports:- "3000:3000"db:image: postgres:16-alpineprofiles:- dev- productionredis:image: redis:7-alpineprofiles:- dev- production# Only for developmentadminer:image: adminerports:- "8080:8080"profiles:- dev# Only for debuggingdebug:build:context: .dockerfile: Dockerfile.debugprofiles:- debug# Usage:# docker compose up # Only 'web' (no profile)# docker compose --profile dev up # web + db + redis + adminer# docker compose --profile debug up # web + debug
9. Multi-Stage Builds (Smaller Images)

Multi-stage builds let you use multiple FROM statements in a Dockerfile. Build in one stage, copy only what you need to the final stage. This produces much smaller, more secure images.
Without multi-stage: 1.2 GB (includes build tools, dev dependencies)
With multi-stage: 150 MB (only production files)
Result: 8x smaller image!
Multi-Stage Pattern
# ========== MULTI-STAGE BUILDS ==========
# Build in one stage, run in another = smaller images

# Stage 1: Build dependencies
FROM node:20-alpine AS deps
WORKDIR /app
COPY package.json package-lock.json ./
RUN npm ci

# Stage 2: Build application
FROM node:20-alpine AS builder
WORKDIR /app
COPY --from=deps /app/node_modules ./node_modules
COPY . .
RUN npm run build

# Stage 3: Production runtime
FROM node:20-alpine AS runner
WORKDIR /app

ENV NODE_ENV=production

# Create non-root user
RUN addgroup -S nodejs && adduser -S nextjs -G nodejs

# Copy only production files
COPY --from=builder --chown=nextjs:nodejs /app/dist ./dist
COPY --from=builder --chown=nextjs:nodejs /app/node_modules ./node_modules
COPY --from=builder --chown=nextjs:nodejs /app/package.json ./

USER nextjs
EXPOSE 3000
CMD ["node", "dist/index.js"]
Next.js Production Dockerfile
# Optimized Next.js Dockerfile (from official example)
FROM node:20-alpine AS base

# Stage 1: Install dependencies
FROM base AS deps
RUN apk add --no-cache libc6-compat
WORKDIR /app

COPY package.json package-lock.json* ./
RUN npm ci

# Stage 2: Build the application
FROM base AS builder
WORKDIR /app
COPY --from=deps /app/node_modules ./node_modules
COPY . .

ENV NEXT_TELEMETRY_DISABLED 1
RUN npm run build

# Stage 3: Production image
FROM base AS runner
WORKDIR /app

ENV NODE_ENV production
ENV NEXT_TELEMETRY_DISABLED 1

RUN addgroup --system --gid 1001 nodejs
RUN adduser --system --uid 1001 nextjs

COPY --from=builder /app/public ./public

# Automatically leverage output traces to reduce image size
COPY --from=builder --chown=nextjs:nodejs /app/.next/standalone ./
COPY --from=builder --chown=nextjs:nodejs /app/.next/static ./.next/static

USER nextjs

EXPOSE 3000
ENV PORT 3000
ENV HOSTNAME "0.0.0.0"

CMD ["node", "server.js"]
React + Nginx Dockerfile
# Optimized React (Vite/CRA) Dockerfile
# Build with Node, serve with Nginx

# Stage 1: Build
FROM node:20-alpine AS builder
WORKDIR /app

COPY package.json package-lock.json ./
RUN npm ci

COPY . .
RUN npm run build

# Stage 2: Production (Nginx)
FROM nginx:alpine AS runner

# Remove default nginx config
RUN rm /etc/nginx/conf.d/default.conf

# Copy custom nginx config
COPY nginx.conf /etc/nginx/conf.d/

# Copy built assets from builder
COPY --from=builder /app/dist /usr/share/nginx/html

# Expose port 80
EXPOSE 80

CMD ["nginx", "-g", "daemon off;"]
Nginx Config for React SPA
# nginx.conf - For React SPA routing

server {
    listen 80;
    server_name localhost;
    root /usr/share/nginx/html;
    index index.html;

    # Enable gzip compression
    gzip on;
    gzip_types text/plain text/css application/json application/javascript text/xml application/xml;

    # Cache static assets
    location ~* \.(js|css|png|jpg|jpeg|gif|ico|svg|woff|woff2)$ {
        expires 1y;
        add_header Cache-Control "public, immutable";
    }

    # SPA routing - serve index.html for all routes
    location / {
        try_files $uri $uri/ /index.html;
    }

    # Health check endpoint
    location /health {
        access_log off;
        return 200 "healthy\n";
        add_header Content-Type text/plain;
    }
}
10. Docker Security Best Practices
Security should be built into your Docker workflow from the start. Follow these practices to reduce your attack surface and protect your applications.
Security Checklist
# ========== DOCKER SECURITY BEST PRACTICES ==========# 1. Never run as rootFROM node:20-alpineRUN addgroup -S appgroup && adduser -S appuser -G appgroupUSER appuser# 2. Use official/verified imagesFROM node:20-alpine # OfficialFROM bitnami/postgresql # Verified publisher# 3. Scan images for vulnerabilitiesdocker scout cves my-imagedocker scout quickview my-image# 4. Use specific image tags, not :latestFROM node:20.11.1-alpine3.19# 5. Don't store secrets in images# BAD:ENV API_KEY=mysecret# GOOD: Use Docker secrets or env at runtimedocker run -e API_KEY=$API_KEY my-app# 6. Use multi-stage builds (smaller attack surface)# 7. Set read-only filesystem where possibledocker run --read-only my-app# 8. Drop unnecessary capabilitiesdocker run --cap-drop ALL --cap-add NET_BIND_SERVICE my-app# 9. Use no-new-privileges flagdocker run --security-opt=no-new-privileges my-app# 10. Keep images updateddocker pull node:20-alpine # Get security patches
Managing Secrets
# ========== MANAGING SECRETS ==========# Method 1: Environment variables (simplest)docker run -e DATABASE_PASSWORD=secret my-app# Method 2: Environment file# .env file:# DATABASE_PASSWORD=secret# API_KEY=mykeydocker run --env-file .env my-app# Method 3: Docker secrets (Compose)# docker-compose.yml:services:app:secrets:- db_passwordsecrets:db_password:file: ./secrets/db_password.txt# In container, secret is at /run/secrets/db_password# Method 4: External secret managers# - HashiCorp Vault# - AWS Secrets Manager# - Google Secret Manager# - Azure Key Vault# Never commit secrets to git!# Add to .gitignore:# .env# .env.local# secrets/
Never store secrets in Dockerfiles, environment variables in docker-compose.yml committed to git, or image layers. Use Docker secrets, environment variables at runtime, or external secret managers.
11. Production Considerations
Running Docker in production requires additional considerations: health checks, resource limits, logging, monitoring, and restart policies.
Production Tips
# ========== PRODUCTION TIPS ==========# 1. Always use health checksHEALTHCHECK --interval=30s --timeout=3s --start-period=5s --retries=3 \CMD curl -f http://localhost:3000/health || exit 1# 2. Set resource limits (prevent runaway containers)docker run --memory=512m --cpus=0.5 my-app# In Compose:deploy:resources:limits:cpus: '0.5'memory: 512Mreservations:cpus: '0.25'memory: 256M# 3. Use restart policiesdocker run --restart=unless-stopped my-app# Options: no, on-failure, always, unless-stopped# 4. Log to stdout/stderr (Docker handles rotation)# Don't write logs to files inside container# 5. Use .dockerignore to speed up builds# 6. Tag images properlydocker tag my-app:latest my-app:v1.2.3docker tag my-app:latest my-app:$(git rev-parse --short HEAD)# 7. Use Docker BuildKitDOCKER_BUILDKIT=1 docker build -t my-app .
Logging & Monitoring
# ========== LOGGING & MONITORING ==========# View container logsdocker logs my-appdocker logs -f my-app # Followdocker logs --tail 100 my-app # Last 100 linesdocker logs --since 1h my-app # Last hour# Configure logging driverdocker run --log-driver json-file \--log-opt max-size=10m \--log-opt max-file=3 \my-app# In Compose:services:app:logging:driver: json-fileoptions:max-size: "10m"max-file: "3"# View resource usagedocker statsdocker stats my-app# Monitor container eventsdocker events# Inspect container processesdocker top my-app# Export metrics (for Prometheus)# Use cAdvisor: https://github.com/google/cadvisor
12. Troubleshooting & Cleanup
Docker issues are usually easy to debug once you know where to look. Here are common problems and their solutions.
Common Problems & Solutions
# ========== TROUBLESHOOTING ==========# Problem: Container exits immediately# Solution: Check logsdocker logs my-app# Run interactively to debug:docker run -it my-app sh# Problem: Can't connect to container# Solution: Check port mappingdocker port my-appdocker inspect my-app | grep -A 10 "Ports"# Problem: Permission denied# Solution: Check user/groupdocker exec my-app iddocker exec my-app ls -la /app# Problem: Out of disk space# Solution: Clean updocker system prune -a --volumes# Problem: Slow builds# Solution: Optimize Dockerfile, use .dockerignore# Check layer sizes:docker history my-app# Problem: Image too large# Solution: Multi-stage builds, smaller base images# Use Alpine variants: node:20-alpine instead of node:20# Problem: Container can't resolve hostname# Solution: Check networkdocker network inspect bridgedocker inspect my-app | grep -A 5 "Networks"
Cleanup Commands
# ========== CLEANUP COMMANDS ==========# Remove all stopped containersdocker container prune# Remove all unused imagesdocker image prune# Remove unused images (including tagged)docker image prune -a# Remove unused volumesdocker volume prune# Remove unused networksdocker network prune# Remove EVERYTHING unused (containers, images, volumes, networks)docker system prune -a --volumes# View disk usagedocker system df# View detailed disk usagedocker system df -v
docker system prune -a --volumes removes EVERYTHING unused, including all images and volumes. This will delete database data! Use with caution.
13. Hands-On Challenges
Complete these challenges in order to solidify your Docker knowledge. Each level builds on the previous one. Solutions are not provided - use everything you've learned!
Open a terminal and work through each task. If you get stuck, re-read the relevant section. Google is allowed! Real-world Docker work involves lots of documentation reading.
Level 1: Container Basics
# ========== CHALLENGE LEVEL 1: BASICS ==========# 1. Run nginx on port 9090 and verify it works# Expected: Browser shows "Welcome to nginx!"# 2. Run the container in detached mode with name "my-web"# 3. View the logs of my-web# 4. Stop my-web, then start it again# 5. Remove my-web container# 6. Pull redis:alpine and run it as "my-cache" on port 6379# 7. Execute "redis-cli ping" inside my-cache# Expected output: PONG# 8. List all containers (running and stopped)# 9. Remove all stopped containers with one command# 10. Check Docker disk usage
Level 2: Building Images
# ========== CHALLENGE LEVEL 2: BUILDING IMAGES ==========# Create a project folder with these files:# --- server.js ---const http = require('http');const port = process.env.PORT || 3000;const server = http.createServer((req, res) => {res.writeHead(200, { 'Content-Type': 'application/json' });res.end(JSON.stringify({message: 'Hello from Docker!',timestamp: new Date().toISOString()}));});server.listen(port, () => console.log(`Server on port ${port}`));# --- package.json ---{"name": "docker-demo","version": "1.0.0","main": "server.js","scripts": { "start": "node server.js" }}# TASKS:# 1. Write a Dockerfile for this app# 2. Build the image with tag "my-api:1.0"# 3. Run it on port 3000# 4. Test with: curl http://localhost:3000# 5. Run another instance on port 4000 using -e PORT=4000# 6. Enter the container and view files# 7. View the image layers with docker history
Level 3: Persistence with Volumes
# ========== CHALLENGE LEVEL 3: PERSISTENCE ==========# 1. Create a named volume "mydata"# 2. Run postgres with this volume:# - Volume: mydata:/var/lib/postgresql/data# - Name: my-postgres# - Password: supersecret# - Database: mydb# 3. Connect to postgres and create a table:# docker exec -it my-postgres psql -U postgres -d mydb# CREATE TABLE users (id SERIAL, name TEXT);# INSERT INTO users (name) VALUES ('Alice'), ('Bob');# SELECT * FROM users;# \q# 4. Remove the postgres container# 5. Create a new postgres container with SAME volume# 6. Verify your data still exists!# 7. Explain: What would happen with a bind mount?
Level 4: Networking & Compose
# ========== CHALLENGE LEVEL 4: NETWORKING ==========# 1. Create a network called "app-net"# 2. Run postgres on app-net (no port mapping needed!)# Name: db# 3. Run a Node app that connects to postgres using hostname "db"# Create this app:# --- app.js ---const { Client } = require('pg');const client = new Client({host: process.env.DB_HOST || 'db',user: 'postgres',password: 'secret',database: 'mydb'});client.connect().then(() => console.log('Connected to database!')).catch(err => console.error('Connection error:', err));# 4. Verify the app can connect to the database# 5. Create a docker-compose.yml with both services# 6. Run with docker compose up and verify connectivity
Level 5: Production-Ready
# ========== CHALLENGE LEVEL 5: PRODUCTION ==========# 1. Write a multi-stage Dockerfile for a React app:# - Stage 1: Build with Node# - Stage 2: Serve with Nginx# - Include proper nginx.conf for SPA routing# 2. Add health checks to your Dockerfile# 3. Create a complete docker-compose.yml with:# - React frontend (Nginx)# - Node.js API# - PostgreSQL database# - Redis cache# - Proper networks (frontend, backend)# - Named volumes for data# - Environment variables# - Health checks# - Restart policies# 4. Set up logging with size limits# 5. Add resource limits (memory, CPU)# 6. Compare image sizes before/after multi-stage build# 7. Scan your image for vulnerabilities:# docker scout cves your-image
If you've completed all 5 levels, you have a solid foundation in Docker! You can now containerize applications, set up development environments, and deploy to production. Keep practicing with real projects to deepen your expertise.